
🌲⛺️Roughing It Never Looked So Good! 12x12 Camping Scrapbook Layout Using Weekend Adventures DSP
- This Chick Loves Paper

- May 18, 2025
- 9 min read
Updated: Dec 16, 2025

Let Me Tell You the Untold Story Behind This Layout…
Two boys who didn’t know the difference between a tent stake and a marshmallow stick go camping… ⛺️
(Yes, that’s the title of the next layout—stay tuned!)
😂😂😂
They had a blast, didn’t burn the place down, made it home safe, and somehow remembered to take enough photos to keep this scrapbooker happy.
I didn’t get to go, but thanks to Weekend Adventures 12” x 12” Designer Series Paper and the Two-Tone Cardstock Pack, I still got to scrapbook like a trailblazing champion—without ever leaving my craft table.
No Stamps? No Problem! Cricut to the Rescue ⛺️

Here’s the thing: I don’t own a single camping stamp or die. Zero.
So, I opened Design Space®, designed the entire layout from scratch, and let my Cricut do what it does best—cut all the cute things.
From tents and signs to pine trees and campfires, every SVG was hand-placed, layered, and brought to life with cardstock.
This full layout is available to cut in Design Space to help recreate it with your own supplies!
Materials Used For This 12x12 Camping Scrapbook Layout:


Paper Packs & Cardstock::
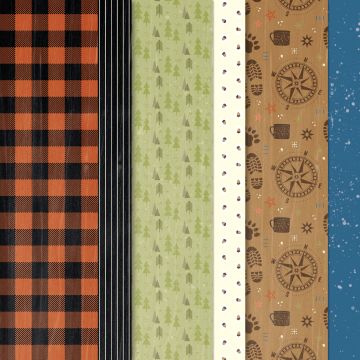
⛺️ Weekend Adventures 12” x 12” Designer Series Paper – Stampin’ Up!
⛺️ Weekend Adventures 12” x 12” Two-Tone Cardstock Pack – Stampin’ Up!
⛺️ White Willow 12X12 Cardstock - Stampin' Up!
⛺️ Pumpkin Pie 8½” × 11” Cardstock – Stampin’ Up! → used for the layered campfire flames
Thin Cuts:
⛺️ Otterly Amazing Dies - Stampin' Up!
⛺️ CTMH Evergreen Cardmaking Workshop Stamp & Thin Cuts - CTMH
⛺️ Cricut - For title, backback, logs, title & tent
Inks:
⛺️ CTMH Pine Ink — used for inking the edges of trees, photo mats, and layered cardstock pieces
⛺️ StazOn Jet Black Ink — used to give tents, logs, signs, and strips that toasted, campfire-kissed shading
Tools:


✂️ Paper Trimmer, Cut & Emboss Machine, Adhesive, Glue
⭐ Other Tools I Use in My Projects
*As an Amazon Associate, I earn from qualifying purchases.


Cricut® Essentials
• Cricut® Maker 3 — my primary cutting machine for titles, SVGs & embellishments
• Cricut® StandardGrip 12×12 Mat — 3 count used for cardstock, photo paper & labels
Printer
Canon® Printing System (Photos + Printable Cricut Elements)
• Canon TS9521C Crafting Printer — used for ALL printed project photos, journaling pieces, print-then-cut embellishments & titles
Photo Papers
• Canon Photo Paper Plus Glossy II (4×6, PP-301) → For 4x6 or smaller - printed photos
• Canon Matte Photo Paper (MP-101, 8.5×11) → Used for Cricut print-then-cut elements & titles
• Canon Double-Sided Matte Photo Paper (MP-101D, 8.5×11) → Also used exclusively for Cricut embellishments, icons, & layered pieces
Stamping & Precision Tools
• MISTI® Memory Size with 12-1/2" x 12-1/2" Stamping area — for borders, backgrounds & oversized stamping
• MISTI® Stamp Tool Bar Magnet - Additional magnet
Speciality Adhesives
• Tombow® Mono Aqua Liquid Glue — for corners, details & layered paper pieces
• Bearly Art Precision Craft Glue (4oz Original) — for embellishments & fine-detail gluing
• Tombow® Mono Air Touch Adhesive— my preferred tape runner for base
• Tombow® Mono Air Touch Adhesive, Refill 2-Pack — my preferred tape runner for base layers
Journaling Tools
• Avery® Easy Peel® Full-Sheet Clear Labels (8665) → Used for long typed journaling strips
• Avery® Clear Shipping Labels 2×4 (8663) → Used for short typed journaling strips or blocks
• Skaura Pigma Micron Fineliner Pens - Archival Black - Assorted Point Sizes - Used for handwritten Journaling
Step-by-Step: Building the “Roughing It” Layout—Trail Style! ⛺️✂️

Ready to recreate this outdoor adventure?
Grab my downloadable “Roughing It” 12×12 Double Page Sketch and let it be your campsite trail map. This sketch has everything marked out — every strip, every mat, every color block — so you’re never sitting there wondering, “Does this go here… or did I just put my tent upside down again?”
With all the measurements laid out and the whole layout mapped like a campground guide, you can craft with confidence, skip the guesswork, and jump straight into the fun stuff: building clusters, popping foam tape, and making your layout look like you survived the great outdoors… without actually leaving your craft room.
Step 1: Build Your Base — The Trail Starts Here
Lay down your Basic Beige 12×12 cardstock to form the foundation for both pages, then start adding your patterned strips using the sketch as your guide. Each strip works like a different layer of terrain—wide pieces that ground the layout, thin accents that create movement, and pops of color that mimic the textures of a real campsite.
And let me tell you… that skinny Misty Moonlight strip? Absolute trail magic. It pulls the whole spread together the way a campsite lantern pulls everyone out of the dark.
⭐ Step 2: Give Your Photos the Star Treatment with Double Mats

Start by creating your photo mats using Early Espresso as the base layer and White Willow as the second layer. Each mat is sized to match the Roughing It sketch exactly:
Left Page Mats: Right Page Mats:
One 4½” × 6½” Two 6½” × 4½”
Three 3½” × 3½” One 4¼” × 6¼”
Before assembling the layers, ink the edges using CTMH Pine ink and a dauber for soft, natural shading. This adds warmth and definition around each photo, helping them pop against the textured background. Once your mats are inked and layered, place them in their designated spots on the sketch, maintaining visual balance across both pages.
The double mats + inking combination lifts even the simplest camping snapshot and gives the entire layout a polished, cohesive finish.
Step 3: Create a Forest That Feels Alive 🌲✨

No forest? No problem. Because I don’t own many tree dies yet, I turned to Design Space® and let my Cricut® handle the wilderness. Each tree was cut twice—once in Granny Apple Green for the lighter back layer and once in CTMH Pine for the darker top layer. Placing the lighter color in the back makes the darker top layer stand out beautifully, giving you that full, dimensional “forest line at sunset” effect.
Before assembling, ink the edges of the CTMH Pine layer using the same pine ink with a dauber. This soft shading adds subtle shadows that make the layers blend seamlessly.
And suddenly… your trees have more depth than the boys had camping skills — and that’s saying something.

Step 4: Ink Everything (Yes… Everything!) for That “Toasted Marshmallow” Look
Texture brings this layout to life, so ink the edges of all your pieces—trees, tents, signs, rocks, logs, even the skinny paper strips.
That subtle hit of black around the tent?
Pure toasted marshmallow perfection. It adds warmth, weight, and just enough rugged charm to make every layer feel like it was kissed by campfire smoke.
Step 5: Build Cluster Magic Around Your Photos
Once your foundation is set, it’s time to create those irresistible embellishment clusters. Use your Cricut to cut tents, backpacks, pine trees, logs, signs, and campfires—basically everything except the mosquitoes. The pinecones? Those are from the CTMH Evergreen thin cuts, because even Cricut deserves a break once in a while.

Cluster 1: The Campfire Scene (Main Cluster — Left Page)
This is the heart of the layout. I built a full campsite moment with:
• A tent
• Layered pine trees
• Logs
• A glowing campfire
• The moon & tiny stars (cut from White Willow cardstock)
Everything is grouped to create one immersive storytelling moment — almost like you’re stepping directly into their little campsite.
Cluster 2: Compass & Lantern (Top Accent Cluster)
To establish a visual triangle and keep the eye moving across the spread, the second cluster is much smaller but high-impact:
• A compass
• A lantern
• A pinecone
Small in size, but mighty in design — this cluster pulls the eye upward without overwhelming the page.

Cluster 3: Adventure Sign Cluster (Right Page)
For the third cluster, I used:
• The Adventure sign
• A backpack
• A log
• A few sprigs and branches
One important detail: the arrow on the Adventure sign is intentionally pointed back into the layout — never off the page. This guides the viewer’s eye inward and keeps the visual flow moving across your photos.
⭐ Step 6: Pop It Like It’s Hot (with Foam Tape… and Fire Layers!) 🔥

Every cluster got a little lift with foam tape — the title, the pinecones, the backpack, and parts of the campsite scene all rise off the page to add movement and depth.
But the campfire? THAT baby got the deluxe treatment.
The fire is made from multiple cardstock layers cut in Stampin' Up! Crushed Curry & Pumpkin. Then each is stacked to give it that real crackling glow. Each flame layer is offset and inked to mimic that warm, flickering light you get from the real deal.
And then there’s the title — a whole project of its own. It’s a Print-Then-Cut base layer, but I also cut additional Early Espresso letters, stacked and layered them, then adhered them on top of the print layer. So not only is the title popped up with foam tape… Every single letter is dimensional on its own. Talk about commitment. 😂🌲🔥
🌲🔥 A Layout That Brings the Campfire to Your Craft Table 🌲🔥

By the time you’ve inked your edges, layered your trees, built that adorable campfire scene, and popped your title higher than a tent in a windstorm, this layout really starts to feel like you were right there at the campsite — just without the dirt, bugs, or burnt marshmallows. Every detail has a purpose: the clusters pull your eye through the story, the mats frame the memories, and that fire? It’s absolutely the drama. Put it all together, and you’ve got a double-page spread that captures the adventure, the chaos, and the “boys being boys” energy of this camping trip perfectly.
Explore More Layouts That Bring the Campfire Glow 🔥
This layout might be filled with trees, tents, and campfire moments, but the real journey is the heart behind it—your stories, your chaos, your memories preserved with love. If this layout lit a spark, just wait… there’s a whole forest of inspiration waiting for you. Road trips, birthday madness, boys being boys, and everything in between—your next creative adventure is just a click away.


Share Your Wildest Crafting Adventures! 🌲

If this camping layout inspired you, then friend… the wilderness is calling! Whether your story is “camping triumph,” “camping disaster,” or “we tried and the tent won,” I want to see it—and so does our community.
Our Members Gallery is officially open (and mostly behaving itself!). You can now upload up to 4 photos per project, show off your layouts, and cheer on other crafters as they share their own paper-trail memories.
Post your masterpiece, tag your favorites, and let your creativity spark someone else’s next adventure. After all, crafting is better when we tell our stories together.
Final Thoughts: Who Needs Bug Spray When You’ve Got Foam Tape? ✂️

I may not have braved the wilderness, pitched a tent, or swatted a single mosquito—but I did survive this little paper-trail journey armed with cardstock, glue, and a whole lot of imagination.
The boys had their adventure… and I got mine right here at the craft table. And honestly? My version involved fewer bugs, fewer disasters, and significantly more creative joy. Because let’s be real—my idea of “roughing it” is running out of adhesive halfway through a double-page spread.
Crafting > Camping.
Every. Single. Time.
Happy scrappin’—no survival guide required!
April – This Chick Loves Paper
🛒 Grab Your Supplies & Get Crafting!

All photos and projects are subject to copyright © ThisChickLovesPaper.com.
Images © Stampin’ Up!®
The content in this blog is the sole responsibility of April Raine – This Chick Loves Paper as a Stampin’ Up!® Independent Demonstrator.
The use of and content of classes, services, or products offered is not endorsed by Stampin’ Up!®
Get inspired with this 12x12 double-page camping scrapbook layout using Stampin’ Up!’s Weekend Adventures DSP and Two-Tone Cardstock—designed in Cricut Design Space and packed with trail-ready pro tips! Only at This Chick Loves Paper!
*As an Amazon Associate, I earn from qualifying purchases.
My Storage System for DSP & Cardstock
• 13×13 Plymor 2mil Zipper Reclosable Bags — for 12×12 DSP, cardstock sheets & scraps
• 9×12 Plymor 2mil Zipper Reclosable Bags — for 8.5×11 cardstock & scraps
• 6x8 Plymor 4mil Heavy Duty Reclosable Bags — for storing extra die cut embellishments & finished cards, card workshop kits
Printer Ink
• EZ Ink Compatible 280XXL/281XXL Ink Pack → The exact ink set used for the TS9521C printer


Crafting has been revolutionized with the introduction of the Cricut machine, making it easier and less tiring for crafters. With its ability to cut, craft, emboss, deboss, score, and engrave on various materials, the Cricut machine has become a must-have tool for crafters. Along with the machine, the graphic tool named 'Design Space' allows beginners to create their designs from scratch or use ready-made templates available in the app's library. The app is free, and all you need to do is visit <a href="https://designspace.space/">cricut.com/setup</a> to download it. With the Cricut machine and Design Space, crafting has become an enjoyable and creative activity.