
❄️ Let’s Explore: A 12x12 Winter Scrapbook Layout with Peaceful Garden DSP – A Collab with Jayma Malme & Friends
- This Chick Loves Paper

- Dec 1, 2025
- 12 min read
Updated: Dec 16, 2025
You know that glorious moment when your 12×12 winter scrapbook layout is finally done? The ink’s dry, the shimmer paste is glistening, and you’re doing your little “nailed it” dance in your craft chair? Yep — that was me. I’d just built the perfect snowy Mount Charleston scene, ready to add photos from Lil Man’s very first trip to the snow; tiny boots, sleds, and the biggest grin you’ve ever seen.
Then it happened. He walked in.
Lil Man looked at my layout, tilted his head, and said, “WOW! That’s good!! I’ve got photos from Mount Charleston too.”
Wait—WHAT?! Hold up. 😳 This kid never volunteers photos. I usually have to beg, bribe, and whip up one of my famous cookie-brownie concoctions just to get a single picture. So when he offered them up completely unprompted, I nearly dropped my hot cocoa right onto the layout (that would’ve been a sticky mess 😂).
Apparently, this one hit the cool-mom jackpot because suddenly, he wanted in on it. Now I’ve got a new creative dilemma: do I use his adorable first-snow adventure, or his older, “mountain man” version? Same mountain, totally different stories and both melt my heart in their own way.
I guess I’ll have to think on it a bit longer… but in the meantime, grab your cocoa, your favorite adhesive, and a pinch of shimmer paste because we’re about to explore how a few sheets of Peaceful Garden DSP turned into a mountain masterpiece for the Jayma Malme & Friends Collab. ❄️✨
🌲 MATERIALS — WHAT YOU’LL NEED TO BUILD YOUR 12x12 WINTER SCRAPBOOK LAYOUT
If you’ve been hanging around me long enough, you know I don’t just build scrapbook pages… I build scenes. Think “Hallmark Movie meets Snow Day with Cardstock.” ❄️✨
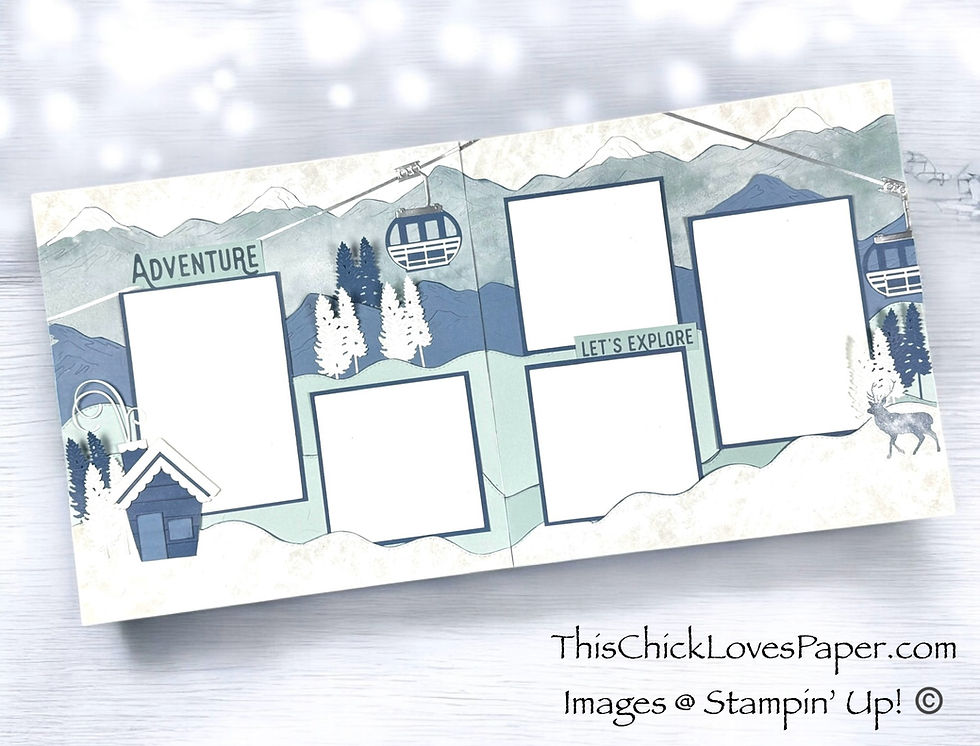
For this 12×12 double-page, 5-photo winter scrapbook layout, I raided my stash of Christmas paper (yep, Christmas!) and turned it into a snowy mountain retreat — complete with a cozy cabin, ski lift, and enough shimmer to make Frosty jealous. Here’s everything you’ll need if you want to recreate the magic:
✂️ Designer Series Paper (DSP)


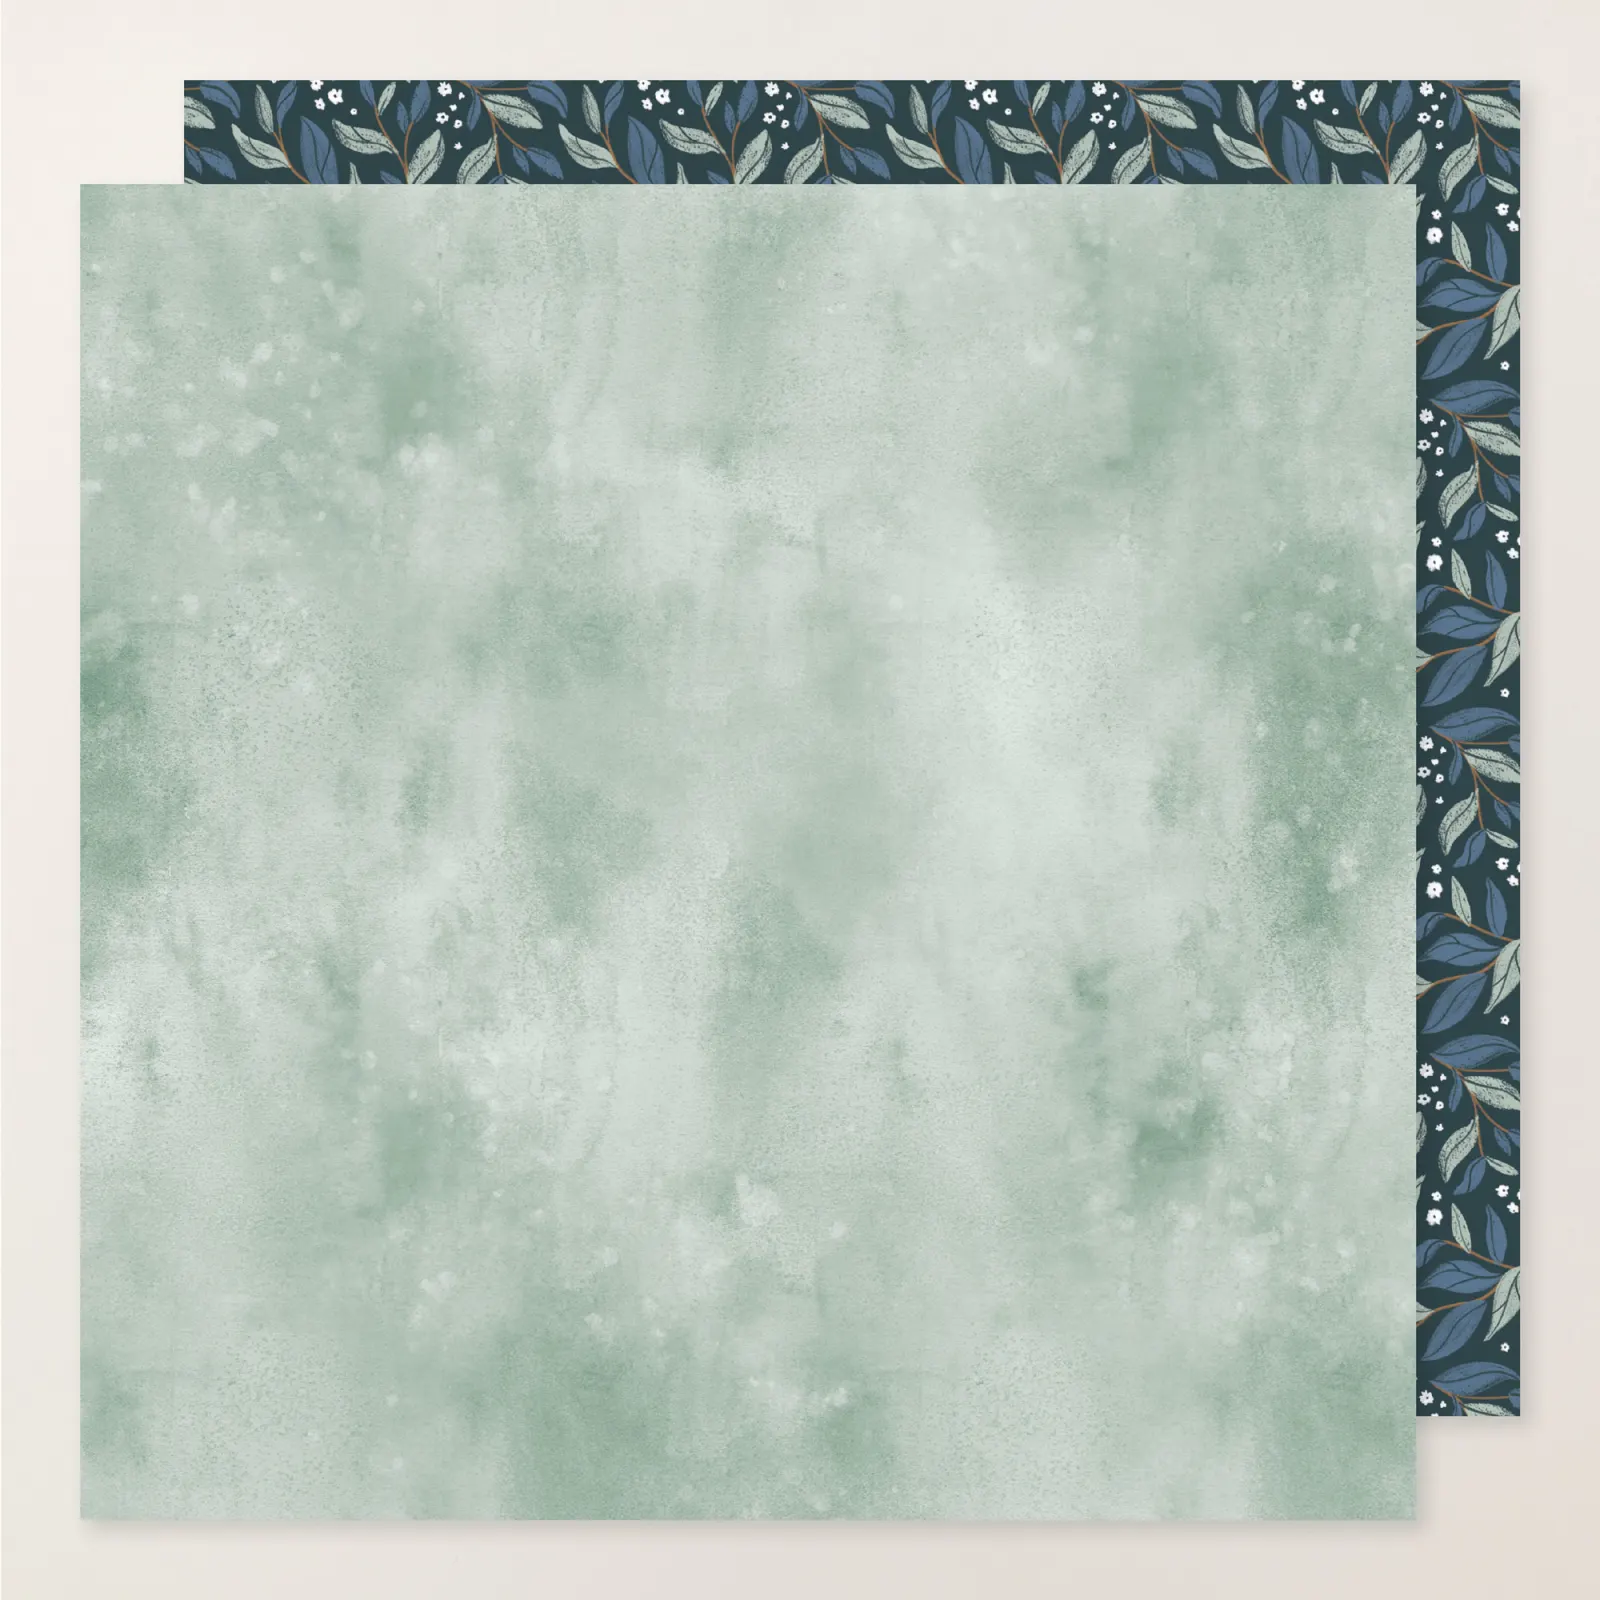
Stampin’ Up!® Peaceful Garden 12” × 12” DSP → Used for sky, first mountain range, and bottom snow layer. Its soft gray tones set the chilly scene perfectly.
🩵 Cardstock


Stampin’ Up!® Misty Moonlight 12×12 Two-Tone Cardstock → Light side = mountain range; dark side = photo mats & embellishments.
Stampin’ Up!® Cloud Cover 12×12 Two-Tone Cardstock → Light side = snowdrifts; dark side = title base & accents.
Stampin’ Up!® White Willow 12x12 Cardstock → For crisp contrast, roof trim, and die-cut details.
🌲 Stamps & Dies


Stampin’ Up!® Scenic Adventure Dies → Mountains + Trees
Stampin’ Up!® Outdoor Adventure Bundle → Stamped Title + Deer Image
Stampin’ Up!® Above It All Dies → Gondola Cab + Hook + Cable detail
Stampin’ Up!® Country Birdhouse Dies → Cabin Base + Roof + Trim + Door + Chimney
CTMH Fancy Borders Dies → Snow edges
🖋️ Inks & Mediums

Stampin’ Up!® Misty Moonlight Classic Stampin’ Pad → For all edge-inking & shadowing.
CTMH Intense Black Ink (CTMH) → Thin outline on photo mats.
🛠️ Tools & Extras
Stampin’ Up!® Paper Trimmer
✂️ Step-by-Step – Building Your Winter Mountain Masterpiece
Before we dive in: Whenever you see “light side” or “dark side,” that’s referring to Stampin’ Up!’s 12×12 Two-Tone Cardstock. Each sheet gives you two coordinating hues—the lighter for highlights and the darker for depth—so you can add natural contrast without bulky layers. It’s the secret to creating realistic mountains, soft snowdrifts, and cozy cabin texture!
🌨️ Step 1 – Build the Base of Your Snowy Scene

Every great layout starts with a solid base — and this one needed a little winter drama and depth.
I began with a 12”×2” strip of Peaceful Garden DSP for both the sky and snow, using that serene white-and-gray pattern to create a seamless winter backdrop. It’s soft, subtle, and looks just like a snow-dusted morning sky without needing a single cut — just trim and adhere.
The first mountain range came from the green-blue Peaceful Garden DSP in the same pack — its foggy tones instantly gave me those cool, mist-covered-mountain vibes. I used the Scenic Adventure Dies to cut the peaks, letting the natural marbling of the DSP create built-in highlights and shadows. No extra ink or blending needed — the paper did all the heavy lifting.
Next, I cut the second mountain range from the light side of Misty Moonlight Cardstock to add that frosty mid-tone contrast. Then, I brought in the CTMH Fancy Border Dies with the light side of Cloud Cover Cardstock to create soft, rolling snowbanks that blend perfectly into the mountain scene.
Finally, the bottom snow layer echoes the sky DSP, tying the whole scene together for a cohesive, wintry world. I inked every edge in Misty Moonlight Ink for a subtle, shadowed finish that makes each layer pop like sunlit peaks after fresh snowfall.
💡 Pro Tip: When building snowy landscapes, let your DSP patterns work for you! Natural gradients and watercolor textures add instant realism without bulky layers — it’s like scenic painting, only with paper.
📸 STEP 2: Photo Mats that Frame the Frost

Once the landscape was down, it was time to set the scene for the stars of the show — the photos.
Each of my photos measures 4”×6” and 4”×4”, but of course, I can’t leave them sitting flat on the mountain! Every image got a pair of double mats for depth and definition.
I started with Basic White Cardstock cut at 4¼”×6¼” for the rectangular photos and 4¼”×4¼” for the squares — that clean, crisp border instantly brightens the frosty tones. Then I layered each one over the dark side of Misty Moonlight Cardstock, cut at 4½”×6½” and 4½”×4½”, to frame them in that perfect wintry blue.
To finish, I inked every edge with CTMH Intense Black Ink, adding that thin, polished outline that makes each layer pop against the snow.
Across the double layout, the two 4×6 photos act as anchors while the three 4×4 photos lead your eye diagonally across the mountain scene — a balanced, natural flow that mimics how your eyes would travel across a snowy landscape.
💡 Pro Tip: When working with cool color palettes, a thin black inked edge adds instant definition without overpowering your layers. It’s like eyeliner for your cardstock — subtle but striking. 🖤
🏡 STEP 3: Crafting the Cabin — A Birdhouse Glow-Up


That cozy little cabin? Believe it or not, it started as the Country Birdhouse Die — talk about a creative glow-up!
I die-cut the birdhouse from Basic White Cardstock to serve as the base. Then, I cut ½” strips from the dark side of Misty Moonlight Cardstock and layered them across the front to create a rustic, plank-style siding effect.
To make those boards stand out, I inked all the edges with CTMH Intense Black Ink, giving them bold definition and a little mountain grit — because let’s face it, no cabin in the woods should look too perfect!
The roof and awning are cut from Basic White Cardstock for a clean, snow-covered contrast, while the door and window were hand-cut from the light side of Misty Moonlight, adding soft variation without losing that frosty vibe.
And of course, no winter cabin is complete without a puff of “smoke”! I used my Cricut Maker 3 to cut a delicate swirl from Basic White Cardstock, letting it curl up from the chimney like cocoa steam on a snowy morning.
💡 Pro Tip: When creating layered embellishments, alternate between light and dark cardstock sides to mimic real shadows and highlights — it’s an instant texture boost without extra bulk.
🎿 STEP 4: The Lift & the Layers — Adventure in Motion

To echo Mount Charleston’s ski vibes, I used the Above It All dies to craft a gondola, cutting the cabin from the dark side of Misty Moonlight and the accents from Basic White. A shimmer of Silver Foil Paper became the hook that connects it to the cable.
That cable begins its journey on the left-hand side of the layout, stretching just above the mountain range and tucking neatly behind the stamped “Adventure” title. I cut it from Silver Foil DSP, giving it that perfect metallic sheen that catches the light like a real gondola wire glinting in the sun. It adds just the right amount of movement and shimmer without stealing attention from the rest of the snowy scene.
🦌 Step 5 – Finishing the Forest: Where Motion Meets Magic

On the right page, I created a peaceful woodland scene that brings the entire layout to life. Using the Scenic Adventure Tree Dies, I layered one set of trees cut from the dark side of Misty Moonlight Cardstock and another from Basic White, giving that crisp snow-capped effect that mirrors a frosty Mount Charleston morning.
The deer, from the Outdoor Adventure Bundle, is stamped in Misty Moonlight Ink and placed right at the foot of the drift — calm, curious, and perfectly framed by the trees behind him.
Then came my favorite part: the gondola in motion. This one’s only half visible, as if it’s just gliding into view from beyond the page edge. I angled the Silver Foil DSP cable upward this time, opposite of the left-hand side where it slopes down. Even though the two silver lines don’t actually meet, your eye feels that they connect somewhere off-page — a little illusion of movement that keeps the entire scene alive and flowing.
💡 Pro Tip: When creating two-page layouts, don’t force visual elements to physically meet across the seam. Let your design suggest the connection — it gives the illusion of continuity and adds a cinematic sense of motion.
🪶 STEP 6: Titles, Textures & Snowy Finishes

The “Adventure” title (Outdoor Adventure Bundle) is stamped in Misty Moonlight ink on the dark side of Cloud Cover cardstock, matching the mountain hue and blending seamlessly with the scene. On the opposite page, a smaller “Let’s Explore” sentiment mirrors the gentle curve of the gondola, pulling your eye softly across the spread.
Not every layout needs a bold, center-stage title — sometimes the magic is in subtlety. When your design already tells the story through its layers and color palette, a quiet sentiment can whisper the theme instead of shouting it, letting the mood of the page stay intact.
💡 Pro Tip: When designing scenic layouts, balance your visual “volume.” If your mountains, trees, or embellishments already carry strong visual weight, choose a title treatment that harmonizes instead of competes. A smaller, softly stamped sentiment can still make a statement — just in a quieter, more elegant way. ❄️
📝 STEP 7: Journaling in the Snow

The story will flow along the right-hand snowbank using Clear Avery Labels printed with typed journaling and cut into staggered strips. Each line will read like footprints across fresh powder — simple, intentional, and perfectly imperfect. It’s a layout design that feels clean but still full of heart.
I love this method—it keeps the design crisp while letting the background shine through like morning light on untouched snow. If your story ever grows (and trust me, they always do!), there’s plenty of space to drift more journaling across the left page near the cabin cluster, continuing your tale across the mountainscape.
💡 Pro Tip: Clear labels are a winter crafter’s best friend! They let your paper patterns peek through while still giving you that tidy, typewriter-text finish. Print your journaling in a soft gray or Misty Moonlight blue to blend seamlessly with snowy layouts without losing readability.
💖 Layout Complete — Cue the Cocoa & Admire the View

And there we have it — our mountain adventure is complete! Every layer of Peaceful Garden DSP, every inky edge, and every little snow-capped detail came together to build a layout that feels both peaceful and full of life. From the Misty Moonlight and Basic White gondolas gliding across the sky to that cozy little cabin nestled in the drift, this scene is pure winter magic.
Now comes the hardest part — deciding which photos will make the final cut! Do I go with Lil Man’s first-ever snow day or his grown-up Mount Charleston shots? I’m leaning toward his, because the way his eyes lit up and he said “WOW!” made every layer worth it. 💙
Either way, the layout is ready and waiting — and once I finally choose, I’ll post an update (or maybe even a sequel 😉).
🎁 COLLAB SPOTLIGHT — JAYMA MALME & FRIENDS: CHRISTMAS PAPER, ANY WAY YOU LIKE IT!

This layout was created for the Jayma Malme & Friends November Collab Challenge, where the only rule was simple: use Christmas DSP in any way you want! That’s right — no required sketch, no color limits, just creative freedom with holiday paper.
. This snowy scene started with Peaceful Garden DSP, a holiday design that completely transformed into a crisp, wintry wonderland. That’s the real fun of this challenge — taking something festive and turning it into something fresh.
To see the rest of the Jayma Malme & Friends Collab projects, visit the other participating creators and explore their takes on the same prompt — each one is a unique spin on
💌 COME CRAFT WITH US — JOIN THE ADVENTURE

If your heart races faster than your Cricut when new cardstock arrives, you belong on this adventure too! 💙
Becoming part of my Stampin’ Up! team isn’t just about paper — it’s about people.
We laugh, we learn, we swap sparkle secrets, and we celebrate every creative win (even the ones covered in glitter).
Whether you’re looking to grow your skills, build your business, or just join a community of crafty souls, you’re invited to grab your glue gun and come play.
Click “Craft With Me” or reach out to learn how you can start your own creative journey — because the only thing better than crafting a layout is crafting it together.
❄️ EXPLORE MORE WINTER MAGIC – KEEP THE COCOA COMING & THE CREATIVITY FLOWING
Love this 12×12 winter scrapbook layout? You’ll want to check out the coordinating winter and Christmas scrapbook layouts & cards below! Each design has its own snow-kissed story, perfect for inspiration on your next mountain or holiday memory. Scroll through the gallery below to see how you can transform your paper crafting into winter ideas.


🎿 SHARE YOUR CREATIONS – LET YOUR SNOWFLAKES SHINE

Now it’s your turn to make the Members Gallery sparkle! ❄️
Share your winter and Christmas scrapbook layouts—whether you’ve captured snowy adventures, glitter-dusted memories, or cozy nights by the fire. Every project you post helps another crafter find their spark. You never know who might see your page and think, “I can make that!”
The Members Gallery isn’t just a showcase—it’s a place to inspire, motivate, and connect. So upload those masterpieces, add your story, and help our creative community stay warm all winter long.
The more layouts we share, the more ideas we spark, and the bigger the blizzard of inspiration becomes. 💙
✨ FINAL THOUGHTS – LAYERS OF LOVE, LAUGHTER & LIL MAN

Crafting this layout reminded me that creativity is more than glue and paper — it’s a connection. It’s the bridge between the snow days of the past and the moments still to come. Whether it’s five-year-old giggles or teenage snapshots from the same mountain, this project proves that every layer we build tells a story worth keeping.
So here’s to building mountains, layering memories, and letting your creativity explore every season — because every page we create is another chapter in the stories we love most.
💙 April – This Chick Loves Paper
Grab Your Supplies & Get Crafting!

All photos and projects are subject to copyright © ThisChickLovesPaper.com. Images © Stampin’ Up!®
The content in this blog is the sole responsibility of April Raine – This Chick Loves Paper, Independent Stampin’ Up!® Demonstrator. The use of and content of classes, services, or products offered is not endorsed by Stampin’ Up!®
A 12x12 Winter scrapbook layout (step-by-step tutorial) created by This Chick Loves Paper for the Jayma Malme & Friends Collab, featuring Peaceful Garden DSP, two-tone cardstock, and a cozy mountain scene with 5 photos and heartfelt storytelling.
⭐How I Protect My DSP, Cardstock & Finished Cards

I store my DSP, cardstock, scraps, and even finished cards in these clear resealable bags.
The 2-mil thickness is perfect for everyday crafting (they make a 4-mil option if you want extra durability!), and they’re tough, reusable, and great for keeping your entire crafting stash clean, tidy, and protected from the chaos of the craft room.
*As an Amazon Associate, I earn from qualifying purchases.
• 13×13 Plymor 2mil Zipper Reclosable Bags — for 12×12 DSP, cardstock sheets & scraps
• 9×12 Plymor 2mil Zipper Reclosable Bags — for 8.5×11 cardstock & scraps
• 6x8 Plymor 4mil Heavy Duty Reclosable Bags — for storing extra die cut embellishments & finished cards, card workshop kits


Beautiful scene!