🌊 Beach Shaker Card: Rolling Waves, Sparkly Sand & a Tiny Vacation in an Envelope
- This Chick Loves Paper
- Mar 12
- 13 min read
Updated: Mar 12
✨ No beach in Vegas? Fine. I’ll craft my own shoreline.

There’s always that one product that ends up on your wish list… but doesn’t quite make the first cut when you place your order.
You know exactly what I’m talking about. The one where you hover over the “add to cart” button for a solid thirty seconds and then tell yourself, “Mmm… maybe next time.”
Not because you don’t love it — but because apparently the crafting budget thinks it’s the boss of you.
That was exactly the case with the Beach Boardwalk Designer Series Paper and the Rolling Waves Bundle for me. They were on my list for a while before I finally gave in and ordered them anyway —because, let’s be honest, that “maybe later” list almost always turns into “fine, I’m getting it.” 😂
Part of the reason these products caught my eye is likely where I grew up. I spent most of my life on the Central Coast of California, where going to the beach on a Saturday was just something we did.
I now live in Las Vegas, where the closest beach is about four hours away. Technically, there’s a lake nearby… but a man-made lake in the desert just isn’t fooling anyone. 😂
The beach has always been one of those places where you can play in the sand, listen to the waves, and just let the world slow down for a minute.
That’s the little feeling I wanted to capture in this card — rolling waves, sparkly sand, and a couple of cheerful beach umbrellas soaking up the sunshine.
Because sometimes the best thing you can send someone is a little ray of sunshine…
or a tiny vacation in an envelope. 🌊🏖️✨💥
So grab your supplies, shake the sand out of your flip-flops, and let’s make some waves at the craft table. 🌊
🏖️✨ Here’s What You Need to Make This Beach Shaker Card
Designer Series Paper

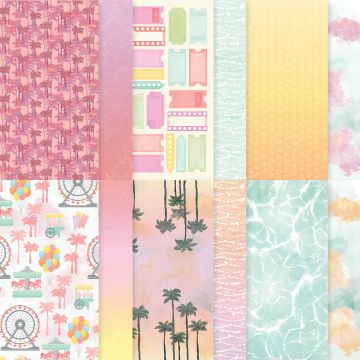


Stampin’ Up! Beach Boardwalk 12x12 Designer Series Paper – used for the ocean background behind the layered wave dies.
Stampin’ Up! Woodgrain Wonders 12” × 12” Designer Series Paper – used for the card front background, sentiment banner, and die-cut shell elements

Cardstock
Stampin’ Up! Basic White Cardstock (8½” × 11”) – used for the card base, umbrellas, die-cut waves, and the postage frame layer
Stampin’ Up! Pool Party Cardstock (8½” × 11”) – used for the layered ocean wave die cuts.
Stampin’ Up! Pecan Pie Cardstock (12” × 12”, light side) – used for the sandy shoreline background
Stampin’ Up! Strawberry Slush Cardstock (8½” × 11”) – used for the starfish and umbrella accents
Stampin’ Up! Darling Duckling Cardstock (8½” × 11”) – used for the umbrella accents
Stampin’ Up! Garden Green Cardstock (8½” × 11”) – used for the die-cut tropical leaf embellishment

• Stampin’ Up! Rolling Waves Bundle – used to die cut the layered ocean waves and beach embellishments
• Stampin’ Up! Ocean Friends Bundle – used to stamp the “Hello Friend” sentiment
• Stampin’ Up! Perennial Postage Dies – used to create the decorative postage-style frame for the shaker window
Ink & Coloring
• Stampin’ Up! Coastal Cabana Classic Stampin’ Pad – used to deepen the ocean color on the Beach Boardwalk DSP
• Stampin’ Up! Early Espresso Classic Stampin’ Pad – used for stamping the sentiment

Embellishments
• Stampin’ Up! Loose Gold Sequins – used to mimic sparkly beach sand
Tools
Stampin’ Up! Stampin' Cut & Emboss Machine
Stampin’ Up! Paper Trimmer
Stampin’ Up! Blending Brush
Stampin’ Up! Window Sheets (for shaker element)
Stampin’ Up! Bone Folder

Adhesives & Additional Tools
*As an Amazon Associate, I earn from qualifying purchases.
• Foam Tape – used to create the raised shaker cavity so the Loose Gold Sequins can move freely inside the card
• Bearly Art Precision Glue – used to adhere the layered wave die cuts and small embellishments like the shells, starfish, and umbrellas
• Tombow Air Touch Adhesive + Liquid Glue — strong, smooth hold for the larger and heavier embellishments.
🌊✂️ Let’s Make This Beach Shaker Card
Before we start assembling this beach shaker card, it helps to prep the pieces that bring the whole shoreline scene together. Since this design uses several die-cut elements, I found it easiest to cut and assemble those pieces first while the Stampin’ Up! The Cut & Emboss Machine was already out. Once everything was prepped, building the shaker and finishing the card flowed much more smoothly.
1️⃣ Create the Card Base

Start by creating a standard A2 card base using Stampin’ Up! cardstock. Basic White Thick Cardstock.
Cut one sheet of 8½” x 11” cardstock in half to create two pieces measuring 5½” x 8½”. Each of those pieces will make one card base. Score each piece at 4¼” on the long side, then fold inward to create a vertical A2 card measuring 4¼” x 5½”.
Use your Stampin’ Up! Bone Folder to burnish the fold so the card closes neatly and lies flat.

Next, cut a piece of Stampin’ Up! Cut the Woodgrain Wonders 12” x 12” Designer Series Paper to 4¼” x 5½”, then adhere it to the front of your card base.
On most of my cards, I cut the woodgrain so the grain runs vertically, and I really liked that look because the sentiment strip runs horizontally and the two directions play nicely together. One of my cards ended up with the grain running horizontally, and that looked good, too. This is one of those design choices that really comes down to preference.
2️⃣ Create the Die-Cut Embellishments

Now it’s time to prep the die-cut pieces that bring this beach shaker card to life.
Using the Rolling Waves Dies, die cut the layered wave pieces from Basic White Cardstock and Pool Party Cardstock. I cut two wave pieces from Basic White and one wave piece from Pool Party.
Once the pieces were cut, I layered the wave pieces, adhered them, and set them aside to dry. This step is important because the assembled waves become a key focal point of the shoreline scene, and having them attached in advance makes the shaker assembly much easier later.

While your die-cutting machine is still out, cut the remaining embellishments for the front of the card. I die-cut the umbrellas, tropical leaves, shells, and starfish at this point, so everything would be ready when it was time to decorate.
For my card, the umbrellas were layered using Strawberry Slush, Darling Duckling, and Basic White Cardstock.
The tropical leaf was cut from Garden Green Cardstock, the shells from Woodgrain Wonders Designer Series Paper, and the starfish from Strawberry Slush Cardstock.
💡 Pro Tip: When die-cutting shells from patterned paper, position the paper so the grain or pattern runs vertically through the die. This helps the paper's lines follow the natural shape of the shell and gives the finished embellishment a more realistic look.
3️⃣ Prep the Shaker Frame, Shoreline & Ocean Background

Now that all of the embellishments are ready, it’s time to prepare the pieces that will form the shaker portion of the card.
Start by die-cutting the largest Perennial Postage Die from Stampin’ Up! Basic White Cardstock. This piece will eventually sit on top of the shaker window and frame the entire beach scene.
Because I didn’t have a smaller nesting die that fit inside this shape, I simply used my paper trimmer to trim out the center panel. Carefully cut along the inside edges until the middle piece lifts out, leaving you with a clean, open postage-style frame.

Next, cut a piece of Stampin’ Up! Pecan Pie Cardstock (using the light side of the 12” × 12” cardstock) to 3⅜” wide by approximately 4¾” long. This piece will sit behind the shaker and become the beach sand.
If you purchased the Rolling Waves Bundle, there is a stamp included that creates a beautiful textured shoreline effect where the waves meet the sand.
However, because I was creating a shaker card, I wanted the sand texture to appear a little more scattered behind the sequins.
So instead, I used a splatter stamp from a Close To My Heart set to mimic the more natural, speckled look of sand across the beach.
Next, cut a piece of window sheet (acetate) to the same size as the Pecan Pie shoreline piece. This clear layer will become the shaker window that holds the Loose Gold Sequins inside the card.
Finally, prepare the ocean background.
Start with a piece of Stampin’ Up! Beach Boardwalk Designer Series Paper cut to 3⅜” wide by about 3” long.
Before trimming, use a blending brush and Coastal Cabana Classic Ink to deepen the ocean tones in the patterned paper. This helps tie the background color in with the layered wave die cuts and gives the water a little extra depth.
Once that’s done, it’s time to dry-fit your shoreline scene so you can see how everything will line up inside the shaker frame.

Place the ocean DSP on top of the Pecan Pie shoreline piece so you can see where the water will meet the sand.
Next, position the layered wave die cuts on top of the ocean paper and adjust them until the shoreline looks the way you like.
Once you’re happy with the placement, lay the Basic White Perennial Postage frame over the entire scene.
This quick-dry fit lets you see exactly what will show through the finished shaker window.
Because the ocean paper started as a square, you’ll notice a small portion of the paper extending below the edge of the waves.
Trim that excess away so the ocean paper follows the same gentle angle as the shoreline.
After trimming the angle, adhere the layered waves to the ocean DSP using your precision-tip liquid glue and set the panel aside to dry.
Once the glue is dry, use your paper snips to trim the excess wave edges on the left and right sides so they line up with the edges of the ocean paper. This brings the entire ocean panel back to the same 3⅜-inch width and allows it to fit neatly inside the shaker frame.
4️⃣ Assemble the Shaker Window

Now it’s time to turn your shoreline scene into a shaker.
Attach the window sheet to the front of the ocean panel.
Keep your assembled ocean and wave panel face up. Using your Barely Art precision-tip glue, run a thin line of adhesive along the left side, right side, & top edge of the ocean panel. Then add glue along the edge of the waves as well.
Place the window sheet directly on top and press firmly, especially along the wave area.
This step is important because attaching the waves to the window sheet keeps the sequins contained in the sand section and prevents them from sliding up into the ocean portion of the card.
Set this piece aside and allow it to dry completely.
Add the foam tape.
Once the glue is dry, turn the piece over and apply foam tape to the back of the panel. Add foam tape around the outer edges and along the angled shoreline so the shaker elements stay contained in the sandy portion of the card.
Add the shaker sand.
Sprinkle a small amount of Stampin’ Up! Loose Gold Sequins into the shaker area. These sequins become the sparkly sand inside the card.
Seal the shaker.
Peel off the foam tape backing and attach the Pecan Pie sand piece to the back. Before pressing it into place, make sure the stamped splatter is facing the correct direction so the sandy texture sits where you want it when the card is turned back over.
Finish the shaker panel.
Flip the piece back over, adhere the Basic White Perennial Postage frame to the front of the shaker window, and then attach the completed shaker panel to the front of the card base.
5️⃣ Add the Sentiment & Finish the Card Front

Stamp the greeting onto a scrap of Woodgrain Wonders Designer Series Paper using Stampin’ Up! Early Espresso Classic Ink.
Once the sentiment is stamped, trim it into a small banner or label that will sit nicely in the lower corner of the card.
If you’d like, lightly ink the edges of the sentiment strip with Early Espresso to give it a little extra definition.
Set the sentiment aside for a minute to let the ink dry while you begin decorating the card front.

Begin in the upper right corner of the shaker frame. Adhere the tropical leaf so it slightly overlaps the edge of the frame and begins framing the beach scene.
Next, place the two beach umbrellas on top of the leaf, allowing one umbrella to slightly overlap the other. This helps create a layered look and adds a fun pop of color to the corner of the card.
Now move down to the lower left corner along the shoreline. Before adhering everything permanently, it helps to dry-fit the leaf and sentiment banner.

Position the sentiment slightly above the bottom edge of the frame so a bit of the sandy shoreline still shows underneath. This also leaves room to add the final embellishments.
Once the placement looks right, adhere the leaf and sentiment banner to the card front.
Finally, finish the cluster by adding the die-cut shell and starfish along the shoreline near the sentiment. Carrying the Strawberry Slush color from the umbrellas down into this corner creates a visual triangle, which helps guide the eye across the design and keeps the card feeling balanced.
✨ 🌊 Your Tiny Beach Escape Is Officially Complete!

Once everything is layered and those sparkly sequins start shifting around like tiny grains of sand, this card really comes to life. Between the rolling waves, the angled shoreline, and the little beach umbrellas soaking up the sunshine, it feels like a tiny seaside scene tucked right inside an envelope.
The “Hello Friend” sentiment makes this a perfect everyday card—ideal for sending a little sunshine to someone who could use a smile. But the best part about a design like this is how easy it is to switch things up. Change the sentiment, and suddenly this same card works beautifully for a birthday, retirement, summer hello, vacation send-off, or even a cheerful thinking-of-you card.
Beach cards have a way of making people smile… and honestly, who wouldn’t want to receive a tiny vacation in their mailbox? 🌊🏖️✨
☀️ Don’t Pack Up the Flip-Flops Yet… More Crafty Fun Ahead!
If this beachy shaker card made you smile, don’t head for the shoreline just yet. There’s plenty more crafty inspiration waiting! From handmade cards to scrapbook layouts that capture life’s little moments, these projects are perfect when you’re ready to keep the creativity flowing. Take a peek, get inspired, and maybe even find your next idea for the craft table.


☀️ Don’t Keep That Crafty Sunshine to Yourself!

If you decide to make this beachy shaker card — or if it inspires you to create your own seaside scene — I would absolutely love to see what you come up with!
One of the best parts of crafting is seeing how everyone puts their own spin on a design. Maybe you swap out the sentiment, change the colors, or build an entirely different shoreline.
However, you make it yours, don’t keep that crafty sunshine to yourself! Share your creation in the Members’ Gallery so we can all celebrate your beautiful work.
🌊 One Last Wave Before You Go…

There’s just something about a beach scene that instantly feels like a little escape. Maybe it’s the sound of the waves, the warmth of the sunshine, or the simple joy of sandy toes and salty air. That’s exactly the feeling I wanted to capture in this card — rolling waves, sparkly sand, and cheerful little umbrellas soaking up the sunshine.
And honestly, as I’m finishing up this blog tonight, the house is quiet and dark except for the soft glow of one of my turtle lights. Sitting on the table in front of me are these little beach cards… and every time the light catches those gold sequins, they sparkle just like tiny grains of sand on the shoreline.
It made me smile because that’s exactly what this card is meant to do — send a little sunshine, a little sparkle, and a tiny vacation in an envelope.
Sometimes the smallest handmade card can feel like the perfect little escape, arriving at just the right moment. 🌊🏖️✨
✨ Until next time… may your sequins sparkle and your waves roll perfectly.
April - This Chick Loves Paper
Where glitter is basically a craft supply… and sequins count as sand. 🌊✨
Grab your supplies & get crafting!

All photos and projects are subject to copyright © ThisChickLovesPaper.com
Images © Stampin’ Up!® & CTMH®
The content in this blog is the sole responsibility of April Raine – This Chick Loves Paper, Independent Stampin’ Up!® Demonstrator. The use of and content of classes, services, or products offered is not endorsed by Stampin’ Up!®.
Create a beach shaker card with rolling waves, sparkly sand, and cheerful seaside details in this step-by-step cardmaking tutorial by This Chick Loves Paper! Using the Stampin’ Up!® Rolling Waves Bundle, Beach Boardwalk Designer Series Paper, layered cardstock, and loose gold sequins, this handmade card captures the feeling of a tiny vacation in an envelope. Perfect for summer cards, friendship cards, or sending a little sunshine through the mail. 🌊🏖️✨

⭐How I Protect My DSP, Cardstock & Finished Cards
*As an Amazon Associate, I earn from qualifying purchases.
I store my DSP, cardstock, scraps, and even finished cards in these clear resealable bags.
The 2-mil thickness is perfect for everyday crafting (they make a 4-mil option if you want extra durability!), and they’re tough, reusable, and great for keeping your entire crafting stash clean, tidy, and protected from the chaos of the craft room.
• 13×13 Plymor 2mil Zipper Reclosable Bags — for 12×12 DSP, cardstock sheets & scraps
• 9×12 Plymor 2mil Zipper Reclosable Bags — for 8.5×11 cardstock & scraps
• 6x8 Plymor 4mil Heavy Duty Reclosable Bags — for storing extra die cut embellishments & finished cards, card workshop kits