
Cookies, Cocoa & Christmas Cheer: A Cozy 12x12 Christmas Cookies and Cocoa Scrapbook Layout
- This Chick Loves Paper

- Nov 19, 2025
- 12 min read
Updated: Dec 14, 2025

There are people who “like” Christmas… and then there’s me: Clark W. Griswold with ponytails, running a full-scale holiday baking operation out of my kitchen every year. 🎄🍪
Most years, our cookie marathon covers everyone: friends, family, neighbors, coworkers, the Dutch Bros girls, the gas station peeps — if you cross our path in December, you’re probably getting a treat box. But this story? This batch? It wasn’t for the whole village.
It was for Lil Man. 💚
He looked like he needed a little extra Christmas cheer, and around here, nothing delivers comfort faster than warm chocolate-chip cookies and peppermint hot cocoa that could melt even the Grinch’s cold little heart. So we baked, we stirred, we scooped, and we basically turned the kitchen into a Christmas cookie factory.

And because this chick truly loves paper, I naturally turned that cozy little moment into a 12x12 Christmas cookies and cocoa scrapbook layout filled with texture, sparkle, and all the warm, home-for-the-holidays energy I could fit on two pages.
The best part?
This Christmas layout is built with AUTUMN paper. 🍂➡️🎄 Because when the colors work, they work — and I’m not about to argue with my cardstock.
Grab your cocoa (with or without the peppermint schnapps 😉), and let’s build this layout from the first strip to the last cookie crumb.
MATERIALS – WHAT I USED TO BAKE THIS LAYOUT TO LIFE
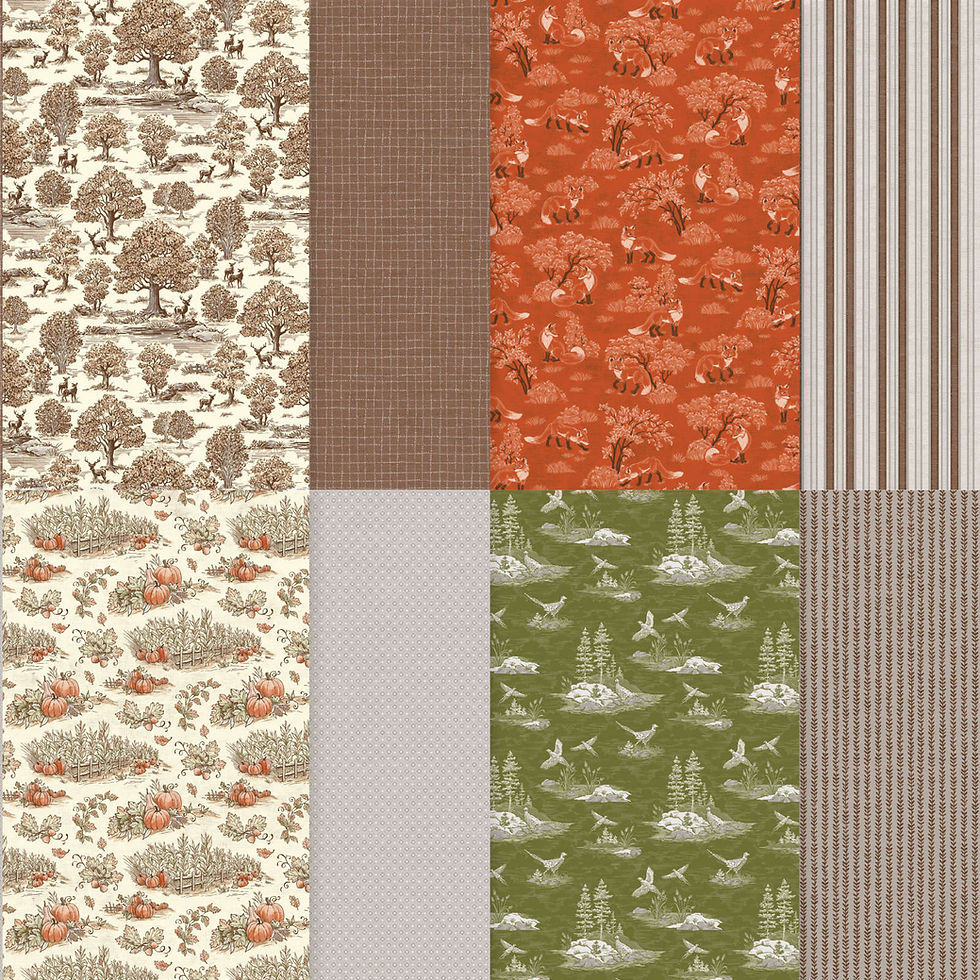
Patterned Paper:
Inks & Coloring
Stampin’ Up!® Early Espresso Classic Stampin’ Pad
Stampin’ Up!® Bronze Stampin’ Blends Marker (for chocolate chips)
Cardstock


Stampin’ Up!® Basic White 12” × 12” Cardstock (bases, inner mats & embellishments)
Stampin’ Up!® Early Espresso 8½” × 11” Cardstock (photo mats, recipe mat, awning layer, title layers)
Stampin’ Up!® Real Red 8½” × 11” Cardstock (horizontal strip, accents, layered title letters)
Stampin’ Up!® Crumb Cake 8½” × 11” Cardstock (strip + stamped cookies)
Stampin’ Up!® Silver Foil Specialty Paper (cookie sheets + metal accents)
Stamps & Bundles


Stampin’ Up!® “Merry Christmas” stamp
Stampin’ Up!® Homemade Treats Bundle (cookie sheets, mitt, rolling pin)
Stampin’ Up!® Perfect Pair Stamp Set (cookies)
Stampin’ Up!® Gingerbread Man Bundle (candy canes)
Stampin’ Up!® Deckled Circle Dies (for cookies)
Tools:


As an Amazon Associate, I earn from qualifying purchases.
Stampin' Up! Paper Trimmer
Shimmery White Embossing Paste for frosted details
3" X 4" (7.6 X 10.2 CM) FLIP FLAPS™ for hidden journaling & extra photos
Sponge daubers (for soft edging)
Stampin' Up! Simply Shammy - easily cleans ink from narrow grooves in stamps.
⭐ Other Tools I Use in My Projects
*As an Amazon Associate, I earn from qualifying purchases.


Cricut® Essentials
• Cricut® Maker 3 — my primary cutting machine for titles, SVGs & embellishments
• Cricut® StandardGrip 12×12 Mat — 3 count used for cardstock, photo paper & labels
Printer
Canon® Printing System (Photos + Printable Cricut Elements)
• Canon TS9521C Crafting Printer — used for ALL printed project photos, journaling pieces, print-then-cut embellishments & titles
Photo Papers
• Canon Photo Paper Plus Glossy II (4×6, PP-301) → For 4x6 or smaller - printed photos
• Canon Matte Photo Paper (MP-101, 8.5×11) → Used for Cricut print-then-cut elements & titles
• Canon Double-Sided Matte Photo Paper (MP-101D, 8.5×11) → Also used exclusively for Cricut embellishments, icons, & layered pieces
Printer Ink
• EZ Ink Compatible 280XXL/281XXL Ink Pack → The exact ink set used for the TS9521C
Stamping & Precision Tools
• MISTI® Memory Size with 12-1/2" x 12-1/2" Stamping area — for borders, backgrounds & oversized stamping
• MISTI® Stamp Tool Bar Magnet - Additional magnet
Speciality Adhesives
• Tombow® Mono Aqua Liquid Glue — for corners, details & layered paper pieces
• Bearly Art Precision Craft Glue (4oz Original) — for embellishments & fine-detail gluing
• Tombow® Mono Air Touch Adhesive— my preferred tape runner for base
• Tombow® Mono Air Touch Adhesive, Refill 2-Pack — my preferred tape runner for base layers
Journaling Tools
• Avery® Easy Peel® Full-Sheet Clear Labels (8665) → Used for long typed journaling strips
• Avery® Clear Shipping Labels 2×4 (8663) → Used for short typed journaling strips or blocks
• Skaura Pigma Micron Fineliner Pens - Archival Black - Assorted Point Sizes - Used for handwritten Journaling
My Storage System
• 13×13 Plymor 2mil Zipper Reclosable Bags — for 12×12 DSP, cardstock sheets & scraps
• 9×12 Plymor 2mil Zipper Reclosable Bags — for 8.5×11 cardstock & scraps
• 6x8 Plymor 4mil Heavy Duty Reclosable Bags — for storing extra die cut embellishments & finished cards, card workshop kits
How This 12x12 Christmas Cookies and Cocoa Scrapbook Layout Came Together
STEP 1 – Design the Layout & Build the Dimensional Title
Before I ever touched the paper trimmer, I mapped out the full double-page design in Design Space: where the photos would live, where the strips would run, where the title and hot cocoa recipe would sit, and which corners would get embellishment clusters. This saves so much second-guessing once you start cutting.

I created the “Cookies & Cocoa Kinda Day” sentiment and the hot cocoa recipe as print-and-cut pieces from my Cricut.
Then I cut the key words again from Early Espresso and Real Red cardstock, stacked the letters, and adhered them over the printed title. Not every letter — just enough to give it that intentional, layered look.
This extra step makes the sentiments look like they came out of a professionally designed kit instead of a printer.
Pro Tip:
If you want your titles to feel custom and dimensional without designing a million separate layers, print your base title, then pop select letters or words on top with die cuts. Instant “wow” with minimal extra cutting.
STEP 2 – Cut & Ink the Strips (and Hide the Seams Like a Pro)
For both pages, I used 8½” × 11” cardstock turned horizontally for my strips. That means they don’t reach the full 12”… which is where the magic trick comes in. I cut:

Real Red strip: 12” × 2” (from 8½” × 11”, pieced)
Crumb Cake strip: 12” × 1½” (pieced)
Autumn Toil DSP strip (espresso pattern): 12” × 3” (pieced)
Because the cardstock wasn’t long enough, I cut each strip into two pieces and arranged them so the gaps would sit underneath where my photo mats would go. Once the photos are in place, the seams completely disappear.
Before ashearing, I inked just the top and bottom edges of each strip using Early.
Espresso ink and a blending tool. The ink softens the edges and adds that fresh-from-the-oven warmth that matches the cookie theme.
Pro Tip:
When your paper isn’t long enough, don’t fight it — hide the breaks under photos or large elements. It saves paper, money, and stress… and absolutely no one will know but you.
STEP 3 – Add the Photo Mats & Hidden Journaling Flip-Flap
With the strips adhered, it was time to build the photo foundation:

Left Side of Layout:
One large 4½” × 6½” Early Espresso mat (with a 4¼” × 6¼” Basic White mat inside) for a 4” × 6” photo.
One 3½” × 3½” Early Espresso mat (with a 3¼” × 3¼” white mat) for the Cookies & Cocoa Kinda Day title block.
One 3½” × 4½” Early Espresso mat (with a 3¼” × 4¼” white mat) for a smaller 3” × 4” photo.
Right Side of Layout:
A 4½” × 8” Early Espresso mat for the hot cocoa recipe (white mat 4¼” × 7¾”).
A 4½” × 6” Early Espresso mat (with 4¼” × 5¾” white mat) for a 4” × 5¾” photo.
A 4½” × 3¼” Early Espresso mat (with 4¼” × 3” white mat) for the smaller supporting photo beneath it.

I also added a flip-flap over the bottom photo on the right page so I could tuck journaling underneath the image — perfect for telling the story behind this late-night cookie rescue without adding more visible text to an already word-heavy layout (sentiment + recipe).
Pro Tip:
If your page already has a lot of writing (titles, recipes, big sentiments), use flip-flaps for journaling. You still get the full story, but your layout stays clean and visually balanced.
STEP 4 – Build the Awning & Bottom Border
To give this layout that “little Christmas bakery” feel, I used a Cricut awning cut with two layers: The top layer in Autumn Toil DSP & a slightly offset under-layer in Early Espresso.

I inked the edges of both, then adhered them together and popped the entire awning up with 3M foam tape so it would look like a real storefront awning over a cookie shop window.
To balance the top, I added a ¼” Early Espresso strip along the bottom of both pages, also with softly inked edges, to ground the design and tie the two pages together top-to-bottom.
To pull that festive color story across the entire spread, I added a thin sliver of Real Red 8½”×11” Cardstock right above the
awning and another matching strip along the top of the 1/4” strip of both pages. It adds just the right POP of holiday red and gives the whole layout a more whimsical, cheerful finish.
Pro Tip:
Any time you build a strong horizontal element near the top of your layout, repeat a thinner strip near the bottom. It keeps the whole spread from feeling “top-heavy.”
STEP 5 – Build the Embellishments (Cookies, Cocoa & Christmas Cheer)
Once the base pages were finished, it was time for my favorite part — embellishments! I started by die-cutting all the little pieces: the mugs, candy canes, mittens, cookie trays, pine leaves, and of course… the cookies. I inked the edges of several pieces with the Stampin’ Up! Early Espresso to give everything a softer, more dimensional, “fresh-from-the-bakery” look.
Now let’s talk about those cookies — because they turned out extra cute.

I stamped the cookie image from the Perfect Pair Stamp Set onto Crumb Cake 8½”×11” Cardstock using Early Espresso ink. Then, instead of using a larger die, I reached for the Deckled Circle Dies in a smaller size… and it trimmed off part of the outline.
Normally, that might feel like a mistake — but it was perfect. Those slightly clipped, deckled edges made the cookies look chunky, handmade, and totally realistic, just like my real-life small, thick chocolate-chip cookies.
I finished them by coloring the chocolate chips with Bronze Stampin’ Blends, which added that warm, baked, melty look.
Pro Tip:
If a die cuts tighter than you planned, don’t panic. Sometimes, trimming off a stamped outline actually makes an image look more natural — especially for food. Imperfect edges = perfect realism.
STEP 6 – Create the Embellishment Clusters (Cookies, Cocoa & Kitchen Tools)
This is where the layout turned from “cute” to scene-building magic.

On the left page, I started building the main embellishment cluster by placing the candy canes on top of the little baking sheet to set the angle and spacing. Once those were in place, I nestled the red cocoa mug right beside the large photo mat and added the big swirl of whipped cream on top. Before adhering anything, I arranged a few cookies around the bottom of the mug to see how the balance felt — and they were perfect.
But once the mug was sitting there, I realized the cluster needed just a touch more of that deep Early Espresso tone that runs through the layout. So I tucked a
cinnamon stick behind the whipped cream to bring that warmth in. The mug still needed a little something-something, so I added a small white snowflake to the front as a cute winter detail.
To finish grounding the whole cluster and soften the edges, I added two white sprigs behind the mug. They give the embellishments just enough lift and texture without taking attention away from the photo.
Above the sentiment area, I used the rolling pin, a cookie, and a sweet oven mitt to create a second cluster that points the eye right back into the center of the spread.

On the right page, I tucked the two silver “cookie sheet” pieces above the hot cocoa recipe to act like little metal tags — a subtle nod to the actual baking pans from the photos. Once those were in place, I built a cozy cocoa cluster right beside the recipe block using a red mug overflowing with whipped cream, peppermint sticks, and a candy cane.
To ground the mug and pull in the same texture from the left page, I tucked a pair of white pine sprigs behind it, then added two stamped cookies at the base for balance and warmth. The mix of Real Red,
Basic White, Crumb Cake, Early Espresso, and a touch of silver mirrors the palette
from the left side, keeping the spread cohesive without duplicating the same arrangement.
Cluster Close-Up – Why This Works
Each cluster repeats the same visual elements: red, brown, white, and a touch of silver. You see cookies, cocoa, and baking tools in all three spots, but never in an identical way. That repetition makes the whole layout feel cohesive, while the slight variations keep it interesting and lively.
Pro Tip:
When you’re not sure if you’ve gone “too far” with embellishments, look for triangles. If your key icons (like mugs or cookies) form soft visual triangles across your pages, you’re likely in the sweet spot.
STEP 7 – Add the Title, Whimsy, and Winter Sparkle

With the main design in place, I went ahead and added the Merry Christmas title above the center block to anchor the spread and bring the whole layout fully into the holiday theme. Then, for a little extra whimsy, I tucked in those delicate white Cricut-cut swirls — a last-minute addition that gave the page that “steamy hot cocoa drifting into the air” feel.
To finish everything off, I brushed shimmery glimmer paste onto the white pine sprigs and the whipped-cream dollops on each mug. It adds the perfect frosty sparkle without overwhelming the photos — just a soft winter glow that ties all the Christmas elements together.
Pro Tip:
When your layout needs just a touch more personality, tone-on-tone shapes or subtle shimmer can bring everything to life. It doesn’t take much — just a few intentional details can make the whole page feel magical.
A Cozy Christmas Moment on Paper

With all the layers, textures, and cozy little details in place, this layout feels exactly like the moment it was meant to capture — warm, sweet, slightly chaotic, and full of Christmas comfort. The photos, embellishments, and pops of peppermint red tie everything together in a way that feels festive without being overwhelming. And honestly? Using autumn paper to build a full Christmas baking story might be my new favorite bit of magic. It’s a spread that smells like cookies, looks like Christmas, and feels like home — everything a holiday layout should be.
EXPLORE MORE – For Foodies, Frosting Lovers & Festive Hearts
If layouts like this make your crafty heart hungry (literally and creatively), you’re going to love exploring even more food-themed creations on the blog. From Christmas-morning breakfast spreads to birthday-cake layouts, from cookie-themed cards to cocoa-inspired designs, there’s a whole menu of delicious projects waiting for you. Let this layout be your reminder that everyday food photos — whether holiday treats or Tuesday-night snacks — can become warm, memory-rich masterpieces. Dive into the gallery for more sweet, savory, and totally scrumptious ideas to keep your creativity cooking.


SHARE YOUR CREATIONS – Show Off Your Cookies & Cocoa Magic

Did this cookies-and-cocoa cutie spark an idea for your own baking layout?
I would love to see what you create. Maybe it’s your family’s secret fudge recipe, your favorite Christmas brunch, or your version of a wild holiday cookie exchange.
Whatever you’re cooking up on paper, upload your pages to the Members Gallery so we can all be inspired by your colors, clusters, and storytelling. Your pages might be the exact spark another crafter needs to finally scrap their own kitchen memories.
FINAL THOUGHTS – When Paper, Cocoa & Love Collide

At the end of the day, this layout isn’t just about cookies or cocoa or even Christmas. It’s about pressing pause when someone you love needs a little extra warmth, and turning that quiet, ordinary moment into something you can hold in your hands years from now. That’s the heart of what we do here at This Chick Loves Paper — we take flour on the counter, cocoa on the stove, and a kid who needs a hug, and we turn it into a story that lasts.
May your holidays be cozy, your cocoa be hot, and your layouts be full of the people (and snacks) that make your world feel like home. 💚
Cozy up, craft hard, and always save room for one more cookie on the page.
April – This Chick Loves Paper
🛒 Grab Your Supplies & Get Crafting!

Photo Disclaimer
All photos and projects are subject to copyright
Images © Stampin’ Up!®
Blog Disclaimer
The content in this blog is the sole responsibility of April Raine – This Chick Loves Paper as a Stampin’ Up!® Independent Demonstrator. The use of and content of classes, services, or products offered is not endorsed by Stampin’ Up!®
Create a 12x12 Christmas Cookies & Cocoa scrapbook layout with This Chick Loves Paper, featuring layered holiday designs, baking-inspired accents, and step-by-step instructions for festive memory-keeping.


Wonderful layout! Love it!