
Fat Girl Wanted Cookies… And Made a Card Instead! – Handmade Thank You Card with Cookie-Themed Scraps
- This Chick Loves Paper

- Jun 30, 2025
- 7 min read
Updated: Jan 13

Let’s be honest: I wasn’t planning to bake another project… but when I saw those leftover scraps from my “Fat Girl Wanted Cookies!” layout staring back at me like, “April, don’t you dare toss us,”—I listened. Because in this craft room, no cookie gets left behind! 🍫🙅♀️
So I whipped up this delicious little thank-you card that’s equal parts chocolate chunk and heartfelt hug. 🥹💕
The Recipe? Simple:
✔ Same striped layers as the layout
✔ Same cookie cluster magic
✔ Same faux stitching deliciousness
✔ New format, new flavor… and a sweet surprise inside!
✂️ What I Used to Bake This Baby
🧁 Cardstock


• Stampin’ Up! Basic Beige 8-1/2” x 11” Cardstock
• Stampin’ Up! Pretty in Pink 8-1/2” x 11” Cardstock
• Stampin’ Up! Basic Black 8-1/2” x 11” Cardstock
• CTMH White Daisy (or Stampin’ Up! Basic White Thick 8-1/2" x 11")
• CTMH Mocha (or Stampin’ Up! Early Espresso 8-1/2" X 11" Cardstock)

🍪 Stamps & Thin Cuts
• Stampin’ Up! More Than Autumn Bundle (coffee cup, heart, whipped topping)
• CTMH Freshly Baked Digital Art Kit (oven mitt, rolling pin, spatula)
🎨 Ink & Coloring
• Stampin’ Up! Early Espresso Classic Stampin’ Pad
• Stampin’ Up! Pretty in Pink Classic Stampin’ Pad


🛠 Tools


• White Gel Pen
• Foam Tape
• Cricut® & Design Space® (for title + inside sentiment)
⭐ Cricut Tools & Embellishment Papers I Use in My Projects
*As an Amazon Associate, I earn from qualifying purchases.


Cricut® Essentials
• Cricut® Maker 3 — my primary cutting machine for titles, SVGs & embellishments
• Cricut® StandardGrip 12×12 Mat — 3 count used for cardstock, photo paper & labels
Printer
Canon® Printing System (Photos + Printable Cricut Elements)
• Canon TS9521C Crafting Printer — used for ALL printed project photos, journaling pieces, print-then-cut embellishments & titles
Photo & Embellishment Papers
• Canon Photo Paper Plus Glossy II (4×6, PP-301) → For 4x6 or smaller - printed photos
• Canon Matte Photo Paper (MP-101, 8.5×11) → Used for Cricut print-then-cut elements & titles
• Canon Double-Sided Matte Photo Paper (MP-101D, 8.5×11) → Also used exclusively for Cricut embellishments, icons, & layered pieces
Speciality Adhesives
• Tombow® Mono Aqua Liquid Glue — for corners, details & layered paper pieces
• Bearly Art Precision Craft Glue (4oz Original) — for embellishments & fine-detail gluing
• Tombow® Mono Air Touch Adhesive— my preferred tape runner for base
• Tombow® Mono Air Touch Adhesive, Refill 2-Pack — my preferred tape runner for base layers
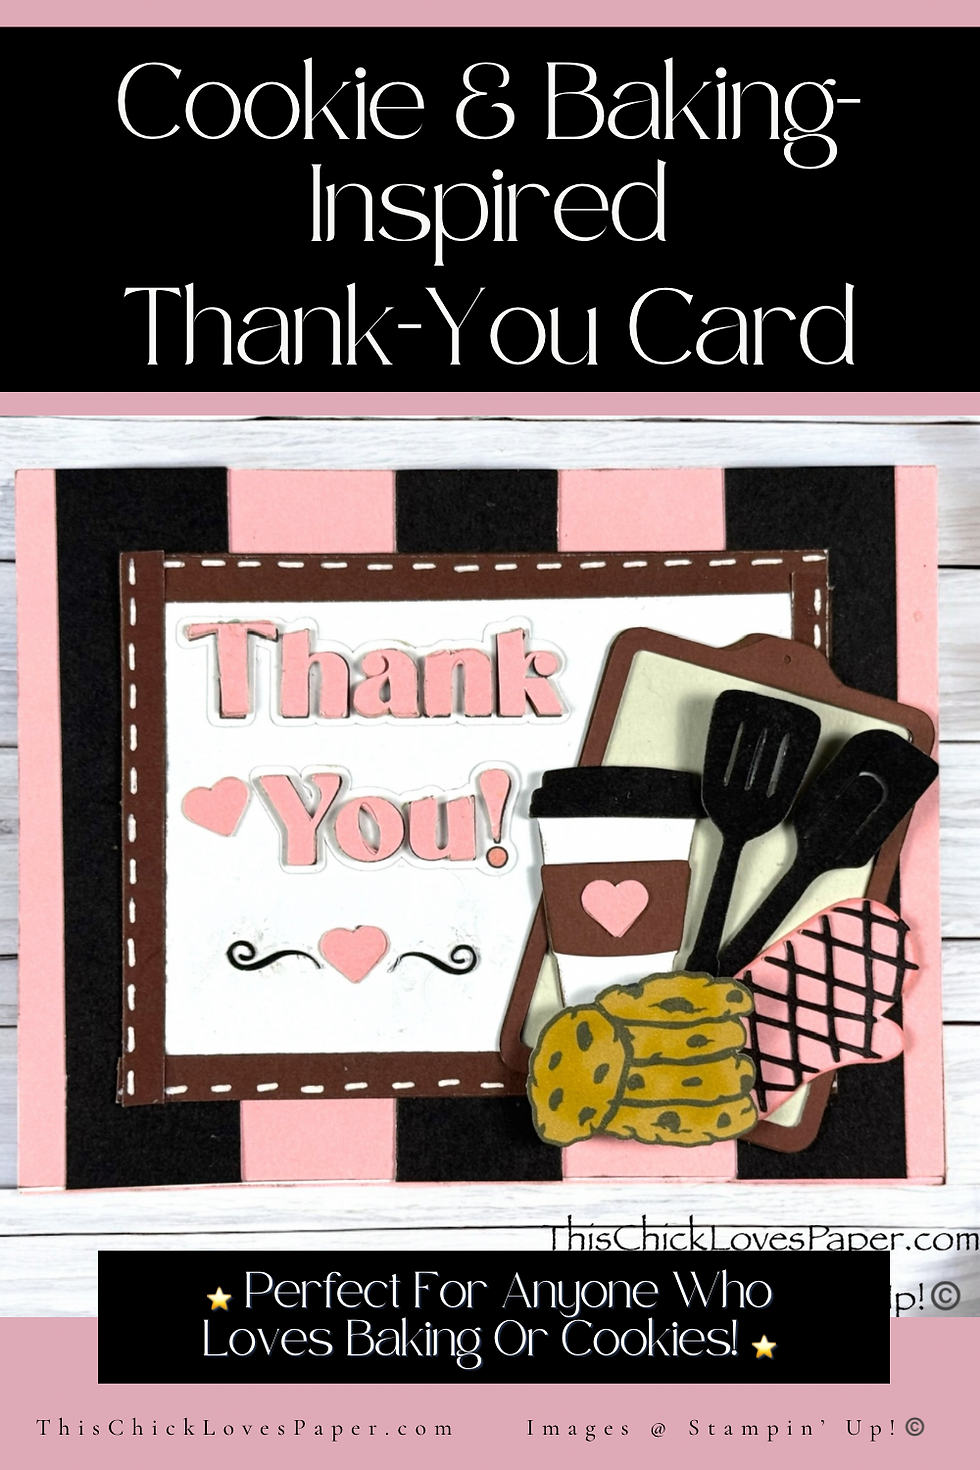
🧁 Step-by-Step Instructions – Bake It, Ink It, Send It!
With the same colors, stripes, and cookie-cluster magic from my “Fat Girl Wanted Cookies!” layout, this card came together like a second helping of something sweet. I wanted the design to feel familiar—like a little sister project to the scrapbook page—but still have its own personality and flavor. And with nothing but scraps, a few stamped images, and my Cricut riding shotgun, this card baked up quicker than a fresh batch of chocolate chip cookies. Here’s how to whip it together, one delicious step at a time.
1️⃣ Preheat Your Craft Oven (A.K.A. Make the Card Base)
Slice your 8-1/2” x 11” piece of Basic White Thick Cardstock in half horizontally to get two 5-1/2” x 8-1/2” pieces.
Score one at 4-1/4” to form a horizontal A2 card base. Fold, press, and set aside like a fresh cookie dough chillin’ in the fridge.

2️⃣ Make It Striped & Sweet
Cut a 5-1/2” x 4-1/4” panel from Pretty in Pink cardstock.
Slice Basic Black into 1” x 4-1/4” strips and evenly space them across your pink panel.
Adhere with liquid glue or Stampin’ Seal, lining them up like a perfectly iced bakery case.
Pro Tip: This striping technique is the same one from your “Fat Girl Wanted Cookies!” layout—so you’re recycling with sass.
3️⃣ Whip Up the Mat Layers
• Cut a 4-1/2” x 3-1/4” Mocha cardstock mat — this is your base layer.
• Cut a 3-3/4” x 2-3/4” White Daisy piece and layer it on top of the Mocha.
Adhere the two together, white on top, using your favorite adhesive.
Now for the stitched chocolatey goodness:
• Cut 1/4” Mocha cardstock strips the exact length of your finished mat.
• Add faux stitching to each strip with your white gel pen.
• Adhere the stitched strips across the top, side, and bottom edges of your layered mat.
This gives you that “baked with love” stitched look without risking your whole piece.
Why it works:
A. If your stitching goes rogue, no panic — you just replace the strip instead of redoing the whole mat.
B. Those slim Mocha bands act like a chocolatey design hug, adding balance, contrast, and a polished finish to the focal panel.

4️⃣ Create Your Cookie Cluster
From your CTMH Freshly Baked Digital Art Kit and Stampin’ Up! More Than Autumn Bundle, assemble:
• Cookie Tray
• Spatulas
• Oven mitts
• Coffee cups
• Hearts
• Cookie Stack (I didn’t have a stamp or dies, so mine is digital)
Place your embellishments in the bottom right corner of the double mat, leaving space for your title.
Pro Tip: Don’t have the exact images? Use what’s in your stash and bake up your own batch of cuteness!
5️⃣ Bold Letters, Zero Crumbs — Thanks Cricut!

Cut a bold “Thank You” sentiment using Pretty in Pink cardstock.
I created the phrase in Cricut Design Space by picking a playful font that matched the card’s sweet personality.
Then I made a Print Then Cut file with a border for extra contrast and dimension, and layered the cardstock letters right on top.
No pens, no shaky lines, just clean cuts and that chef’s kiss pop of depth. 💕

6️⃣ Finish the Inside With a Punch (of Sugar)
Open your card and add:
• A printed message from Cricut: “You made my day… now my cookie jar runneth over.”
• A scalloped top, a couple of rolling pins, and a cookie cluster tucked in like little baking ninjas
Boom. Instant smile delivery.
🍪 Sweet Success! Your Handmade Cookie Thank You Card is Fresh Outta the Craft Oven!

And just like that, your card is fresh out of the craft oven—layered, stitched, and sprinkled with handmade goodness. Whether you’re baking up thanks for a Stampin’ Up! order or sending cookie-themed hugs to a friend, this sweet design delivers with every bite. Want to switch it up? Swap the “Thank You” for “Bite Me,” “Baked With Love,” or “Life’s Short—Eat the Cookie.” This design is quick, fun, and the perfect excuse to use every last scrap… because paper (like cookies) should never go to waste. 🍪💌
🍬 Explore More Sugar Rush Cards & Scrapbook Layouts!
Craving seconds? You’re in the right kitchen, my friend. If this sweet little thank-you card has your crafty taste buds tingling, you’ll love diving into more dessert-worthy projects—from cookie-themed layouts and sprinkle-covered cards to punny paper treats baked fresh from leftover scraps. Whether you’re in the mood for soft pastels, bold chocolate browns, or full-on sugar-rush color combos, there’s always another delicious idea waiting to be whipped up. Let the inspiration keep rolling… like a runaway cookie off a freshly greased baking sheet. 🍪✨


📸 Share Your Cookie Crafting Magic!

What I love the most about cards like this? They’re proof that even the tiniest paper scraps can turn into something adorable, meaningful, and downright scrumptious.
If this little leftover-love project inspired you to bake a card of your own—or if you’ve got cookie-themed cuteness already cooling on your craft table—I’d be over the moon to see it.
Share your creation in the Members’ Gallery so we can celebrate the cozy, crumb-covered magic that happens when we turn scraps into something worth savoring. 🍪💗
💋 Final Thoughts from the Cookie Lovin’ Queen

This card is sweet proof that leftovers aren’t just “extra”—they’re an opportunity. One tiny stack of scraps turned into a delicious thank-you, layered with love, stitched with personality, and sprinkled with cookie-themed joy.
Whether you’re baking up gratitude, crafting something cute, or transforming the tiniest bits into something beautiful, remember this: every project has the potential to deliver a smile. And sometimes? The leftovers taste even better.
Bake it. Ink it. Send it. Repeat.
💋 April – This Chick Loves Paper
🛒 Grab Your Crafting Supplies!
All photos and projects are subject to copyright © ThisChickLovesPaper.com.
Images © Stampin’ Up!®
The content in this blog is the sole responsibility of April Raine, This Chick Loves Paper as a Stampin’ Up!® Independent Demonstrator.
The use of and content of classes, services, or products offered is not endorsed by Stampin’ Up!®.
Create a handmade cookie-themed A2 thank-you card created with leftover scraps from the “Fat Girl Wanted Cookies!” layout. This step-by-step tutorial by This Chick Loves Paper features striped layers, faux stitching, Cricut-cut sentiments, and adorable baking embellishments—perfect for anyone who loves crafting, cookies, or sweet handmade cards.

⭐How I Protect My DSP, Cardstock & Finished Cards
*As an Amazon Associate, I earn from qualifying purchases.
I store my DSP, cardstock, scraps, and even finished cards in these clear resealable bags.
The 2-mil thickness is perfect for everyday crafting (a 4-mil option is also available for extra durability), and they’re tough, reusable, and great for keeping your entire crafting stash clean, tidy, and protected from the chaos of the craft room.
Different sizes available! Here are the ones I use the most:
• 13×13 Plymor 2mil Zipper Reclosable Bags — for 12×12 DSP, cardstock sheets & scraps
• 9×12 Plymor 2mil Zipper Reclosable Bags — for 8.5×11 cardstock & scraps
• 6x8 Plymor 4mil Heavy Duty Reclosable Bags — for storing extra die cut embellishments & finished cards, card workshop kits
Other Tools I Use In My Projects
*As an Amazon Associate, I earn from qualifying purchases.


Stamping & Precision Tools
• MISTI® Memory Size with 12-1/2" x 12-1/2" Stamping area — for borders, backgrounds & oversized stamping
• MISTI® Stamp Tool Bar Magnet - Additional magnets
Journaling Tools
• Avery® Easy Peel® Full-Sheet Clear Labels (8665) → Used for long typed journaling strips
• Avery® Clear Shipping Labels 2×4 (8663) → Used for short typed journaling strips or blocks
• Skaura Pigma Micron Fineliner Pens - Archival Black - Assorted Point Sizes - Used for handwritten Journaling


Comments