🎶 What’s This? What’s This?! Scrappin' Disney Magic: The Nightmare Before Christmas Layout! 🎶
- This Chick Loves Paper
- Apr 4, 2024
- 7 min read
Updated: Jun 12, 2025
“What’s this? What’s this? A scrapbook full of cheer?
What’s this? It’s spooky, yet sincere!
What’s this? I must be dreaming—how did this layout come to life?
Oh wait… It’s all thanks to This Chick Loves Paper!”

That’s right, my fellow crafty ghouls and goblins—today, we’re diving straight into the world of Jack Skellington, Zero, and all things delightfully eerie! Whether you’re a die-hard Halloween Town fan or love a little spooky whimsy in your scrapbooks, this Nightmare Before Christmas-inspired layout is the perfect way to capture Disney magic with a twist!
So grab your scissors, summon your inner Sandy Claws, and let’s craft something spooktacular! 👻✨
👻 Scrappin' Disney Magic The Nightmare Before Christmas Materials
Every great scrapbook layout starts with the right color palette, and for this Nightmare Before Christmas-inspired design, I wanted a mix of moody, bold, and Halloween-perfect hues!
🦇 Original Colors (CTMH Cardstock): I used Black, White, Royal, Sundance, and Capri to bring the layout to life.
• Cardstock Colors:


🎃 Stampin’ Up! Crossover Colors: Want to recreate this look with Stampin’ Up! cardstock? You totally can! Try using Basic Black, White Willow, Gorgeous Grape, Pumpkin Pie, and Azure Afternoon for a spooky-fun, picture-perfect match!
🖤 Must-Have Inks:


✨ Pro Tip: Gorgeous Grape adds the perfect touch of eerie elegance, while Pumpkin Pie makes those Halloween accents pop!
Essentials


✂️ Paper Trimmer: Because clean cuts make all the difference!
🧡 Adhesives: A mix of glue and foam strips to add depth and dimension.
Sponge Daubers - inking edges
🎨 SVG Files & Custom Cuts: The Secret to Intricate Designs
This layout features custom SVG designs, which I created in Cricut Design Space® and cut using my Cricut® machine on Close To My Heart cardstock. But if you’re new to SVGs, don’t worry—I got you!

🖥️ What’s an SVG File? Think of SVG files as pre-designed cut files that your Cricut® can use to create intricate shapes, titles, and embellishments. They’re a game-changer for scrapbook layouts, making it easy to get detailed designs without fussy cutting by hand!
✨ Pro Tip: If you’re new to Cricut® cutting, always do a test cut first! Some SVG files may require minor adjustments in Design Space for a smoother cut, especially if they contain fine details.
🦇 Bringing the Layout to Life – Step-by-Step

Once I had my layout fully planned and cut using my Cricut®, the assembly was a total breeze! This design came together effortlessly—it was all about layering!
Step 1: Creating a Bold Base
I used CTMH Royal cardstock as my base—a bold choice, since I usually start with white! But hey, when crafting a Nightmare Before Christmas-inspired layout, moody and dramatic is the way to go!
I added a black & white striped strip across the top & bottom of both pages.
✨ Pro Tip: Want to recreate this with Stampin’ Up! colors? Try using Gorgeous Grape for a similarly rich, eerie effect!
Step 2: Adding Depth with Inked Edges
To make this layout really pop, I inked the edges of all my cardstock pieces using ink pads that matched each color of cardstock. This technique adds instant depth, helps define your shapes, and gives the entire layout a shadowed, dimensional look.

Inking the Edges: What It Means
Inking edges is exactly what it sounds like! You simply swipe, dab, or rub an ink pad along the edges of your paper before gluing them down. For this layout, I used sponge daubers, which gave me more control and a softer finish.
Why I Inked Everything:
Adding ink around the edges helps each paper layer stand out, especially on a dark or dramatic background (like my Royal base). It creates the illusion of depth and shadow, without adding extra bulk!
PRO TIP:
• Use light pressure for a soft, subtle glow.
• Apply more ink for bold, shadowy contrast.
• Match the ink color to the cardstock for a clean, cohesive look.
This one little trick adds a huge wow-factor—and it only takes a few seconds per piece!
Step 3: Stacking the Moon & Hill – The Cricut® Magic! 🌙✨
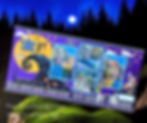
This is the most iconic scene from the movie, and I wanted to go big, bold, and Halloween Town fabulous! Not only did I want the silhouette of Jack and Sally to steal the show, I also needed enough room on the hill for a full 4x6 photo—mission accomplished!

The moon and twisted hill came from one layered SVG file I designed in Cricut Design Space®. That means Cricut® did all the precision slicing for me—each piece stacks perfectly to create built-in shadows, highlights, and that signature eerie glow. No extra inking or shadowing required!
🟡 Layering Order:
1️⃣ Sundance – for that bright, glowing moonlight
2️⃣ Capri – adds a subtle highlight
3️⃣ Black – becomes the dramatic outer silhouette
✨ Pro Tip:
Use a precision glue pen when assembling layered SVGs! It keeps adhesive exactly where you need it and avoids smudging those finely detailed edges. Trust me, spooky magic should be the only thing getting messy here.
Step 4: Creating the Perfect Photo Mats 📸✨
Now that the mountain scene was in place, it was time to frame the stars of the show—our photos!

I waited to build the mats until I confirmed that my 4x6 photo would sit perfectly on the hill. Once I knew everything fit, I created photo mats that would brighten up the layout and tie into the color palette from the photos and scene.
Since the background and hill are both on the darker side, I chose Capri and White cardstock for a layered, high-contrast look that pops off the page.
To give each photo a clean, polished finish, I double-matted the images, adding both structure and visual balance.
✨ Pro Tip:
Double-matting is a quick way to make your photos look extra sharp and professional! Just be sure your outer mat color pulls from your page elements, while your inner mat adds brightness or contrast.

Step 5: The Finishing Touches – Where the Magic Happens! 🕸️🎃
With the main scene complete, it was time for my favorite part—embellishing! This is where the page truly transforms from “almost done” to absolutely unforgettable.
The first detail I tackled was the title. I loved how the black SVG lettering popped against that bold Sundance moon—it instantly grounded the design and echoed the movie’s iconic vibe. But I wanted a bit more magic, so I layered it with the same color used on my photo mats to bring the whole layout together. A little foam tape underneath gave it just the right dimension!
To echo that bold black across the page, I added a smaller hill on the opposite side and layered a sweet SVG of Jack and Sally in front of a tombstone—a subtle nod to Halloween Town’s most hauntingly adorable duo.

That little scene sparked a spooky-fun idea…
Graveyard fencing! I ran the die-cut fence along the bottom of the page to build out a full Halloween scene. Then, to top it off (literally), I added an eerie sky filled with bats, clouds, stars, and just a touch of that creepy whimsy we all love.
Finally, I sprinkled in a few more SVG embellishments—layered pumpkins, ghosts, Zero, and spiderwebs—to bring every corner of the page to life.
✨ Pro Tip:
Use repeating colors, shapes, or characters across your layout to create visual harmony and guide the eye naturally across the page. It’s one of the easiest ways to make your design feel cohesive and complete!
🎭 This Is Halloween… But It’s Also So Much More!
While this layout is perfect for a Nightmare Before Christmas-themed spread, don’t let that stop you from getting creative! These design elements work for all sorts of magical Disney memories, including:
🏰 Mickey’s Not-So-Scary Halloween Party
👻 Spooky theme park nights & haunted house adventures
🎭 Villains After Hours or Disney Halloween overlays
🎄 A little Christmas magic with a Halloween twist! (Because let’s be real—Jack Skellington does both!)
✨ Discover More Disney-inspired layouts!
If you loved this Nightmare Before Christmas layout, don’t stop here! Explore more Disney-inspired scrapbook designs for even more creative inspiration:
🔎 Check out my Disney-Inspired Layout Gallery!


🎃 Share Your Frightfully Fun Creations!
Did you brew up your own Nightmare Before Christmas-inspired scrapbook page? Maybe something hauntingly whimsical or frightfully fabulous?
🦇 I need to see what you’ve stitched together—whether it’s spooky stripes, patchwork magic, or a moonlit moment with Jack & Sally themselves!
🎃 Head to the Members Gallery and share your eerie masterpieces!
Let’s fill the crypt (err… gallery) with spine-tingling inspiration for fellow memory-keepers who like their layouts with a twist of the macabre.
💀 A Fan’s Tribute to Jack and Sally
Some layouts are just layouts… but this one? This one is special. 💜
As a lifelong Nightmare Before Christmas fan, this project wasn’t just about crafting—it was about capturing the magic, whimsy, and hauntingly beautiful charm of Jack and Sally’s world. From the layered moon to the bold colors and eerie details, every piece of this layout was designed with love, nostalgia, and just a little bit of Halloween Town mischief. 👻✨

And the best part? It all came together in about an hour! 🕰️
That’s right—stunning scrapbook layouts don’t have to take all day! With the right materials, SVG files, and a bit of creative layering, you can bring your favorite fandom to life in no time.
So, whether you’re a die-hard Jack & Sally fan like me or just love a good spooky scrapbook challenge, I hope this layout inspires you to craft a little magic of your own. 🎃💀✨
Until next time… stay crafty, stay spooky!” 👀🎨
April - This Chick Loves Paper
🛒 Grab Your Supplies & Start Crafting!
📌 Please Note: All photos are subject to copyright
Images © Stampin’ Up!®,
Images © Close To My Heart®
📌 Blog Disclaimer: The content in this blog is the sole responsibility of April Raine - This Chick Loves Paper as a Stampin’ Up!® Independent Demonstrator. The use of and content of classes, services, or products offered is not endorsed by Stampin’ Up!®
What’s this? What’s this?! 🎃✨ This Chick Love Paper is Scrappin' Disney Magic! This Nightmare Before Christmas 12x12 double-page scrapbook layout is designed in Cricut Design Space® and cut on CTMH cardstock using a Cricut®! Whether you’re new to SVG files or a seasoned crafter, this step-by-step guide breaks it all down—spooky color combos, enchanting embellishments, and pro tips to bring Halloween Town to life! Get ready to craft something frightfully fabulous—because every memory deserves a little Disney magic!