
🍪✨ Handmade Christmas Baking Card (A2 Size) Inspired by My Cookies & Cocoa Scrapbook Layout! 🍪✨
- This Chick Loves Paper

- Nov 22, 2025
- 8 min read
Updated: Dec 16, 2025

💕 Bakers share treats. Crafters share cards. Life is sweet!
If my 12x12 Christmas Cookies & Cocoa scrapbook layout had a little sidekick who insisted on tagging along to the cookie exchange, this card would be it.
I started this project because our neighbors bake cookies every year! Cute little trays of treats that show up at our door for me and Lil Man like clockwork. This year, I’m gifting a box of assorted baking-themed cards, which they can use to go right back out into the world with their homemade goodies. If they’re spreading kindness from the kitchen, I’m spreading kindness from the craft room… and that feels like the sweetest holiday collaboration ever.
This Christmas Baking Card, inspired by My Christmas Cookies & Cocoa Scrapbook Layout, captures all the cozy baking vibes in a smaller, gift-ready format.
Time to preheat the paper oven, grab your cookie cutters (aka dies), and let’s get crafting like we mean it!
🎄 Materials You’ll Need for This Handmade Christmas Baking Card (A2 Size)
Christmas Baking Card Inspired by My Christmas Cookies & Cocoa Scrapbook Layout
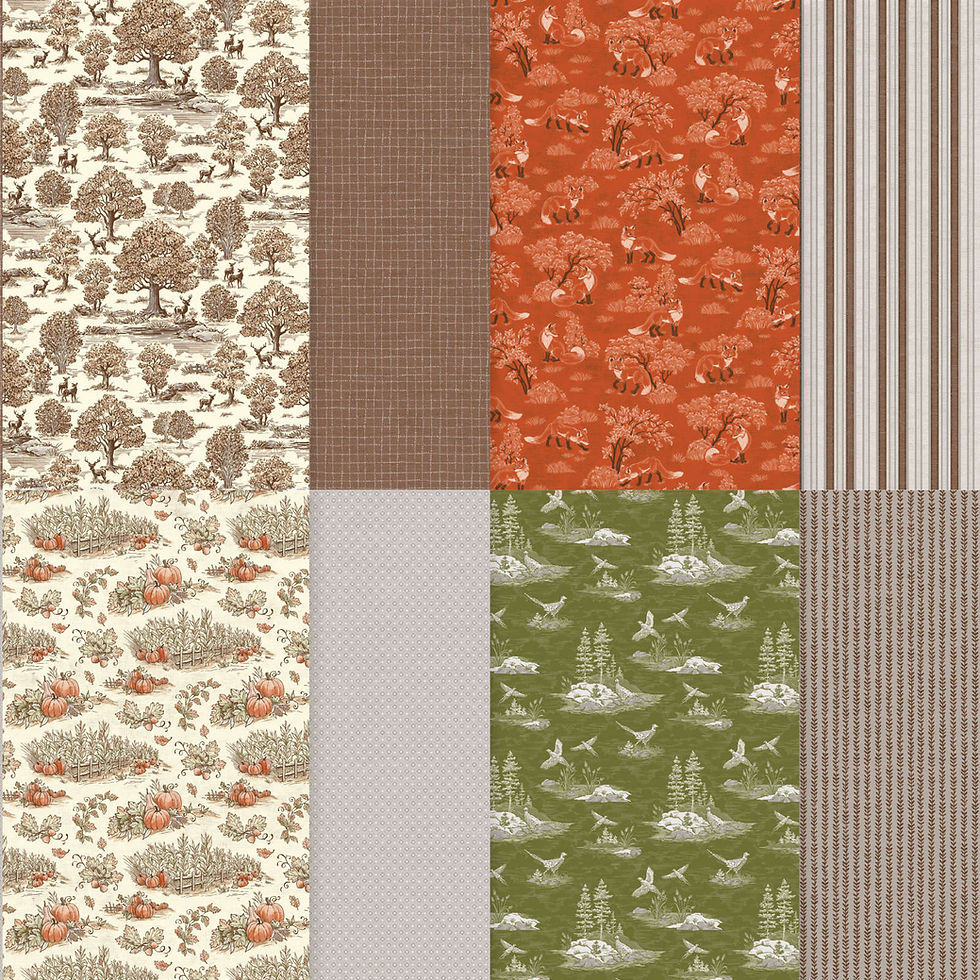
✨ Patterned Paper:
• Stampin’ Up!® Autumn Toil Designer Series Paper
🎨 Inks & Coloring:
• Stampin’ Up!® Early Espresso Classic Stampin’ Pad
• Stampin’ Up!® Real Red Classic Stampin’ Pad
Stampin' Up!® Crumb Cake Classic
Stamps & Dies


Stampin' Up! Homemade Treats Bundle
Stampin' Up! Delicate Pines Bundle
📄 Cardstock:


• Stampin’ Up!® Basic White Cardstock (stamped images, card base, sprigs)
• Stampin’ Up!® Real Red Cardstock (layered strips + stamped accents)
• Stampin’ Up!® Crumb Cake Cardstock (gingerbread + rolling pin)
• Stampin’ Up!® Early Espresso Cardstock (cookie sheet base + mat layer)
• Stampin’ Up!® Silver Foil Specialty Paper (cookie sheet metal layer)
🧰 Tools:


• Stampin' Up! Paper Trimmer
• MISTI® Stamping Tool
• Stampin' Up! Bone Folder
• Stampin' Up! Take Your Pick
🩹 Adhesives:
• Tombow Liquid Glue
• Aqua Liquid Glue
🎄 Step-By-Step: Bake This Card Like a Holiday Treat
Inspired by My Christmas Cookies & Cocoa Scrapbook Layout

This handmade Christmas Baking Card was born straight from my scrapbook table — literally.
I love creating companion cards for my layouts, especially for themed projects like this one.
It’s a fun way to stretch your supplies, use up leftover scraps, and keep the creative vibe flowing from page to paper.
When your scrapbook layout has this much personality, why not let the card share the same sweet, cozy energy? 🍪✨
🍫 Step 1: Bake the Card Base
Start with Stampin’ Up! Basic White Cardstock. Cut the sheet at 5½” along the long (11”) edge to create two horizontal A2 card bases.
Score each one at 4¼”, fold along the score, and crease with a bone folder for a crisp, professional finish.
Pro Tip: Score & fold with the raised (mountain) side on the inside. It keeps the fold clean instead of cracked—just like letting dough rest before you bake. 😄
🍪 Step 2: Slice Your Stripy Layers

This design mirrors the layout’s strip layering. Cut each strip to 5½” wide, then ink every edge with Early Espresso Classic Stampin’ Pad to mimic toasted cookie crust. Apply adhesive and install them from top to bottom, in this order:
• Real Red strip (≈⅛”)
• Striped DSP (¼”)
• Crumb Cake (½”)
• Real Red (¾”)
• Plaid DSP (1¼”)
Line them up neatly like rows of freshly sliced cookie dough. Straight alignment shows intention and brings structure to the scene.
Pro Tip: After inking your strips, let them dry for a moment before placing them on the card. Wet ink can leave little smudges where you don’t want them—especially if you slide a strip to straighten it.
📜 Step 3: Create a Double-Matted Sentiment Panel

Cut Early Espresso Cardstock to 4” x 3” and Basic White Cardstock to 3¾” x 2¾”.
Ink the edges of both pieces using the Early Espresso Classic Stampin’ Pad, and let them dry briefly so the edges don’t smear.
Once dry, adhere the white piece on top of the Early Espresso piece to create your double-matted “recipe card.”
Position in the center and adhere the mat to the card base.
🍴 Step 4: Stamp & Die-Cut Your Baking Crew

Using Basic White 8½” x 11” Cardstock, stamp your images in the following colors:
Gingerbread + rolling pin = Crumb Cake
Mitt + piping bag = Real Red
Next, create your cookie sheet in two layers:
Cut one cookie sheet from Early Espresso Cardstock
Cut one cookie sheet from Silver Foil Specialty Paper
Trim the foil version slightly smaller around the edges so the Early Espresso layer peeks out like a rim on real bakeware. Adhere the foil on top of the espresso piece.
To finish your ingredients, cut white sprigs using the Delicate Pines Dies. These will act as garnish around your cookie sheet — similar to powdered sugar or greenery that decorates treat trays.
🖋 Step 5: Stamp the Sentiment

Place this double mat onto your card front where it will eventually sit (don’t glue it down yet). Set your die-cut images on top of the mat in the exact arrangement you want in the finished cluster. With everything temporarily in place, position your sentiment stamp in the open space on the mat — this lets you see exactly where it should go.
Once you’re happy with the sentiment placement, gently remove the die-cuts, keep the stamp where it is, and move the mat into your MISTI®. Because your stamp is already aligned, you can now ink it with Early Espresso and stamp with confidence.
You can stamp using a clear block, but using a MISTI allows you to re-stamp in the exact same position if the first impression isn’t dark enough. Let the sentiment dry completely before you move on to adhering the die-cuts in a later step.
🍫 Step 6: Build the Cookie Tray Cluster

Before gluing anything, arrange all of your stamped pieces directly on the card the way you want them to appear on the finished card. This ensures everything fits the space and keeps your cluster from feeling crowded. Once you’re happy with the arrangement, begin adhering the pieces.
Start by gluing the cookie sheet to the mat — this anchors the scene. Tuck the white sprig underneath the bottom edge of the sheet so it angles toward the lower corner of the card. Angle the oven mitt across the sprig, leaving enough room for all three gingerbread cookies to sit comfortably on the tray.
Add the cookies to complete the main cluster.
Once the full tray cluster has dried, adhere any remaining baking pieces (such as the rolling pin or piping bag) to the card front, placing them near the scene like tools set down on a counter. These extras help tell the story and finish the “kitchen moment” without crowding the tray itself.
💡 Pro Tip: Glue the main cluster first, then add the smaller pieces last. Details work best as accents, not competition.
✨ Step 8: Add Sugared Pearl Accents

Once the inside of your card is complete, close it and return to the front panel. Now it’s time to “sugar” your cookie scene with Antique Pearls. Place them close to the main cluster — think of them as little sprinkles resting around the cookie tray. Keeping them near the focal point highlights your design instead of scattering the viewer’s attention across open space.
Use a small pick-up tool or tweezers so each pearl sits exactly where you planned it. A little precision here makes your cluster feel finished and intentional, just like carefully decorating real cookies fresh from the oven.
🎉 The Finished Card: A Snack-Sized Treat With Big Flavor

Fully baked, perfectly layered, and ready to deliver with the treats.
And just like that, this Handmade Christmas Baking Card (A2 size) is officially out of the oven! With its striped “cookie tray” layers, double-matted sentiment block, sugared pearl accents, and shiny metal cookie sheet, this little card carries all the cozy charm of my Cookies & Cocoa scrapbook layout. It’s the perfect treat to tuck in with a plate of Christmas cookies, neighbor gifts, or holiday care packages.
🔎 Explore More: Bake Up More Card Desserts
Craving more crafty confections? Explore my baking-themed and Christmas card projects — cocoa mugs topped with whipped-cream clusters, peppermint patterns, cookie-sheet die cuts, and frosted sentiments perfect for cookie swaps and neighbor gifts. Whether you love playful gingerbread or elegant “cocoa couture,” there’s a dessert-worthy project ready to inspire your next creative batch.
Want more cozy ideas like this Christmas Baking Card, inspired by My Christmas Cookies & Cocoa Scrapbook Layout? Dive into the gallery of sweet, handmade goodness! 🍪✨✨


Share Your Creations — What’s Cooking in Your Craft Room?

Show off your cookie-craft magic — we’re hungry for inspiration!
Have you made your own Handmade Christmas Baking Card or any baking-inspired project?
Whether it’s a cookie layout, a recipe scrapbook page, or a card celebrating holiday sweetness, share it in the Members Gallery! You might inspire someone else to turn family treats into keepsakes, cookie trays into cards, or holiday memories into handmade magic.
Let’s fill the gallery with creativity that smells like Christmas.
💥 Final Flourish: Creativity Is the Best Kind of Homemade

💥
Final Flourish: Creativity Is the Best Kind of Homemade
Craft it, gift it, keep it forever — the tastiest kind of handmade.
Cookies may disappear in a day, but a handmade card lasts long after the treats are gone. When you pair your Cookies & Cocoa scrapbook inspiration with this Handmade Christmas Baking Card, you’re not just making something cute — you’re creating a keepsake that carries warmth, whimsy, and a little holiday magic.
This card is more than layers and inked edges; it’s a moment captured, a memory shared, and a sprinkle of joy tucked inside an envelope. Whether it’s gifted with a tray of sweets, mailed to a friend, or added to your stash for someone special, it becomes part of the season’s story — your story.
So keep crafting, keep baking, and keep creating your own brand of holiday magic. Because when your heart leads the way, the handmade goodness always rises. ✨🍪
April — This Chick Loves Paper
🛒 Grab Your Supplies & Get Crafting!

Photo Disclaimer
All photos and projects are subject to copyright
Images © Stampin’ Up!®
The content in this blog is the sole responsibility of April Raine – This Chick Loves Paper as a Stampin’ Up!® Independent Demonstrator. The use of and content of classes, services, or products offered is not endorsed by Stampin’ Up!®
Create a handmade A2 Christmas Baking Card inspired by the Cookies & Cocoa scrapbook layout — a sweet, step-by-step tutorial from This Chick Loves Paper using baking-themed dies, warm inked edges, and cozy holiday layers.
Perfect for gift-giving, cookie exchanges, and pairing with homemade treats. 🍪✨.
⭐How I Protect My DSP, Cardstock & Finished Cards

I store my DSP, cardstock, scraps, and even finished cards in these clear resealable bags.
The 2-mil thickness is perfect for everyday crafting (they make a 4-mil option if you want extra durability!), and they’re tough, reusable, and great for keeping your entire crafting stash clean, tidy, and protected from the chaos of the craft room.
*As an Amazon Associate, I earn from qualifying purchases.
• 13×13 Plymor 2mil Zipper Reclosable Bags — for 12×12 DSP, cardstock sheets & scraps
• 9×12 Plymor 2mil Zipper Reclosable Bags — for 8.5×11 cardstock & scraps
• 6x8 Plymor 4mil Heavy Duty Reclosable Bags — for storing extra die cut embellishments & finished cards, card workshop kits


Comments