
🍔🔥 Handmade Bistro Burger Thank-You Cards (A2 Size) – A Step-by-Step Tutorial
- This Chick Loves Paper

- Jul 10, 2025
- 9 min read
Updated: Dec 16, 2025

Sometimes a card is more than just a card—it’s a moment, a memory, and a message that hits harder than the lunch rush on a Friday night.
This burger-themed beauty was handmade for my son’s hardworking crew at a local burger and steakhouse joint. As a new manager, he wanted to show appreciation to the teammates who really stepped up during a tough shift. When he asked,
“Could you make thank-you cards?”
You better believe I had my Cricut open and my spatula in hand before he even finished the sentence.
These bold, burger-stacked A2 cards are packed with fries, flames, and foam tape—all served up with a side of sass. Ready to craft a thank-you that sizzles? Let’s get flippin’. 🔥
🍟 Ingredients Needed For These Handmade Bistro Burger Thank-You Cards
📦 Cardstock


Stampin’ Up! Thick Basic White 8-1/2” x 11 Cardstock – Card base (8-1/2” x 11”)
Stampin’ Up! White Willow 12 X 12 Cardstock – Matting for sentiment + inside layer
Stampin’ Up! Basic Black 8-1/2” x 11 Cardstock – Tray, knife handle, sentiment letters, mat strips, utensils
Stampin’ Up! Poppy Parade 8-1/2” x 11 Cardstock – Inside “Awesome” letters & ketchup
Stampin’ Up! Pumpkin Pie 8-1/2” x 11 Cardstock – Flames
CTMH Sundance – Flame accents
Stampin’ Up! Brushed Silver Specialty DSP – Knife blade
🎨 Inks & Coloring Tools
Jet Black Stazon Ink – Sentiment stamping
Stampin’ Blends:
Cheese & Fries: LEMON LOLLY STAMPIN’ BLENDS COMBO PACK
Lettuce & Pickle: MOSSY MEADOW STAMPIN' BLENDS COMBO PACK
Flames: Outlined with PUMPKIN PIE STAMPIN' BLENDS COMBO PACK


🖋️ Stamps & Thin Cuts

Stampin’ Up! Bistro Burger Bundle – Stamped burger, sentiment, & knife
Cricut (Design Space) – Flames, utensils, “YOU,” custom text, inside sentiment
🧰 Tools & Adhesives


Cricut & Design Space
Foam Tape
Acetate (for optional ketchup cup)
⭐ Other Tools I Use in My Projects
*As an Amazon Associate, I earn from qualifying purchases.


Cricut® Essentials
• Cricut® Maker 3 — my primary cutting machine for titles, SVGs & embellishments
• Cricut® StandardGrip 12×12 Mat — 3 count used for cardstock, photo paper & labels
Printer
Canon® Printing System (Photos + Printable Cricut Elements)
• Canon TS9521C Crafting Printer — used for ALL printed project photos, journaling pieces, print-then-cut embellishments & titles
Photo Papers
• Canon Photo Paper Plus Glossy II (4×6, PP-301) → For 4x6 or smaller - printed photos
• Canon Matte Photo Paper (MP-101, 8.5×11) → Used for Cricut print-then-cut elements & titles
• Canon Double-Sided Matte Photo Paper (MP-101D, 8.5×11) → Also used exclusively for Cricut embellishments, icons, & layered pieces
Stamping & Precision Tools
• MISTI® Memory Size with 12-1/2" x 12-1/2" Stamping area — for borders, backgrounds & oversized stamping
• MISTI® Stamp Tool Bar Magnet - Additional magnet
Speciality Adhesives
• Tombow® Mono Aqua Liquid Glue — for corners, details & layered paper pieces
• Bearly Art Precision Craft Glue (4oz Original) — for embellishments & fine-detail gluing
• Tombow® Mono Air Touch Adhesive— my preferred tape runner for base
• Tombow® Mono Air Touch Adhesive, Refill 2-Pack — my preferred tape runner for base layers
Journaling Tools
• Avery® Easy Peel® Full-Sheet Clear Labels (8665) → Used for long typed journaling strips
• Avery® Clear Shipping Labels 2×4 (8663) → Used for short typed journaling strips or blocks
• Skaura Pigma Micron Fineliner Pens - Archival Black - Assorted Point Sizes - Used for handwritten Journaling
✂️ Step-by-Step: How I Built These Bistro Burger Beauties

🍔 1. Base & Stripes
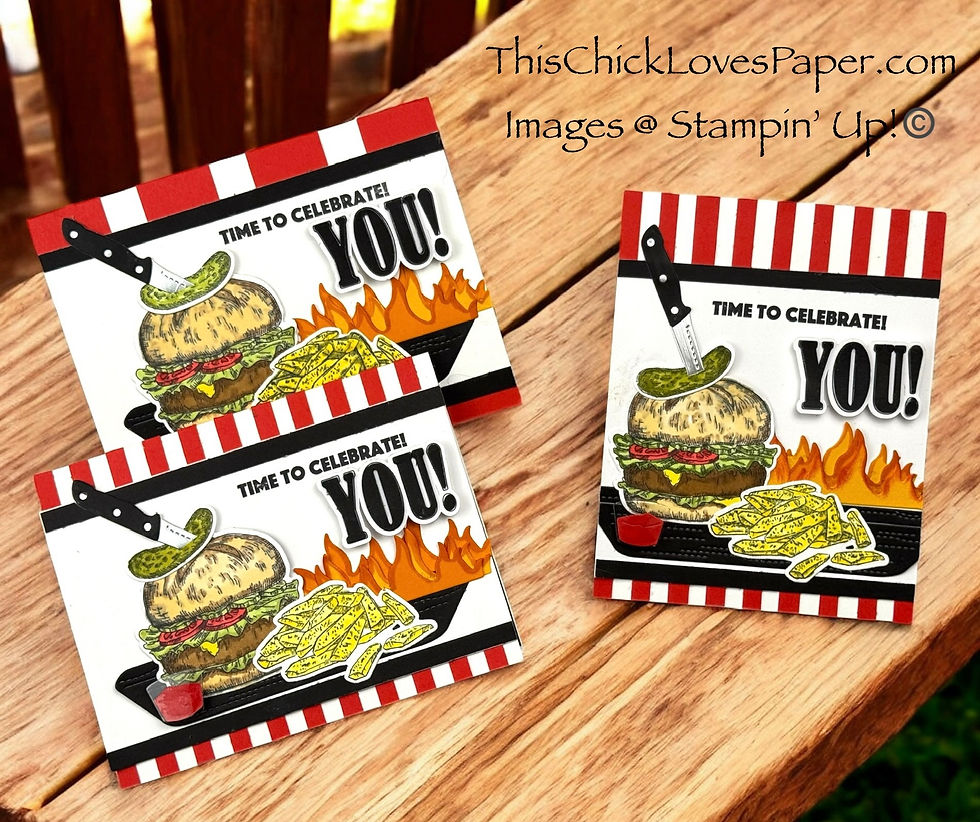
Cut Stampin’ Up! Thick Basic White cardstock to 5-1/2” x 8-1/2”, score at 4-1/4” to create an A2 card base.
Add your diner-style stripes using Poppy Parade cardstock:
• Vertical card: 1/4” x 5-1/2”
• Horizontal card: 1/4” x 4-1/4”
Adhere each strip 1/4” apart across the card front.
💡 Pro Tip: Want to reduce bulk and save cardstock? Try 1/4” x 1-1/2” stripes instead. Just know they take a little more time to apply!

🖤 2. Mat & Sentiment
• Vertical Card Mat: 4-1/4” x 4-1/4”
• Horizontal Card Mat: 5-1/2” x 4”
Use Basic Black Two-Tone cardstock to cut two 1/4” strips and adhere them to the top and bottom of the mat.
Stamp “Time to Celebrate” in Jet Black Stazon on the White Willow mat—just under the top black strip, aligned toward the right corner.
3. Embellishment Prep
It’s time to fire up the flavor—let’s get these layers grilled and ready!
Start by stamping your main embellishments from Stampin’ Up! Bistro Burger Bundle onto White Willow cardstock using Jet Black Stazon Ink. You’ll need to stamp the:
• 🍔 Burger • 🥒 Pickle • 🍟 Fries

Once stamped, color each piece using your Stampin’ Blends (see the full color breakdown above in the Materials section). This is where your burger comes to life with mouthwatering detail—buns toasted, lettuce crisp, and cheese oh-so-melty.
Next, die-cut the flame accents from the Bistro Burger Bundle using:
• Pumpkin Pie cardstock
• Sundance cardstock (CTMH 12x12 Two-Tone)
Use the Pumpkin Pie Stampin’ Blend to ink around the edges for a flickering, fiery finish that turns up the heat.
For the knife, grab your scraps:
• Cut the blade from Brushed Silver Specialty DSP
• Cut the handle from Basic Black 12x12 Two-Tone Cardstock
The serving tray (also known as a burger basket) is die-cut from the Bistro Burger Bundle using Basic Black 12x12 Two-Tone Cardstock. Sleek and simple, it anchors the scene like a real fast-food tray would!
Optional but saucy: Die-cut the ketchup dollop using Poppy Parade cardstock for the ketchup and acetate for the cup. This fun little extra adds unexpected dimension and ties the whole meal—er, card—together!
📌 Pro Tip: When coloring with Stampin’ Blends, let each layer dry before adding more detail. It helps prevent bleeding and gives you that professional, smooth-blend look every time.
🧑🍳 4. Layer & Build That Burger Front
Start layering on the card base front:


• Adhere the black tray close to the bottom black strip of the mat.
• Place (but don’t glue!) the burger so you can position the flames—some will tuck slightly behind the tray for dimension.
• Once flames are adhered, insert the pickle and knife into the slit in the burger bun—yes, that awesome pre-cut detail comes with the stamp!
• Re-check the placement so the knife doesn’t stick off the card edge, especially for horizontal cards. Then, adhere the burger in place.
• Add the fries last, overlapping the burger slightly for extra depth.
🔤 5. Building the “YOU” Sentiment

This is one of my signature techniques!
• I used Cricut’s print & cut to create a flat “YOU” word.
• Then, I cut five of each letter in Basic Black cardstock, stacked four of each, and glued them together.
• Once dry, I adhered the stacked letters on top of the print & cut layer.
• The entire finished word was mounted with foam tape to make the “YOU” pop more than anything else, highlighting the person receiving the card!
🍅 6. Optional Ketchup Cup
On a few cards, I added a ketchup cup to the bottom corner:
• Ketchup: Poppy Parade cardstock
• Cup: Acetate
This was the only other element (besides the “YOU”) that used foam tape, but it added just the right touch of pop without stealing the spotlight!
✉️ Inside the Card: Flames, Flair & Flippin’ Fun
Before we dive into the inside details, let’s clear something up real quick…

Yes—there’s a “your” where some grammar-loving folks might expect a “you’re.” But that little slip? Totally intentional. 😉
It’s actually a nod to one of the running jokes between my son, his fellow manager, & team members. As the youngest on the team, he takes a little playful ribbing, and one of them just happened to be, “Bet you don’t even know the difference between your and you’re!” So, for extra sizzle, that joke made it into the card! Because around here, paper burgers come with a side of sass… and grammar rules? They’re more like loose guidelines. 🍔🔥
Now, back to the build:
Double-mat the inside with:
Basic Black (slightly smaller than card base)
White Willow (layered on top)
I used Cricut to design a custom printed sentiment specific to my son’s workplace—and added more flames (same file as the front) using Pumpkin Pie & Sundance cardstock, inked with a Pumpkin Pie Blend.
To finish it off, I layered Cricut-cut cooking utensils over the fire, just for fun. Because if the front says flippin’, the inside better be cookin’. 🍳🔥
🍔 The Finished Handmade Thank-You Cards – From Fast Food to Full-On Bistro Burger Flair!

This burger card is a bold bite of custom cuts, diner vibes, and heartfelt gratitude—handmade to celebrate the crew who showed up, stepped up, and kept the grill runnin’.
Some cards featured vertical stripes and plenty of space for dramatic toppings. Others took a horizontal route with wide red stripes for that extra retro feel. I even played around with alternate ketchup cups and different utensil placements—because when you’re cooking with paper, you get to plate it your way.
And while the bold colors and burger stack scream masculine card, don’t be fooled—this design is fun, fiery, and perfect for anyone. Two of my son’s coworkers who received these cards were fierce, hard-working chicks, and let me tell you—they ate it up! 😍🍟
Whether you’re thanking a teammate, celebrating a first job, or crafting something just because, this card’s got range. It’s flippin’ fun, full of heart, and ready to serve.
🍽️ Explore More: Scrapbook Layouts & Cards Cooked to Perfection
If this burger card made your heart sizzle, you’re going to love what’s cookin’ in the gallery! From food-themed scrapbook layouts to pun-filled handmade cards, I’ve stacked up a whole buffet of paper-crafted deliciousness.
These projects go beyond “masculine” and straight into mouthwatering territory—perfect for anyone who loves a good meal and a great story.


📸 Share Your Creations — Show Us What’s Cookin’ In Your Craft Room!

Whipped up a burger card of your own? Built a layout that would make a diner chef proud? Maybe you crafted something so cute it should come with its own combo meal! 🍔✨
Upload your project to the Members Gallery and give us a taste of your creative flavor. Tell us who it was for, what inspired it, or which detail made you say, “Ohhh, that’s delicious.”
Your crafty concoctions might be exactly what another maker needs to spark their next idea — because in this community, we’re always hungry for inspiration. 😄🔥
Final Thoughts from the Grill — Where Crafting Meets Heart 🍔💛
Diner stripes, stacked burgers, and a pickle on top? Oh yes… this card brought the heat. But beneath the fries and flames, this project was really about connection — a mama helping her kid show leadership, gratitude, and heart in the most handmade way possible.
When he came home and said, “They LOVED the cards… can you make more?”
That was the real five-star review. ⭐⭐⭐⭐⭐
Because sometimes appreciation looks like a paper burger, a hand-cut flame, and a whole lot of love layered in between.
So keep crafting the moments that matter — the funny ones, the heartfelt ones, and the deliciously unexpected ones.
And always, always keep it flippin’ fun. 💛🔥
April – This Chick Loves Paper
🛒 Grab Your Supplies & Get Crafting!

All photos and projects are subject to copyright © ThisChickLovesPaper.com.
Images © Stampin’ Up!®
The content in this blog is the sole responsibility of April Raine – This Chick Loves Paper as a Stampin’ Up!® Independent Demonstrator. The use of and content of classes, services, or products offered is not endorsed by Stampin’ Up!®
Fire up your next handmade thank-you with these burger-themed A2 cards!
Created with the Stampin’ Up! Bistro Burger Bundle, Cricut embellishments, and bold diner-inspired stripes, these Bistro Burger Handmade Thank-You Cards are perfect for team appreciation, masculine designs, and food-themed paper projects.
⭐How I Protect My DSP, Cardstock & Finished Cards

I store my DSP, cardstock, scraps, and even finished cards in these clear resealable bags.
The 2-mil thickness is perfect for everyday crafting (they make a 4-mil option if you want extra durability!), and they’re tough, reusable, and great for keeping your entire crafting stash clean, tidy, and protected from the chaos of the craft room.
*As an Amazon Associate, I earn from qualifying purchases.
• 13×13 Plymor 2mil Zipper Reclosable Bags — for 12×12 DSP, cardstock sheets & scraps
• 9×12 Plymor 2mil Zipper Reclosable Bags — for 8.5×11 cardstock & scraps
• 6x8 Plymor 4mil Heavy Duty Reclosable Bags — for storing extra die cut embellishments & finished cards, card workshop kits


Comments