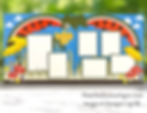
🍉🐞 A Bug’s Land 12×12 Scrapbook Layout — A Whimsical Disney-Inspired Garden Scene That Brings the BOOM!
- This Chick Loves Paper
- Jan 10
- 13 min read
Updated: Jan 10

When Disney closed Bug’s Land to make room for Marvel, I won’t lie — I cried a little. That tiny world of oversized flowers, glowing mushrooms, and adorable characters had such a special charm, especially when seen through your child’s eyes. Everything felt larger than life because you suddenly felt so small.
So for this layout, I wanted to do something BIG.
Not just a scrapbook page… But a full immersive scene that would pull you straight into that shrunken-down Bug’s Life perspective.
Giant flowers bending overhead. Layered grass taller than the characters. A huge slice of watermelon acting as a whimsical “prop.” Sunshine-yellow coneflowers that frame the page like real Disney set pieces. And of course — tiny bugs bringing the charm, including the ones cut from Stampin’ Up!’s Cute as a Bug DSP.
When I say this layout was FUN to build… I mean FUN!
Scene building is my happy place — and this Disney Bug’s Land Scrapbook Layout instantly became one of my favorites ever.
Grab your rake, gloves & watering can, because we’re stepping into the garden!
A bug’s land scrapbook layout - What You’ll Need to Create This Garden Wonderland

🌼 Pattern Paper
Stampin’ Up!® Cute as a Bug DSP
Used for the layered grass (light + dark patterns)
Used to die-cut the little bug embellishments
Purchase items separately, or grab the Cute As A Bug Suite Collection here:
🧡 Cardstock


Stampin’ Up!® Azure Afternoon 12x12” Two Tone Cardstock — base pages.
Stampin’ Up!® Mossy Meadow 12x12” Two Tone Cardstock — photo mats, banana leaves
Stampin’ Up!® White Willow 12x12” Cardstock — photo mats, clouds
Stampin’ Up!® Poppy Parade 12x12” Two Tone Cardstock — watermelon layers, mushroom caps
Stampin’ Up!® Daffodil Delight 12x12” Two Tone Cardstock — coneflower petals, tiny accent flowers
Stampin’ Up!® Early Espresso 12x12” Two Tone Cardstock — bottom border strip, coneflower centers, watermelon seeds
Stampin’ Up!® Basic Beige 8-1/2"x11” Cardstock — mushroom stems
🌼 Stamps & Dies

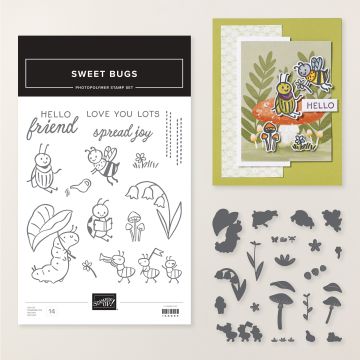

Stampin’ Up!® Sweet Bugs Bundle (stamps + dies)
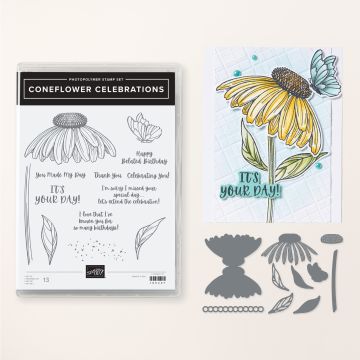
Stampin’ Up!® Coneflower Bundle
🎨 Inks


Stampin’ Up!® Daffodil Delight Classic Stampin’ Pad — shading coneflower petals
Stampin’ Up!® Mossy Meadow Classic Stampin’ Pad — inking grass edges
CTMH Intense Black Ink Pad — edge-dragging photo mats
🛠 Tools & Adhesives

Stampin' Cut & Emboss - Die Cutting Embellishments
Blending Brushes — shading petals + ink blending
Paper Trimmer + Scissors
3-D Foam Tape
Cricut Maker — grass, watermelon, clouds, leaves, mushrooms, title
⭐ Other Tools I Use in My Projects
*As an Amazon Associate, I earn from qualifying purchases.


Cricut® Essentials
• Cricut® Maker 3 — my primary cutting machine for titles, SVGs & embellishments
• Cricut® StandardGrip 12×12 Mat — 3 count used for cardstock, photo paper & labels
Photo & Embellishment Papers
• Canon Photo Paper Plus Glossy II (4×6, PP-301) → For 4x6 or smaller - printed photos
• Canon Matte Photo Paper (MP-101, 8.5×11) → Used for Cricut print-then-cut elements & titles
• Canon Double-Sided Matte Photo Paper (MP-101D, 8.5×11) → Also used exclusively for Cricut embellishments, icons, & layered pieces
Printer
Canon® Printing System (Photos + Printable Cricut Elements)
• Canon TS9521C Crafting Printer — used for ALL printed project photos, journaling pieces, print-then-cut embellishments & titles
Speciality Adhesives
• Tombow® Mono Aqua Liquid Glue — for corners, details & layered paper pieces
• Bearly Art Precision Craft Glue (4oz Original) — for embellishments & fine-detail gluing
• Tombow® Mono Air Touch Adhesive— my preferred tape runner for base
• Tombow® Mono Air Touch Adhesive, Refill 2-Pack — my preferred tape runner for base layers
🌿✨ BEFORE WE DIG IN: Using Cricut Design Space to Build the Scene

Let’s talk about Design Space for a second — because this layout would not exist without it.
I’m a visual crafter. I need to SEE the page before I cut a single piece of cardstock.
Design Space lets me:
Drop in shapes as placeholders
Resize embellishments
Preview stamps, dies, and SVGs
Mock up mats, clusters, and scene elements
Test colors before committing
And yes… even decided that a white background was NOT giving and switched to Azure Afternoon, which brought this whole layout to life.
For this project, I imported embellishments similar to the Stampin’ Up! Sweet Bugs Bundle, mixed in actual Disney-inspired character SVGs, and mocked up the entire scene before touching my trimmer.
And guess what?
You’ll be able to download the non-licensed Cricut cut files (grass, watermelon slices, leaves, clouds, and more) using the button I’ll add for you on the blog. 🌟
Licensed characters, of course, have to be removed — but all the magic-building pieces will be ready for you.
It’s Go Time! Let’s Craft a Bug-Sized Wonderland Step-By-Step
Okay friend, it’s officially crafting o’clock! Let me show you how this entire bug-sized world came to life, one juicy watermelon slice and tall blade of grass at a time. Follow along, and you’ll be in Bug’s Land before you know it.
Step 1 — Let’s Build That Bug’s-Eye View Background
I started by laying down two sheets of

Stampin’ Up!® Azure Afternoon 12×12” Two Tone Cardstock.
This cardstock has a light side and a dark side — so you’re basically getting two colors in one sheet.
For this layout, I chose the dark side to create a deeper and more vibrant scene.
At the bottom of each page, I added a 12” × ½” strip of Stampin’ Up!® Early Espresso 12x12” Two Tone Cardstock. Think of it as the garden bed — the “dirt” that grounds the entire page and helps everything above it feel taller, bigger, and more whimsical.
PRO TIP: Edge-inking the Early Espresso strip just slightly adds instant depth. It’s subtle… but your eye feels it.
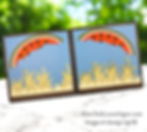
Step 2 — Watermelon Wonderland (Yes, It’s a Giant Bug-Sized Snack)

Next came the big scene anchor — the watermelon slices.
I cut all the watermelon layers on my Cricut using the dark sides of my Two Tone cardstock for maximum contrast and bold, juicy color:
• Poppy Parade — main watermelon flesh (dark side)
• Mossy Meadow — rind (dark side)
• White Willow — the inner rind highlight (White Willow is NOT Two Tone — it is a true solid white)
• Basic Black — the watermelon seeds
A super light drag across the pad adds that illustrated, storybook-style outline — and once it dries, the pieces layer together beautifully. I then glued the seeds into place to finish off each slice.

In a perfect world, I wanted one huge arch spanning both 12×12 pages… but Cricut said, “lol nope,” so two slices it was.
To fake that big dramatic arch, I:
angled each slice so the rounded ends “kiss” toward the center seam
positioned them high enough to frame the layout without crowding the photos
used the measurements on my Close to My Heart mat to repeat the placement on both pages
Left slice: sits roughly between the 1”–10” marks across the top grid, dropping to about the 3” vertical line at its lowest dip.
Right slice: mirrors the left — same height, same inward tilt — so together they create the illusion of one big curved watermelon canopy.
And trust me… I laid out the ENTIRE page (yes, all six mats and all the coneflowers!) multiple times before committing. Getting these slices right makes everything downstream look intentional and magical.
Step 3 — Growing the Grass (Tall Enough to Hide a Bug!)

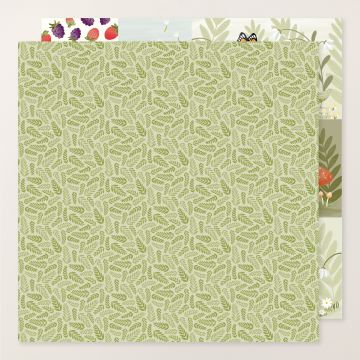

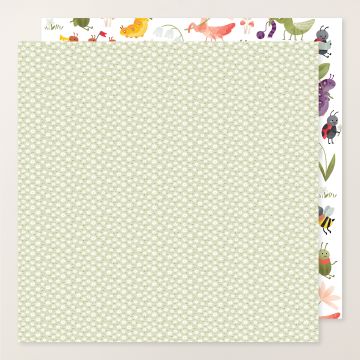
Using Stampin’ Up!® Cute as a Bug DSP, I cut two different grass patterns — one lighter, one darker — on my Cricut so each blade had that perfectly wavy Bug’s Land shape.
My original SVG file actually calls for three full sets of grass, but here’s the crafty truth: the taller grass pieces would have required one and a half sheets of DSP, and I wanted to save my second sheet. So I chose to cut two sets instead of three, knowing the photo mats would cover some of the lower areas anyway.
To add natural depth and dimension, I inked the tips of each blade with Stampin’ Up!® Mossy Meadow Classic Stampin’ Pad. That tiny bit of shading makes patterned DSP look like layered cardstock — without the bulk.
When positioning the grass on the layout, arrange it so the blades peek through the photo mats in the spots you want highlighted.
You’ll notice in my photos that there’s one area with a larger gap, but that section gets fully covered by a mat, so the “missing grass” is never seen.
If you decide to cut all three sets of grass from the Cricut file, that gap disappears entirely & you have fuller grass layers. The Choice is yours!
Once everything was adhered across the bottom of both pages, the whole scene clicked! Suddenly, the page had height, movement, and that perfect bug’s-eye point of view.
Step 4 — Sunshine Coneflowers to Frame the Page
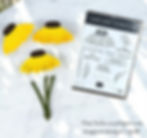
Time to build those gorgeous Stampin’ Up!® Coneflowers — the scene-stealing blooms that make this whole layout feel straight out of Bug’s Land. This die set is brilliantly designed: you get one die that cuts the full solid flower base and another that cuts an entire row of connected petals in a single pass. For this layout, I kept it simple but dimensional by using the solid base plus one row of petals.
Each flower was cut from Stampin’ Up!® Daffodil Delight 12×12 Two Tone Cardstock, and to give them that warm sunlit glow, I brushed Daffodil Delight ink around the edges.
The centers were cut from Early Espresso Two Tone Cardstock for that perfect contrasting pop. Then I added stems cut from the dark side of Mossy Meadow and inked them lightly with CTMH Intense Black to give them definition before they ever touched the page.

Once the blooms were ready, it was time to position them — and here’s where things get layout-strategic. Because these coneflowers are beautifully large (and absolutely the stars of the clusters), I placed them before adding any photo mats.
Doing this ensured they sat exactly where I wanted: one to be tucked slightly behind the main photo for that cinematic layered moment, and the other perched on the right page to balance the entire scene. After they were set, I added the mats so each bloom peeked out just enough to feel magical without overpowering the photos.
Step 5 — Double-Matted Photo Magic
For a scene page like this, photos need structure — something strong enough to stand out, but soft enough not to overpower the garden. So I double-matted all six photos using Stampin’ Up!® Mossy Meadow and White Willow cardstock.
Here’s the sizing breakdown, grouped the way scrapbookers actually think through mats:

Main Photo (1 total)
Mossy Meadow mat: 4½” × 6½”
White Willow mat: 4¼” × 6¼”
Photo: 4” × 6”
Vertical Photos (3 total)
Cut three sets at these sizes:
Mossy Meadow mats: 3½” × 4½”
White Willow mats: 3¼” × 4¼”
Photos: 3” × 4”
Horizontal Photos (2 total)
Cut two sets at these sizes:
Mossy Meadow mats: 4½” × 3½”
White Willow mats: 4¼” × 3¼”
Photos: 4” × 3”
Each Mossy Meadow mat was edge-dragged with CTMH Intense Black Ink to give it that whimsical, illustrated border. The White Willow mats were inked the same way, so everything layers with a crisp, defined frame and stays perfectly visible against the busy background.
⭐ Step 6 — Build the Sky: Leaves, Clouds & Center-Stage Title Magic
With the ground and flowers finished, it was time to pull the scene upward and build out the “sky.” I started by cutting the banana leaves on my Cricut from the dark side of Stampin’ Up!® Mossy Meadow 12x12” Two Tone Cardstock.
These leaves are layered cuts — a solid base plus a detailed top layer — which gives them instant depth without a ton of work.
Placing the Left & Right Leaves

These banana leaves actually sit at the center of the large watermelon arch on each page. Their curved shape helps visually stretch the garden upward and frames the top of the scene beautifully.
Creating the Perfect Center Leaf (Cross-Page Technique!)

The third leaf needed to sit exactly in the middle of the arch — half on the left page, half on the right — so here’s how I placed it:
I pushed both pages together edge to edge so they formed one continuous canvas.
I positioned the leaf right between the first two leaves, centering it perfectly.
I adhered the leaf only to the left page first and let it dry.
Once secured, I trimmed the excess leaf along the page edge.
Then I aligned the trimmed piece onto the right page and adhered it so the design connects seamlessly when the layout is open.
This keeps the leaf perfectly aligned, whether the pages are side-by-side or in the album.

Adding Puffy Clouds (Without Foam Tape!)
Next came the clouds — all cut from White Willow Cardstock and stacked three layers high. This little trick gives them a soft, dimensional look while keeping the page flat and album-friendly.
Centering the Title for Maximum Impact
To finish the structure, I added the layered A Bug’s Life title — an SVG cut on my Cricut.
And instead of placing it in my usual upper-left spot, I tucked it right between the two watermelon slices, letting the leaves, clouds, and arch frame it naturally.
Centered and elevated like that, the title becomes the perfect focal point for the entire spread.

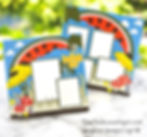
⭐ Step 7 — Mushrooms, Bugs & Final Disney Details
Now for the fun little touches that bring the garden to life. I added mushrooms — cut from Poppy Parade and Basic Beige — along with tiny Daffodil Delight flowers to build soft clusters on both pages. Then I brought in the sweet little bugs from the Cute as a Bug DSP, mixing flat and popped-up pieces for movement. I also cut a few A Bug’s Life–inspired character SVGs on my Cricut and layered them into the clusters, giving the whole scene that extra dose of Disney personality.

For finishing touches, I added two Hidden Mickeys (because it’s Disney… obviously). One hides in the leaves, the other in the grass — subtle enough to be charming, clear enough to make someone smile when they spot them. I also tucked a small journaling flip flap behind one mat, giving plenty of room for extra notes without interrupting the design.
Just like that, the last details clicked into place — and the whole garden felt complete, lively, and full of tiny-world magic.
BOOM! The Garden Is Built & Bugs’ Land Comes Alive
And just like that… BOOM!
The garden is built, the bugs are buzzing, the flowers are glowing, and this scrapbook spread is officially serving Bug’s Land realness. It’s layered, it’s whimsical, it’s full of Disney charm — the kind of layout that makes you smile every time you flip to it. Scene-building magic at its finest.
Ready for More Pixie Dust? Explore My Disney-Inspired Layouts!
If this layout had you whispering “I miss Bug’s Land…” trust me — you’re in good company.
Take a stroll through more of my Disney scrapbook layouts, where magic meets memory-keeping and every page feels like stepping into the park. From character meet-and-greets to parade-day sparkle, you’ll find plenty of pixie-dusted inspiration ready to jumpstart your next crafty adventure.


Your Turn, Crafty Friend — Show Me Your Bug-Sized Magic!
If this little garden scene sparked something inside you — whether it was the layered grass, the sunshine coneflowers, that juicy oversized watermelon, or simply the urge to dive into your Disney photos — I want to see your version come to life.
One of my favorite parts of sharing layouts like this is watching how YOU take the idea and twist it into something completely your own. Maybe your colors shift, maybe your clusters bloom differently, maybe you tuck your title somewhere unexpected…
Whatever direction your creativity wanders, it deserves to be celebrated. So bring your magic into the Members Gallery, friend! Upload your layout, show off your scene-building skills, and let our whole community cheer you on.
A Sweet Farewell to a Tiny World With a Big Heart
“A Bug’s Life” has always been about seeing the world from a new perspective — and this layout does exactly that.
It invites you to shrink down, look up, and remember how magical the small things really are.
Whether you rode Heimlich’s Chew Chew Train a hundred times or wandered through Bug’s Land soaking in the charm, these memories deserve a layout that feels alive.
And this one?
This one tells the story beautifully.
With that said… May your glue dry fast, your colors stay bright, and your memories always feel larger than life.
April — This Chick Loves Paper
🛒 Grab Your Supplies & Get Crafting!

All photos and projects are subject to copyright © ThisChickLovesPaper.com.
Images © Stampin’ Up!®
This content is the sole responsibility of April Raine – This Chick Loves Paper, Independent Stampin’ Up!® Demonstrator. The use of and content of classes, services, or products offered is not endorsed by Stampin’ Up!®
Create a 12×12 double-page Disney Bug’s Land scrapbook layout with this step-by-step tutorial by This Chick Loves Paper. Featuring six photos, a curved watermelon-arch scene, layered grass, sunshine coneflowers, character SVGs, and immersive garden-style scene building, this A Bug’s Life-inspired scrapbook idea brings Disney memories back to life with bold colors and whimsical dimension.

⭐How I Protect My DSP, Cardstock & Finished Cards
*As an Amazon Associate, I earn from qualifying purchases.
I store my DSP, cardstock, scraps, and even finished cards in these clear resealable bags.
The 2-mil thickness is perfect for everyday crafting (a 4-mil option is also available for extra durability), and they’re tough, reusable, and great for keeping your entire crafting stash clean, tidy, and protected from the chaos of the craft room.
Different sizes available! Here are the ones I use the most:
• 13×13 Plymor 2mil Zipper Reclosable Bags — for 12×12 DSP, cardstock sheets & scraps
• 9×12 Plymor 2mil Zipper Reclosable Bags — for 8.5×11 cardstock & scraps
• 6x8 Plymor 4mil Heavy Duty Reclosable Bags — for storing extra die cut embellishments & finished cards, card workshop kits
⭐ Stamping & Journaling Tools I Use in My Projects
Stamping & Precision Tools
• MISTI® Memory Size with 12-1/2" x 12-1/2" Stamping area — for borders, backgrounds & oversized stamping
• MISTI® Stamp Tool Bar Magnet - Additional magnet
Journaling Tools
• Avery® Easy Peel® Full-Sheet Clear Labels (8665) → Used for long typed journaling strips
• Avery® Clear Shipping Labels 2×4 (8663) → Used for short typed journaling strips or blocks
• Skaura Pigma Micron Fineliner Pens - Archival Black - Assorted Point Sizes - Used for handwritten Journaling