
🏎️ Radiator Springs Adventure: A 12x12 Disney-Inspired Cars Scrapbook Layout – A Collab with Jayma Malme & Friends!
- This Chick Loves Paper

- Oct 28, 2025
- 10 min read
Updated: Jan 27

Buckle up, paper lovers—because this 12x12 Disney-Inspired Cars Radiator Springs scrapbook layout is about to take your crafting into overdrive. 🏁 When Jayma Malme puts out a new sketch, you just know it’s going to spark something magical—and this one definitely did. Her design inspired me to rev up my die-cuts and create a full-on Radiator Springs scene filled with layered mountains, winding roads, and that iconic Route 66 flair.
This layout is the perfect pit stop for your Cars Land adventure, Radiator Springs Racers ride photos, or those Lightning McQueen and Mater meet-and-greet moments. So grab your paper trimmer, foam tape, and a strong cup of creative fuel, because we’re about to build something bold, dimensional, and faster than you can say Ka-Chow!
🏗️ How This 12x12 Disney-Inspired Cars Scrapbook Layout Came Together!
Normally, this is where I’d list out every cut, layer, and measurement step-by-step, but since this design is based on a sketch created by Jayma Malme, I’m keeping those details under wraps out of respect for her original work.
Don’t worry, though... I’ve still got you covered! Below, I’ll walk you through the creative process and design strategy so you can still recreate your own 12x12 Disney Cars Radiator Springs scrapbook layout with all the texture, layers, and dimension that make it vroom-worthy. 🏁
Cardstock & Specialty Paper


Base: Stampin' Up! White Willow
Mountains: Stampin’ Up! Pecan Pie & Early Espresso
Photo Mats: Stampin' Up! Poppy Parade + White Willow
Road: Stampin' Up! Basic Black
Metal Panel: Stampin' Up! Brushed Silver or Silver Foil Specialty Paper
Embossing Folders (3D), Embellishments & Details


Modern Herringbone 3D Embossing Folder – for that realistic tire-track road texture
Metal Plate 3D Embossing Folder – adds shine and pit-stop polish
Industrial Trinkets – metal-corner accents for that “custom garage” look
Dies & Stamps


Stampin' Up! Scenic Adventure Bundle – mountains & tree line
Stampin' Up! Deckled Circle Dies – embellishment cluster bases
CTMH Let’s Party Scrapbooking Stamp + Thin Cuts – bold checkered border
Inks
Close To My Heart Intense Black Ink – for inking edges of circles and accents
Stampin’ Up! Early Espresso Classic Stampin' Pad Ink – for mountain shading and depth
Tools


Stampin’ Cut & Emboss Machine – for dies and 3D embossing folders
Stampin’ Seal – quick, clean adhesive for layering
Sponge Daubers - for inking edges
⭐ Other Tools I Use in My Projects
*As an Amazon Associate, I earn from qualifying purchases.


Cricut® Essentials
• Cricut® Maker 3 — my primary cutting machine for titles, SVGs & embellishments
• Cricut® StandardGrip 12×12 Mat — 3 count used for cardstock, photo paper & labels
Printer
Canon® Printing System (Photos + Printable Cricut Elements)
• Canon TS9521C Crafting Printer — used for ALL printed project photos, journaling pieces, print-then-cut embellishments & titles
Photo Papers
• Canon Photo Paper Plus Glossy II (4×6, PP-301) → For 4x6 or smaller - printed photos
• Canon Matte Photo Paper (MP-101, 8.5×11) → Used for Cricut print-then-cut elements & titles
• Canon Double-Sided Matte Photo Paper (MP-101D, 8.5×11) → Also used exclusively for Cricut embellishments, icons, & layered pieces
Stamping & Precision Tools
• MISTI® Memory Size with 12-1/2" x 12-1/2" Stamping area — for borders, backgrounds & oversized stamping
• MISTI® Stamp Tool Bar Magnet - Additional magnet
Speciality Adhesives
• Tombow® Mono Aqua Liquid Glue — for corners, details & layered paper pieces
• Bearly Art Precision Craft Glue (4oz Original) — for embellishments & fine-detail gluing
• Tombow® Mono Air Touch Adhesive— my preferred tape runner for base
• Tombow® Mono Air Touch Adhesive, Refill 2-Pack — my preferred tape runner for base layers
Journaling Tools
• Avery® Easy Peel® Full-Sheet Clear Labels (8665) → Used for long typed journaling strips
• Avery® Clear Shipping Labels 2×4 (8663) → Used for short typed journaling strips or blocks
• Skaura Pigma Micron Fineliner Pens - Archival Black - Assorted Point Sizes - Used for handwritten Journaling
🌄 Scene Building: Crafting the Magic of Radiator Springs

Every great layout starts with a story—and this one began the moment I pictured standing in line for Radiator Springs Racers. You know that feeling: surrounded by red-rock cliffs, desert roads curling around you, the sound of engines echoing in the distance, and the thrill of spotting Lightning McQueen zip past.
That’s exactly what I wanted this layout to feel like.
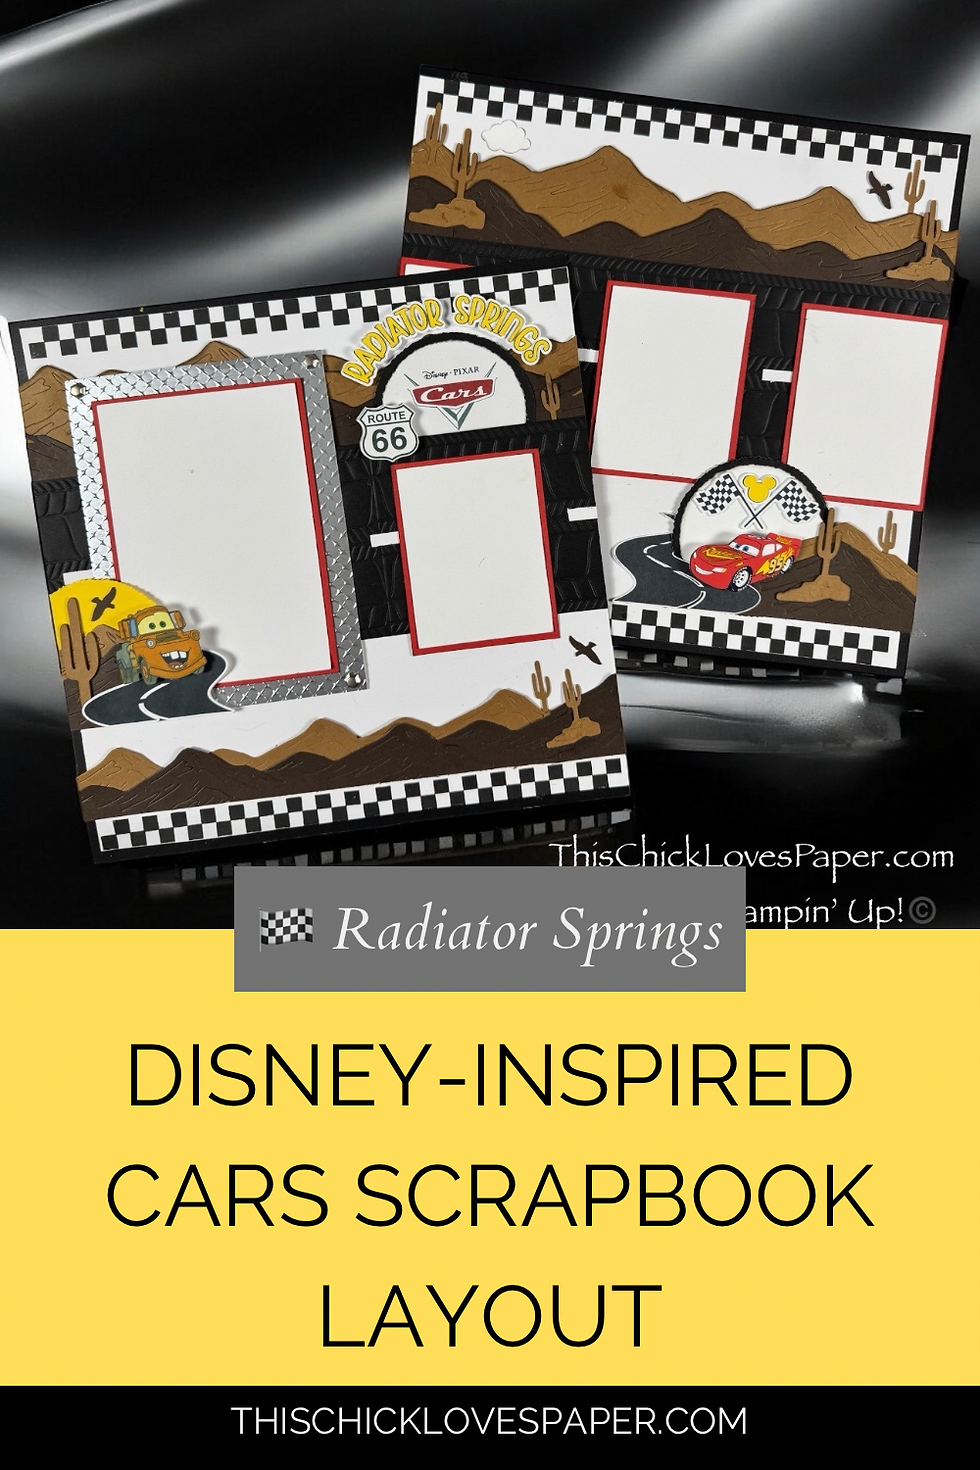
The layered Pecan Pie and Early Espresso mountains capture those famous desert ridges, while the Herringbone-embossed tire track adds that gritty, race-day realism. The Cricut-cut roads winding through the page are my nod to Route 66 — the true heart of Cars. Add in the racing flags, Mater, and Lightning, and suddenly you’re not just looking at paper… you’re in Radiator Springs.
That’s the magic of scene building: using color, texture, and thoughtful design to transport your memories straight back to the moment they happened.
🪄 Building the Layout


1. Start Your Engines
Begin with Stampin’ Up! White Willow Cardstock and a Basic Black border around both pages for a polished frame. Stamp that CTMH Let’s Party checkered border along the top and bottom of your layout to set your race-day tone.
2. Lay Down the Highway
Emboss Stampin’ Up! Basic Black Cardstock using the Herringbone 3D Embossing Folder, then add thin White Willow strips down the center for instant road-tread realism. It’s a small touch that packs a big design impact.
3. Add the Scenery
Cut Pecan Pie and Early Espresso cardstock with the Scenic Adventure Dies. Ink the edges with Early Espresso Classic Stampin’ Pad for that perfect desert-dusk glow, then layer the mountains across the top of your pages for a “Route 66 meets Disney” skyline moment.
4. Metal Moment

Embossed Brushed Silver Specialty Paper using the Metal Plate 3D Folder, and top it with Industrial Trinkets in each corner for that custom-garage look. This metallic panel becomes your left-page focal point and adds just the right shimmer to contrast all that desert texture.
5. Photo Prep
Double-mat your photos with Poppy Parade + White Willow for bold, clean contrast that keeps the focus on your pics.

Start with your largest mat and position it in the center of the embossed silver panel. The remaining photo mats should line up neatly along that embossed Herringbone highway.
💡 Pro Tip: The original sketch called for one large photo and three smaller ones, but I adapted it for five photos total—one large and four smaller. If you’ve got even more pics, try adding Stampin’ Up! Flip Flaps for bonus storytelling space!
Once your mats are in place, measure the remaining space at the bottom of your layout. This is the perfect moment to add more mountains or plan space for journaling. On my right-hand page, I intentionally left a small gap between the mountains; partly to fit one of my embellishment clusters, and partly to reserve space for my journaling later.
6. Cluster Up
Die-cut Deckled Circles, ink the edges with Intense Black, and use them as the foundation for your embellishment clusters.
Once your circles are in place, it’s time to build the magic.
7. Bring on the Magic

This is one of my go-to methods for creating dimensional titles — and it never fails!
I started with a print-and-cut title in Cricut Design Space, then created four “basic cuts” for each word using Stampin’ Up! Daffodil Delight Cardstock. Once they were cut, I stacked each set of letters directly on top of one another using Multipurpose Liquid Glue.
That glue gives you just enough working time to make sure the letters line up perfectly. Once each stack was dry, I adhered them directly on top of the printed base.
This technique adds a layered, chipboard-style dimension before foam tape even comes into play. (But you know me — I still popped the whole thing up on foam tape for that extra “wow” factor!)
💡 Pro Tip: Try this same trick for any title — whether it’s a single word or layered phrase. It gives you that professional, polished finish without needing special dies or premade embellishments.

With the title set, I dove into the embellishment clusters.
Since this is a Cars-themed layout, I knew I needed Lightning McQueen, Mater, and that iconic Route 66 sign. Each of them is popped up on foam tape for playful depth.
For the desert vibe, I stacked die-cut cacti, added a Hidden Mickey, and included a small desert bird for movement and balance. (Let’s just say he’s definitely not a vulture—but he’s got that desert-sky energy! 🪶)
Once the clusters were finished, I adhered my photos and added journaling. I like photographing my layouts before final photo placement so readers can see how the design looks with and without pictures. Any embellishments that overlap photo mats are left unglued until photos slide in easily underneath.
8. Journaling: The Heart of Your Story
For journaling, I will be printing on clear Avery labels for a polished finish. It’s an easy way to keep your words neat while still blending seamlessly into your design.

But let’s be real, your journaling is the most important part of your page.
The layout sets the scene, but your words tell the story.
This is where you capture the moments your camera didn’t: how long you waited in line, who was cracking jokes, what song was blasting, or how your hair looked after Lightning McQueen hit full speed. (Don’t worry, I won’t judge if you screamed louder than your kids. 😅)
Whether you use Avery labels, handwritten notes, or Stampin’ Up! Flip Flaps for extra storytelling space, let this part reflect you.
Your perspective, your emotions, your memories — because years from now, that’s what brings the magic back to life.
💡 Pro Tip: Try cutting your journaling into small strips for a playful, layered look, or keep it in a clean block for a classic style. There’s no wrong way to tell your story — just make sure it’s told. ❤️
🏁Finish Line Feels: A 12x12 Disney-Inspired Cars Radiator Springs Scrapbook Layout – A Collab with Jayma Malme & Friends

Working from a Jayma Malme sketch always sparks creativity! This particular design pushed me to explore new textures, balance bold colors, and tell a story through paper.
This 12x12 Disney-inspired Cars Radiator Springs scrapbook layout is proof that great design doesn’t just happen—it’s built layer by layer with heart, humor, and a little bit of adhesive magic. 💜
Want to see more projects from this collaboration?
✨ You can find the full list of Jayma Malme & Friends YouTube videos for this Collab
✨ Come Craft With Us!

Love paper, color, and a community that cheers you on? 💕 Come craft with me... April from This Chick Loves Paper! Whether you’re brand new to scrapbooking or a seasoned storyteller, there’s always room at the craft table.
If you’ve ever wanted a creative buddy who shares your love of paper, sparkle, and good conversation, this is your sign. 🌟 Let’s craft together, swap ideas, and celebrate every little masterpiece along the way.
Grab your trimmer, foam tape, and a dash of creativity — and join me for more magical moments over at This Chick Loves Paper. 💜
➡️ Tap below to grab your glue and join the fun!
Explore More: From Route 66 to Hollywood Land
If this layout fueled your creative engine, keep the ride going!
Check out more Disney-inspired layouts that mix storytelling, texture, and a whole lotta heart — like my Hollywood Award Layout (starring the same Modern Christmas DSP you saw here!) or the Ka-Chow! The birthday card that started this Cars craze in the first place.
Every design has a story, and every story deserves a spotlight — so grab your glue, cue the soundtrack, and let’s keep the creativity rolling down Route 66! 🌟


💜 Racers!! Share Your Disney-Inspired Creations!

Okay, crafty racers! It’s your turn at the starting line! 🏁
I want to see your spin on this Radiator Springs adventure! Whether you’re scrapping Disney days, road trips, or just love a bold layout, share your projects in the Members Gallery and show us how your creativity takes the wheel.
Your layout might just spark someone else’s next great idea, and that’s what this community is all about. So rev up those trimmers, toss some foam tape on your dashboard, and show us how you bring the magic to your own memory lane! ✂️✨
💥 Final Lap: Wrapping Up with Heart

Every layout tells a story, but this one goes beyond photos; it’s a celebration of creativity, imagination, and the way paper can transport you back to a feeling.
From the shimmer of the metal plate to the dusty tones of the desert, every element of this design was inspired by that moment in line, waiting for the adventure to begin.
So whether you’re documenting Disney days, family road trips, or everyday wins, remember: your stories deserve to be seen, shared, and celebrated — one layer, one layout, and one magical memory at a time.
April – This Chick Loves Paper
🛒 Grab Your Supplies & Get Crafting!
All photos and projects are subject to copyright © ThisChickLovesPaper.com
Images © Stampin’ Up!®
The content in this blog is the sole responsibility of April Raine – This Chick Loves Paper as a Stampin’ Up!® Independent Demonstrator. The use of and content of classes, services, or products offered is not endorsed by Stampin’ Up!®
Create a 12×12 Disney-inspired Radiator Springs scrapbook layout packed with texture, embossing, and Route 66 storytelling magic! 🚗✨ This 12x12 Disney-Inspired Cars Scrapbook Layout – A Collab with Jayma Malme & Friends - holds six photos and features Lightning McQueen, Mater, and layered desert details. Designed by This Chick Loves Paper, this step-by-step tutorial shows how to bring your Cars Land memories to life with bold color and creative dimension.

⭐How I Protect My DSP, Cardstock & Finished Cards
*As an Amazon Associate, I earn from qualifying purchases.
I store my DSP, cardstock, scraps, and even finished cards in these clear resealable bags.
The 2-mil thickness is perfect for everyday crafting (they make a 4-mil option if you want extra durability!), and they’re tough, reusable, and great for keeping your entire crafting stash clean, tidy, and protected from the chaos of the craft room.
• 13×13 Plymor 2mil Zipper Reclosable Bags — for 12×12 DSP, cardstock sheets & scraps
• 9×12 Plymor 2mil Zipper Reclosable Bags — for 8.5×11 cardstock & scraps
• 6x8 Plymor 4mil Heavy Duty Reclosable Bags — for storing extra die cut embellishments & finished cards, card workshop kits


BRAVO!!! What an amazing layout for the best ride at Disney! The metal accent and all your details really took an already amazing design to the next level. Love it!