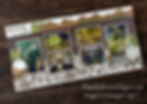
🏨 Midnight Explorer: A 12x12 Disney-Inspired Grand Californian Hotel Scrapbook Layout
- This Chick Loves Paper
- Oct 20, 2025
- 10 min read
Updated: Dec 16, 2025
When the World’s Asleep, I Wander…
Disneyland days are all fireworks, churros, and running from one ride to the next like caffeinated chipmunks. But once the sun sets and your feet are crying in Mickey socks, there’s nothing quite like retreating to the warm wood tones and glowing lanterns of the Grand Californian Hotel.
While Little Man was crashed out in our room, I slipped outside around 2 a.m.—hoodie on, sneakers laced, phone in hand, chasing calm and quiet like it was the last ride of the night.
AND OH BABY. It was Disneyland like I’ve never seen it before:
No people.
No lines.
Not even a car on the street.
Just twinkle lights, crickets, and the gentle sound of fountains doing their thing.
It felt like I had the entire Grand Californian to myself.
And even though I didn’t have the fanciest camera, I snapped every photo I’d never been able to take during the day.
This layout is my love letter to those still, sweet, hotel-after-dark moments.
So grab your favorite cardstock, a hot drink, and your forest dies—because we’re scrapping the quiet side of the Magic Kingdom.
🧾 Materials Used in This 12x12 Disney-Inspired Grand Californian Hotel Scrapbook Layout
🎨
Designer Series Paper
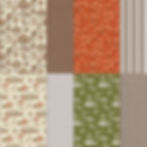
Autumn Toile DSP – Bottom forest layer
📄
Cardstock


Very Vanilla 12"X12" Two Tone Cardstock – Base + clouds + snowflake mat
Early Espresso 8-1/2" X 11" Cardstock – Pinecones, circle mat, tag
Pecan Pie 8-1/2" X 11" Cardstock – Mountains, Hidden Mickeys, photo mats
Old Olive 8-1/2" X 11" Cardstock – Layered pine trees
Mossy Meadow 8-1/2" X 11" Cardstock – Treetops + foliage


Early Espresso, Cloud Cover, Old Olive & Mossy Meadow Classic Stampin’ Pads
📦 Stamps & Dies


Scenic Adventure Bundle – Mountains, moon, trees
Outdoor Adventure Bundle – Deer, sentiment
Delicate Pines Bundle – Pinecones, branches, snowflakes
Deckled Circle Dies - Embellishments
🛠 Tools & Adhesives


Cricut – For custom title, date, Hidden Mickeys
Sponge dauber, Stampin’ Seal, Foam Tape, Multipurpose Liquid Glue, Paper Trimmer
⭐ Other Tools I Use in My Projects
*As an Amazon Associate, I earn from qualifying purchases.


Cricut® Essentials
• Cricut® Maker 3 — my primary cutting machine for titles, SVGs & embellishments
• Cricut® StandardGrip 12×12 Mat — 3 count used for cardstock, photo paper & labels
Printer
Canon® Printing System (Photos + Printable Cricut Elements)
• Canon TS9521C Crafting Printer — used for ALL printed project photos, journaling pieces, print-then-cut embellishments & titles
Photo Papers
• Canon Photo Paper Plus Glossy II (4×6, PP-301) → For 4x6 or smaller - printed photos
• Canon Matte Photo Paper (MP-101, 8.5×11) → Used for Cricut print-then-cut elements & titles
• Canon Double-Sided Matte Photo Paper (MP-101D, 8.5×11) → Also used exclusively for Cricut embellishments, icons, & layered pieces
Printer Ink
• EZ Ink Compatible 280XXL/281XXL Ink Pack → The exact ink set used for the TS9521C
Stamping & Precision Tools
• MISTI® Memory Size with 12-1/2" x 12-1/2" Stamping area — for borders, backgrounds & oversized stamping
• MISTI® Stamp Tool Bar Magnet - Additional magnet
Speciality Adhesives
• Tombow® Mono Aqua Liquid Glue — for corners, details & layered paper pieces
• Bearly Art Precision Craft Glue (4oz Original) — for embellishments & fine-detail gluing
• Tombow® Mono Air Touch Adhesive— my preferred tape runner for base
• Tombow® Mono Air Touch Adhesive, Refill 2-Pack — my preferred tape runner for base layers
Journaling Tools
• Avery® Easy Peel® Full-Sheet Clear Labels (8665) → Used for long typed journaling strips
• Avery® Clear Shipping Labels 2×4 (8663) → Used for short typed journaling strips or blocks
• Skaura Pigma Micron Fineliner Pens - Archival Black - Assorted Point Sizes - Used for handwritten Journaling
🪄 Step-by-Step: Build Your Own 12x12 Disney-Inspired Grand Californian Hotel Scrapbook Layout
Step 1: Create a Cozy, Layered Base
Start with two 12” x 12” sheets of Very Vanilla cardstock as your base. These pages will carry the full mountain lodge vibe — warm, classic, and neutral.
💡 Pro Tip:
Before adhering anything down, ink the edges of all your papers using the Early Espresso Classic Stampin’ Pad and a sponge dauber. Inking adds depth, softens harsh lines, and ties your color palette together beautifully. Once things are glued, it’s too late — so ink now, stick later!

Step 2: Top DSP Strip
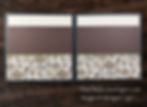
Cut two strips of Early Espresso patterned DSP to 12” x 5.25” and adhere them across the top of each page. This creates a rich woodgrain effect that mimics the hotel’s architecture.
Step 3: Divider Strip
Cut two ¼” x 12” strips of Mossy Meadow cardstock and add them just beneath the top DSP strip. These thin borders act as visual dividers and add structure to the layout.
Step 4: Bottom DSP Scene
Cut two pieces of the Autumn Toile forest/tree pattern to 12” x 4.5” and adhere them to the bottom of each page. When placed side-by-side, the two strips create a continuous mountain tree line —
peaceful, earthy, and perfectly themed.)
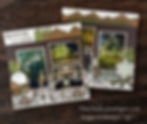
Step 2: Double the Mat, Double the Magic: Framing Your Photos
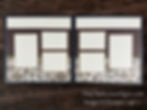
Each photo is double-matted with Stampin’ Up! cardstock Pecan Pue Cardstock, topped with a crisp Very Vanilla mat. I gently inked the edges of each mat with Early Espresso ink using a sponge dauber for soft dimension and visual warmth.
Pro Tip: Inked edges help photo mats pop off patterned paper — a subtle but powerful detail when working with earthy or neutral tones.
Photo mat sizes:
2 vertical photos (4” x 6”)
4 horizontal (4.5” x 3.25” and 4.5” x 3.75”)
Very Vanilla mats (¼” larger)
Pecan Pie mats (¼” larger than Vanilla)
Photos are arranged symmetrically across both sides of the layout — a totally intentional design choice. By mirroring the mat placement, I was able to draw the eye upward to that stunning mountain skyline without cluttering the page. The matted photos sit like windows along a timber lodge wall, quietly inviting you in.
Pro Tip: Double mats = double the magic, especially on nighttime photos where a single layer might disappear into the background.
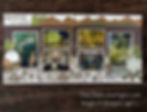
🏔️ Step 3: Stamp the Title & Placement with Purpose
Next up: the title! I always recommend placing your photos first so you know exactly how much space you’ve got to work with — especially when trees, mountains, or big embellishments are coming in later.
I stamped “Adventure Awaits” from the Stampin’ Up! Outdoor Adventure set in Early Espresso onto Very Vanilla cardstock. Once dry, I layered the coordinating stamps right on top of the letters and traced around them to create a clean, cuttable outline.
My plan? Fussy cut it out and pop it up with foam tape for a little lift… but in the end, I decided to keep it flush to the page for a cleaner look.
For now, I laid the title in the upper left-hand corner of the layout, right above the photo cluster — but did not adhere it yet. I wanted to make sure it would sit perfectly once I added the mountain layers and tree embellishments in the next steps.
💡 Pro Tip:
Stamping on a separate piece of cardstock (instead of directly on the layout) gives you freedom to test placement, add dimension, or even start over if needed. It’s like a title sticker — but totally custom!
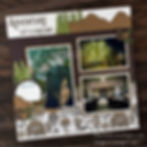
Step 4: Skyline Spotlight – Layered Mountains That Elevate the Entire Page
Time to bring that peaceful, mountaintop lodge feeling to life with a scenic skyline across the top of your layout — the true centerpiece of this design!
I used the Scenic Adventure Dies to create a mountain range and cloud cluster that stretches beautifully across the upper edge, echoing the forested views from the Grand Californian balconies.
Mountains + Trees:
• Die-cut the mountain range from Pecan Pie cardstock
• Inked the ridges lightly with Early Espresso to enhance shadows and natural texture
• Layered the range across the top of the page to form a strong visual silhouette
• Added trees (die cut from Old Olive cardstock) near the title area
• These trees cleverly hide the end of the mountain die making it look like the landscape fades into the forest!
💡 Pro Tip: Layering elements not only adds depth but also gives you a chance to build a visual triangle — drawing the eye through your title, photos, and embellishments for a balanced, pro-level layout.
Soft Clouds:
• Die-cut the cloud shapes from Very Vanilla cardstock
• Lightly inked them with Cloud Cover Classic Ink for a soft, dreamy effect
• Placed them above the mountain range to echo that quiet, early-morning glow
To finish the scene, I die cut a line of smaller trees from Mossy Meadow cardstock and placed them along the right edge of the mountain range. This balanced out the skyline while creating a natural frame for the photos below.
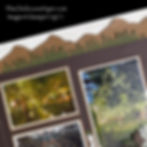
Step 5: Cluster Close-Up:
Over on the far left, just below the vertical photo, I created a mini journaling cluster with a deckled circle die cut from Early Espresso and Very Vanilla cardstock using the Stampin’ Up! Deckled Circles Dies.
I tucked Old Olive trees behind the circle and repeated the mountain silhouette lying across the bottom edge of the circle for continuity.
The Cricut-cut deer finishes off the woodland vibe, and I left the center of the circle open to add light journaling.
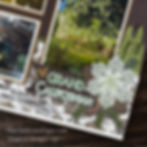
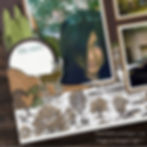
The last embellishment cluster anchors the bottom right corner of the page and frames the “Grand Californian” title with a balanced blend of rustic and seasonal charm. It features a snowflake from Stampin’ Up! Delicate Pines bundle, stamped in both Mossy Meadow and Old Olive for a soft, layered look.
Behind the snowflake, I tucked more trees from the Scenic Adventure set, along with pinecones and ferns from the CTMH Evergreen stamps and dies. This mix of wintery greens adds visual weight to balance the large cluster in the upper corner, creating a triangle of interest across the layout.

Even though I worked with autumn-themed papers, this trip took place in December. So I used the snowflakes and sparkle details in this cluster to subtly shift the vibe toward winter, blending the hotel’s warm, woodsy palette with the festive energy of the holiday season. Hidden Mickeys make another sneaky appearance here, along with just a touch of shimmer to tie everything together.
Pro Tip: Repeating embellishments across your layout not only strengthens your design—it’s a time-saver too. Once you’re in cutting mode, go ahead and prep all three clusters at once. You’ll thank yourself later!
🎬 Layout Complete: A Page That Tells a Story
Now that every cluster is in place and the full design has come together, the layout feels exactly how I imagined it—layered, peaceful, and full of quiet storybook charm.
From the vanilla backdrop and forest edge to the perfectly balanced photo mats and those pops of pine and sparkle, every element was chosen with intention. I love how the earthy tones and cozy textures reflect the Grand Californian’s atmosphere, while the snowflakes and shimmer nod to the magic of the holiday season.
Whether it’s the stamped trees, the Cricut deer, or those sneaky little Hidden Mickeys, this layout captures the calmest, coziest corner of our trip—and proves that storytelling doesn’t have to be loud to be powerful.
🧭 Explore More: If You Love Disney + Cardstock, You’re in the Right Place
If you’re a Disney fan looking for scrapbook layouts that go beyond the parks, you’re in the right place. I love capturing the quiet corners of the magic—like the Grand Californian at midnight—and turning them into scrapbook stories that feel just as memorable as any ride. From Disney hotel stays to iconic attractions and everything in between, I’ve got a gallery full of magical memories waiting for you. Whether you’re crafting your own Disney album or just looking for new layout ideas, this is where the pixie dust keeps flying.


📸 Share Your Creations: Show Off Your Disney Layouts!
Have your own take on this 12x12 Disney-inspired Grand Californian Hotel scrapbook layout? Or maybe a different Disney hotel or park page you’re proud of?
Upload your masterpiece to the Members Gallery and share your story! Whether it’s full of Cricut cuts, character hugs, or castle shots — we’re here for it.
Let’s fill this space with Mickey, memories, and magic.
💥 Final Thoughts: When the Magic Whispers
From the mountain-topped border to the hidden Mickeys tucked between pinecones and snowflakes, this Grand Californian layout was pure scrapbook serenity. Every layer was designed to feel like a midnight walk through the forest — peaceful, nostalgic, and grounded in the magic of the moment. If you’ve ever stood under the twinkling lights of Disney at night, then you already know the feeling I tried to capture here: cozy, timeless, and full of heart. I hope this layout inspires you to tell your story — whether it’s a magical memory or a quiet, powerful pause between the big moments.
May your pages feel like peace and your stories shine like stars above the pines.
April – This Chick Loves Paper
🛒 Grab Your Supplies & Get Crafting!

All photos and projects are subject to copyright © ThisChickLovesPaper.com. Images © Stampin’ Up!®
The content in this blog is the sole responsibility of April Raine – This Chick Loves Paper as a Stampin’ Up!® Independent Demonstrator. The use of and content of classes, services, or products offered is not endorsed by Stampin’ Up!®
Discover this 12x12 Disney-inspired Grand Californian scrapbook layout featuring six photos, layered mountains, cozy autumn colors, and a hint of holiday magic!
Created by This Chick Loves Paper, this step-by-step tutorial shows how to blend nature themes with festive stamping for a warm, story-filled layout. 🌲✨
⭐How I Protect My DSP, Cardstock & Finished Cards

I store my DSP, cardstock, scraps, and even finished cards in these clear resealable bags.
The 2-mil thickness is perfect for everyday crafting (they make a 4-mil option if you want extra durability!), and they’re tough, reusable, and great for keeping your entire crafting stash clean, tidy, and protected from the chaos of the craft room.
*As an Amazon Associate, I earn from qualifying purchases.
• 13×13 Plymor 2mil Zipper Reclosable Bags — for 12×12 DSP, cardstock sheets & scraps
• 9×12 Plymor 2mil Zipper Reclosable Bags — for 8.5×11 cardstock & scraps
• 6x8 Plymor 4mil Heavy Duty Reclosable Bags — for storing extra die cut embellishments & finished cards, card workshop kits