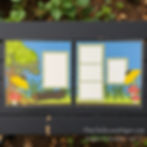
🌼 A Bug’s Life | A Whimsical Disney-Inspired Scrapbook Layout Tutorial
- This Chick Loves Paper
- Jan 27
- 13 min read
A bug-sized adventure featuring a bright, whimsical, photo-packed A Bug’s Life scrapbook layout you can recreate in this step-by-step tutorial!

There’s a special kind of magic in scrapbooking a place you can never walk through again — like freezing a moment in time that would’ve slipped right through your fingers if you hadn’t grabbed your scissors and cardstock. Bug’s Land was tiny, quirky, colorful, and SO full of charm… and honestly? I didn’t realize how much I loved it until it was gone. If you’ve ever looked back and thought, “Ugh, why didn’t I take more photos?” — friend, SAME. 😂
That’s why layouts like this one matter — because we get to rebuild the memories bigger, bolder, brighter, and exactly the way they felt. Oversized flowers, shaded leaves, tiny mushroom houses, characters popping up between the blades of grass… this page isn’t just a layout. It’s a whole little world you get to step back into anytime you flip through your album.
So tighten your antennae, grab your glue, and let’s shrink down together — we’ve got a bug-sized adventure to recreate. 🐞🍃✨
🌿 A Bug’s Life Disney-Inspired Scrapbook Layout – What You’ll Need For This Whimsical Double-Page Tutorial
Patterned Paper

• Stampin’ Up! Cute As a Bug 12×12 DSP — used for photo mats and subtle leaf-themed accents throughout the layout.
Stampin' Up! Cardstock
(Including size + what it was used for!)

• Azure Afternoon 12×12 Two-Tone: (dark side): Full-page bases for both 12×12 sheets.
• Early Espresso 12×12 Two-Tone: Dirt strip + mushroom centers + log details.
• Garden Green 12×12 Two-Tone: (dark side): Layered grass.
• Granny Apple Green 12×12 Two-Tone: (light side): Layered grass, tree + coneflower stems.
• Mossy Meadow 12×12 Two-Tone: Tree canopy layers (dark + light), leaf accents
• Old Olive 12×12 Two-Tone: Extra-thin mat layers behind all White Willow mats.
• Pecan Pie 12×12 Two-Tone: Tree trunk + log layers.
• Daffodil Delight 12×12 Two-Tone: (dark side): Coneflower petals.
•. Poppy Parade 12×12 Two-Tone: Mushroom caps
• White Willow Cardstock: Photo mats + mushroom spots + cloud cuts.
• Basic Beige Cardstock (8½×11): Mushroom stems.
Stamps & Dies

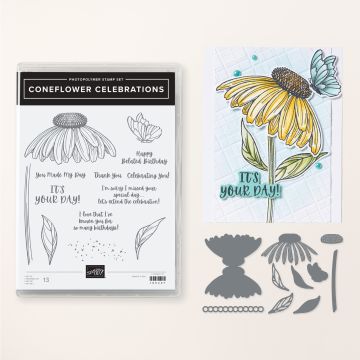

Stampin’ Up!® Coneflower Celebrations Bundle – flowers + stems
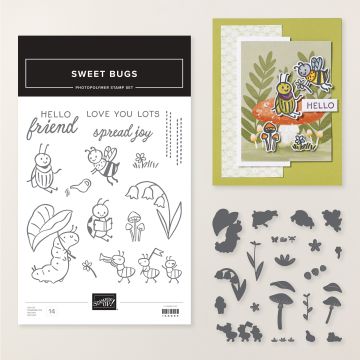
Stampin’ Up!® Sweet Bugs Bundle – mushrooms + tiny bug characters (DSP also cuts with these!)
Inks


• CTMH Intense Black: Edging photo mats.
• Stampin’ Up! Pecan Pie Classic Stampin' Pad: Inking tree trunk + mushroom stems.
• Stampin’ Up! Mossy Meadow Classic Stampin' Pad: Inking leaves + DSP edges.
• Stampin’ Up! Granny Apple Green Classic Stampin' Pad: Inking tree leaves
• Stampin’ Up! Daffodil Delight Classic Stampin' Pad: Inking coneflower petals.
Tools & Adhesives

• Foam Tape
• Scissors / Precision Snips
• Liquid Glue & Adhesive (Below)
• Cricut Maker: Tree, grass, clouds, mushrooms, leaves, log, and character SVGs. (Below)


Cricut® Essentials
• Cricut® Maker 3 — my primary cutting machine for titles, SVGs & embellishments
• Cricut® StandardGrip 12×12 Mat — 3 count used for cardstock, photo paper & labels
Photo Papers
• Canon Photo Paper Plus Glossy II (4×6, PP-301) → For 4x6 or smaller - printed photos
• Canon Matte Photo Paper (MP-101, 8.5×11) → Used for Cricut print-then-cut elements & titles
• Canon Double-Sided Matte Photo Paper (MP-101D, 8.5×11) → Also used exclusively for Cricut embellishments, icons, & layered pieces
Printer
Canon® Printing System (Photos + Printable Cricut Elements)
• Canon TS9521C Crafting Printer — used for ALL printed project photos, journaling pieces, print-then-cut embellishments & titles
Speciality Adhesives
• Tombow® Mono Aqua Liquid Glue — for corners, details & layered paper pieces
• Bearly Art Precision Craft Glue (4oz Original) — for embellishments & fine-detail gluing
• Tombow® Mono Air Touch Adhesive— my preferred tape runner for base
• Tombow® Mono Air Touch Adhesive, Refill 2-Pack — my preferred tape runner for base layers
🌳 Let’s Build This Bug-Sized World!
This layout comes together like a Pixar scene — layer by layer, shape by shape, until suddenly you’ve built a whole tiny landscape full of personality. And here’s the good news: while I used my Cricut, I intentionally chose shapes you can easily freehand or recreate with dies, punches, or even fussy cutting.
Your creativity, your rules.
Let’s get tiny. 👇
🌱 Step 1 — Build the Base (Where the Magic Begins)


Start with two sheets of Azure Afternoon to set the stage — this bright, playful blue gives you that classic Disneyland-sky vibe before you’ve even added a single embellishment. It’s cheerful, bold, and instantly tells your eyes, “Yep, we’re in bug territory now.”
Next, add two 12” × ½” Early Espresso strips across the bottom of each page. Think of these as your “dirt lines” — the grounding layer your entire scene is going to sprout from.
Now for the grass! This is the moment the layout starts to feel alive.

Cut your layers using:
• Garden Green for the deeper back layer
• Granny Apple Green for the bright, whimsical top layer
If you’re using a Cricut, your design will already come staggered in those naturally uneven, organic blade shapes — the SVG does all the heavy lifting for you.
If you’re cutting by hand, that’s where you want to make those wavy, imperfect lines on purpose. Bugs don’t live on golf courses, after all — the charm is in the uneven edges!
⭐ PRO TIP: Hand-cutting your grass? Make the top layer slightly shorter than the back layer — you’ll get instant depth without adding a single foam strip.
🖼️ Step 2 — Build Your Photo Mats (The Frame That Makes the Scene)
Before any embellishment goes down, the photos need a home, and these mats do SO much heavy lifting. Between the patterned DSP, the thin Old Olive accents, and those bright White Willow centers, this entire layout already feels alive.
And yes… we’re using that gorgeous Stampin’ Up! Cute As A Bug 12×12 DSP — the one that makes you want to hoard every last scrap. 😍

LEFT PAGE — Vertical 4×6 Photo
DSP Layer (Base Mat) Cut to 5″ × 7″
I intentionally sized this larger because that pattern paper deserves to be SEEN. It frames the whole photo beautifully.
White Willow Photo Mat 4¼″ × 6¼″
Edges inked by dragging along CTMH Intense Black — just enough to give it definition without darkening the light cardstock.
Old Olive Accent Mat Cut to 4⅜″ × 6⅜″
(This is the “mystery measurement” — exactly halfway between ¼″ and ½″. It creates that perfect thin mat glow without stealing the spotlight.)

RIGHT PAGE — Three Horizontal Photos (4×3 each). These stack vertically inside one long DSP mat.
DSP Mat 5″ × 11″
White Willow Mats (3 total) 4¼″ × 3¼″ each
Old Olive Accent Mats (3 total) 4⅜″ × 3⅜″ each
RIGHT PAGE — Final Vertical 3×4 Photo
DSP Base Mat 4″ × 5″
White Willow Photo Mat 3¼″ × 4¼″
Old Olive Accent Mat 3⅜″ × 4⅜″
All DSP and Old Olive edges are inked in Mossy Meadow Classic Stampin’ Pad for shadow, definition, and that earthy bug-world vibe.
🌳 Step 3 — Create Your Tree (The True Star of the Scene)

This tree is the anchor of the entire left page — the moment you add it, the whole layout suddenly screams Disney scene builder magic.
And yes, this is a Cricut cut, but the layering technique is what brings it to life.
Start by cutting the trunk from Pecan Pie cardstock and ink the edges with Pecan Pie Classic Stampin’ Pad using a sponge dauber. It deepens the grooves and makes the trunk feel warm, dimensional, and perfectly cartoon-ish.
Now let’s build that gorgeous layered canopy — the part everyone stares at because the shadows and teardrops make it look more like an illustration than “cut out.”

🍃 Bottom canopy layer: Mossy Meadow (dark side), edges inked with Mossy Meadow.
🍃 Next canopy layer: Mossy Meadow (light side), edges inked with Mossy Meadow.
🍏 Third layer: Granny Apple Green (light side), edges inked with Old Olive.
🍏 Top canopy layer: Granny Apple Green (dark side) — this is the layer with the cut-out teardrops, edges inked with Old Olive.
When you place it over the light-side Granny Apple Green layer… the teardrops “pop” forward like little highlights! It’s such a tiny detail, but it gives the tree that whimsical Pixar feel that makes the whole page come alive.
⭐ PRO TIP (Non-Cricut):
If you don’t have this exact cut file, grab a simple rounded tree-top shape and use a teardrop die (even one from a raindrop or petal bundle!) to mimic the cut-out canopy pattern. Those little teardrops are what make this tree feel hand-drawn — don’t skip them!
🌼Step 3 — Add the Coneflowers (Oversized, Simple, and So Dang Cute) 🌼

Cut your petals from Daffodil Delight cardstock, then lightly ink the bottoms of each petal with Daffodil Delight Classic Stampin’ Pad. This gives them that soft, sun-kissed glow without needing any curling or shaping — just a gentle blend for depth.
Cut your stems from Granny Apple Green, and ink their edges with Granny Apple Green to help them stand out against the layered grass.
The cone centers are cut from Early Espresso and left exactly as they are — the deep brown gives perfect contrast without extra work.
Each coneflower gets a little whimsy boost with a White Willow curly cue tucked at the base of the stem. These tiny swirls brighten the area and add that playful fairytale touch that makes this layout feel alive.
Place one coneflower on each page, angled inward so they naturally frame the tree, the photo mats, and help your eye drift across the entire spread.
⭐ PRO TIP: Keep the ink blending soft — just enough to give dimension without overpowering the bright yellow petals. Subtle shading = instant professional depth.
🌿 Step 4 — Add the Log (A Tiny Detail with Big Storytelling Energy)

This log is one of those magical little details that makes you feel like you actually shrank down and walked right onto the page.
It’s a Cricut-cut piece built from Pecan Pie, Early Espresso, and Basic Black:
Pecan Pie forms the log end
Early Espresso builds the main body
And that thin Basic Black outline? That’s the secret sauce — the crisp shadow that gives the whole thing definition.
Assemble all three layers so the black outline peeks out evenly around the log.
Then — and this part is IMPORTANT —
Place the log ON TOP of the grass layer, not tucked behind it.
Look at the angle in your photo… doesn’t it pull the whole scene forward? By resting the log above the grass, you get instant depth, instant realism, and instant “oh my gosh this looks 3-D!” energy.
It becomes a grounding spot for your characters and makes the bottom of the layout feel alive and dimensional.
🍄 Step 5 — Mushrooms & Leaves (All the Whimsy, All the Charm)
Now for the little pops of magic that make this layout sing — the mushrooms and those gorgeous layered leaves!
Your mushrooms are Cricut-cut from Poppy Parade, White Willow, and Basic Beige, then lightly inked for soft shading.
These tiny red caps add the PERFECT spark of color — whimsical, playful, and essential for a Bug’s Life–inspired scene.
🐞 Step 6 — Build the Right-Page Title & Character Cluster

Your right page comes together in one big, happy scene — title up top, Hopper causing chaos at the bottom, and all the details tying the whole story together.
Start with your “A Bug’s Life” title, a Cricut Print Then Cut, popped up on foam tape, so it stands loud and proud like the marquee of the land itself. Just to the right, add Flick, also a Cricut Print Then Cut, floating in with his iconic leaf umbrella. Three tiny White Willow clouds, all Cricut-cut, finish the sky — simple, soft, and perfectly placed in that upper-right corner to frame the whole title cluster.

Now drop your eyes down to the ground because this is where the drama happens.
Add your tree stump, cut from Pecan Pie and Early Espresso cardstock, giving you that grounded, earthy base. Ink the edges lightly for depth, then place it snugly against the grass layers.
Perch Hopper right on top — another Cricut Print Then Cut — and pop him up on foam tape so he stands out like the villain he is. Tuck one of your Mossy Meadow double-layer leaves right behind him and the stump, letting just enough peek out so it adds shape without stealing attention.
This completes the entire right page — title, character, grounding elements, and that perfect mix of whimsy + structure that holds the whole scene together.

🐜 Step 7 — Add the Left-Page Clouds & Character Cluster
This side of the layout comes together quickly — just the way we like it, when the right page already brought all the drama.
Start by placing three White Willow clouds (all Cricut-cut) above the photo mat.
Keep them spaced loosely — not too symmetrical, not too scattered — just enough to give the sky that sweet, happy Disneyland feel without competing with the tree canopy.

Next, start building your character cluster along the bottom.
Add your Cricut Print Then Cut bugs, placing one on top of the log and one beside it so they feel like they’re interacting with the scene. Then tuck in that adorable DSP ant with the horn — cut perfectly using the coordinating Stampin’ Up! die bundle. This little guy adds so much charm and makes the whole page feel like it’s mid-celebration.
The combination of SVG characters + DSP die-cut embellishments gives the scene personality, dimension, and that signature “April touch” — a mix of handmade and illustrated that makes the page feel alive.
✨Wrap-Up — A Tiny World With BIG Creative Possibilities
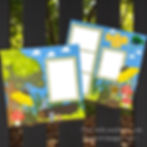
When that final little cloud floated into place, and the last bug friend found his home, this layout came together like a full-on mini world — bright, layered, dimensional, and overflowing with whimsy. The tree anchors the left page, the coneflowers pull your eye across the spread, Hopper brings the drama (of course), and those mushrooms + logs add that perfect storybook charm.
And here’s the best part: this isn’t just a 5-photo Disney double-page layout.
This design is insanely versatile. With just a couple of tiny tweaks, BOTH sides can be used as standalone layouts.
• The left page becomes a gorgeous single-photo scene simply by swapping the clouds for a title.
• The right page is already a perfect four-photo story on its own.
And beyond Disney? Oh friend… this one FLEXES.
Use it for:
• summer adventures
• picnics
• days at the park
• backyard memories
• kids playing outside
• ANYTHING nature-themed
The bright colors, oversized florals, layered grass, and playful embellishments make this layout universal — a happy, sunshiney scene-builder you can use again and again for so many different stories.
✨ Ready for More Whimsy? Step This Way!🐭🌈
If this little bug-sized world made your heart do a cartwheel, wait until you see what else is crawling around my craft room. 😉
From full-blown Disney scene builds to character cards, ride-inspired layouts, and those “oh-my-gosh-how-did-you-make-that?!” moments… I’ve got a whole lineup of projects that will spark ideas faster than Tinker Bell with a glitter wand. ✨✨
Every project has the same FULL step-by-step breakdown — photos, measurements, pro tips, the whole shebang — so you can recreate the magic without guesswork.
So go explore, dive in, binge a few layouts, and don’t be surprised if you look up an hour later thinking… “Yep. I need more cardstock.” 😂💛


🌼 Show Us Your Bug-Sized Creations!
Okay, crafty cutie — now it’s your turn to shrink down and play! I want to see YOUR take on this bright, whimsical bug-sized world.
Whether you swap the coneflowers for daisies, switch up the colors, build a whole new cast of tiny critters, or recreate it exactly step-by-step, your version deserves to be seen!
Upload your layout to the Members Gallery so we can cheer you on, hype you up, and get inspired by the magic only YOU can create. Who knows… your design might spark someone else’s next favorite scrapbook page! 💛🐞✨
🌟 Final Thoughts — Tiny Bugs, Big Personality, Bigger Memories

Honestly? This layout reminded me exactly why I scrapbook in the first place. These moments — the ones that blink by so fast you don’t even realize they’re gone until you’re standing in a brand-new land wondering where the mushrooms, clovers, and quirky bug statues went — they deserve to live somewhere brighter than a camera roll.
And the funniest part? Lil Man and his girlfriend wandered through at one in the morning (as teenagers do), glanced over at my desk, and she literally stopped mid-walk just to say, “Wait… that is SO cute!” If a teenager voluntarily compliments a scrapbook page, that’s basically a standing ovation in my world. 😂✨
This whole bug-sized world came together with color, whimsy, tiny details, and a whole lot of joy — and that’s exactly what I hope YOU feel when you create your version. Whether you’re documenting Disney memories or building your own magical garden, I hope this layout inspires you to go bold, go bright, and make it unmistakably yours.
Now go make some magic, friend… and don’t forget to hide a Mickey or five. 😉🐞🌼
Grab your supplies & get crafting!

All photos and projects are subject to copyright © ThisChickLovesPaper.com
Images © Stampin’ Up!® & CTMH®
The content in this blog is the sole responsibility of April Raine – This Chick Loves Paper, Independent Stampin’ Up!® Demonstrator. The use of and content of classes, services, or products offered is not endorsed by Stampin’ Up!®.
Create a bright and whimsical 12×12 double-page, 5-photo Disney-inspired scrapbook layout featuring oversized flowers, mushrooms, grass layers, and character clusters! This step-by-step scene-building tutorial — created by This Chick Loves Paper — uses Stampin’ Up!® Cute As a Bug DSP, Coneflower Celebrations, layered cardstock, and Cricut cuts to build a magical A Bug’s Life–inspired world. 🌼🐞✨

⭐How I Protect My DSP, Cardstock & Finished Cards
*As an Amazon Associate, I earn from
I store my DSP, cardstock, scraps, and even finished cards in these clear resealable bags.
The 2-mil thickness is perfect for everyday crafting (they make a 4-mil option if you want extra durability!), and they’re tough, reusable, and great for keeping your entire crafting stash clean, tidy, and protected from the chaos of the craft room.
• 13×13 Plymor 2mil Zipper Reclosable Bags — for 12×12 DSP, cardstock sheets & scraps
• 9×12 Plymor 2mil Zipper Reclosable Bags — for 8.5×11 cardstock & scraps
• 6x8 Plymor 4mil Heavy Duty Reclosable Bags — for storing extra die cut embellishments & finished cards, card workshop kits
Stamping & Precision Tools

• MISTI® Memory Size with 12-1/2" x 12-1/2" Stamping area — for borders, backgrounds & oversized stamping
• MISTI® Stamp Tool Bar Magnet - Additional magnet
Journaling Tools
• Avery® Easy Peel® Full-Sheet Clear Labels (8665) → Used for long typed journaling strips
• Avery® Clear Shipping Labels 2×4 (8663) → Used for short typed journaling strips or blocks
Archival Black - Assorted Point Sizes -
Used for handwritten Journaling