
❄️☃️ White Christmas in Las Vegas – A Winter Scrapbook Layout Worth Melting For! ❄️☃️
- This Chick Loves Paper

- Aug 3, 2025
- 11 min read
Updated: Jan 27

Snow in Las Vegas is rare.
Snow that actually sticks long enough to turn your yard into a full-blown winter wonderland?
That’s a scrapbook miracle—and I wasn’t about to miss it.
When those flakes started falling during my son’s kindergarten year, I did what any sentimental mama with zero self-control would do:
Yanked him right out of school to go play in it. ❄️🤣
Shhhh… this stays between us.
Zero regrets. Maximum memories.
I didn’t take many photos that day—honestly, I wasn’t scrapbooking yet. I was too busy chasing giggles, throwing snowballs, and soaking up every flurry before Vegas decided winter was “over.” But the memories? Oh, they froze themselves right into my heart.
And now?
They’re finally preserved in this soft, snow-dusted 12x12 winter layout—complete with frosty poinsettias, shimmering snowflakes, and clusters so sweet they practically jingle.
So grab your earmuffs and your embossing paste…
because we’re about to recreate a Las Vegas White Christmas —right here on paper. ❄️💙
What you need for Scrapbooking this White Christmas- Winter Scrapbook Layout


🖼️ Designer Series Paper
• Peaceful Garden 12x12 DSP (winter floral background)
• Vellum Paper - sprigs
📄 Cardstock


• Stampin’ Up! White Willow Cardstock – photo mats, poinsettias, ivy leaves, snowflakes
• Stampin’ Up Secret Sea Two Tone Cardstock – photo mats, title letters, inked banner
• Cloud Cover Two-Tone Cardstock – anchoring strip (light side) + icicles (dark side)
• CTMH Shortbread – journaling strips, small poinsettias, photo accent

🖋️ Inks
Embellishments
🎨 Stamps & Thin Cuts
• Poinsettia Petals Bundle - Poinsettias and Ivy leaves die cut from White Willow
💡 Pro Tip: Stampin’ Up! Bundles aren’t just convenient, they’re a smart way to stock up and save.
Whether it’s coordinating stamps and dies, ink pads with blocks, or themed sets that make crafting easier, bundles are a budget-friendly way to build your collection with purpose.
🛠️ Tools


Other Tools Used:
• Cricut Machine (see below)
• Foam Tape
• Multipurpose Liquid Glue
⭐ Cricut Essentials & Adhesives I Use in My Projects
*As an Amazon Associate, I earn from qualifying purchases.


Cricut® Essentials
• Cricut® Maker 3 — my primary cutting machine for titles, SVGs & embellishments
• Cricut® StandardGrip 12×12 Mat — 3 count used for cardstock, photo paper & labels
Printer
Canon® Printing System (Photos + Printable Cricut Elements)
• Canon TS9521C Crafting Printer — used for ALL printed project photos, journaling pieces, print-then-cut embellishments & titles
Photo Papers
• Canon Photo Paper Plus Glossy II (4×6, PP-301) → For 4x6 or smaller - printed photos
• Canon Matte Photo Paper (MP-101, 8.5×11) → Used for Cricut print-then-cut elements & titles
• Canon Double-Sided Matte Photo Paper (MP-101D, 8.5×11) → Also used exclusively for Cricut embellishments, icons, & layered pieces
Speciality Adhesives
• Tombow® Mono Aqua Liquid Glue — for corners, details & layered paper pieces
• Bearly Art Precision Craft Glue (4oz Original) — for embellishments & fine-detail gluing
• Tombow® Mono Air Touch Adhesive— my preferred tape runner for base
• Tombow® Mono Air Touch Adhesive, Refill 2-Pack — my preferred tape runner for base layers
We’re Scrapbooking This Las Vegas White Christmas- Winter layout Step-by-Step:
Before we dive into the snowy magic, here’s the vibe: this layout is all about soft layers, frosty textures, and letting those rare desert snowflakes shine. Nothing complicated, nothing fussy — just simple steps that build into a winter wonderland right on your page. Ready to bundle up and craft? Let’s make some snow happen! ❄️✨
🌸 1. Blooming Backgrounds & Winter Breeze Inking
Let’s kick things off by giving this layout the bold, beautiful border it deserves.
We’re talking chunky winter-drama realness — a frame that lets that Peaceful Garden DSP shine like a snowy sunrise.
For THIS layout, we want a big, gorgeous patterned border, so here’s what you’ll do:

Place your 12×12 DSP in the trimmer.
Line the left edge at the 2” mark. (You could do a 1" or 1-1/2” cut; I did 2" because I like a sturdier frame).
Start your blade 2” down from the top, then cut straight down until 2” before the bottom.
Rotate the paper 90°, line it up again at 2”, and repeat.
Do this on all four sides, and you’ll end up with:
✨ A sturdy 2” patterned frame
✨ A perfect 8×8 square from the center, you can save for another project
Zero waste. Maximum beauty.
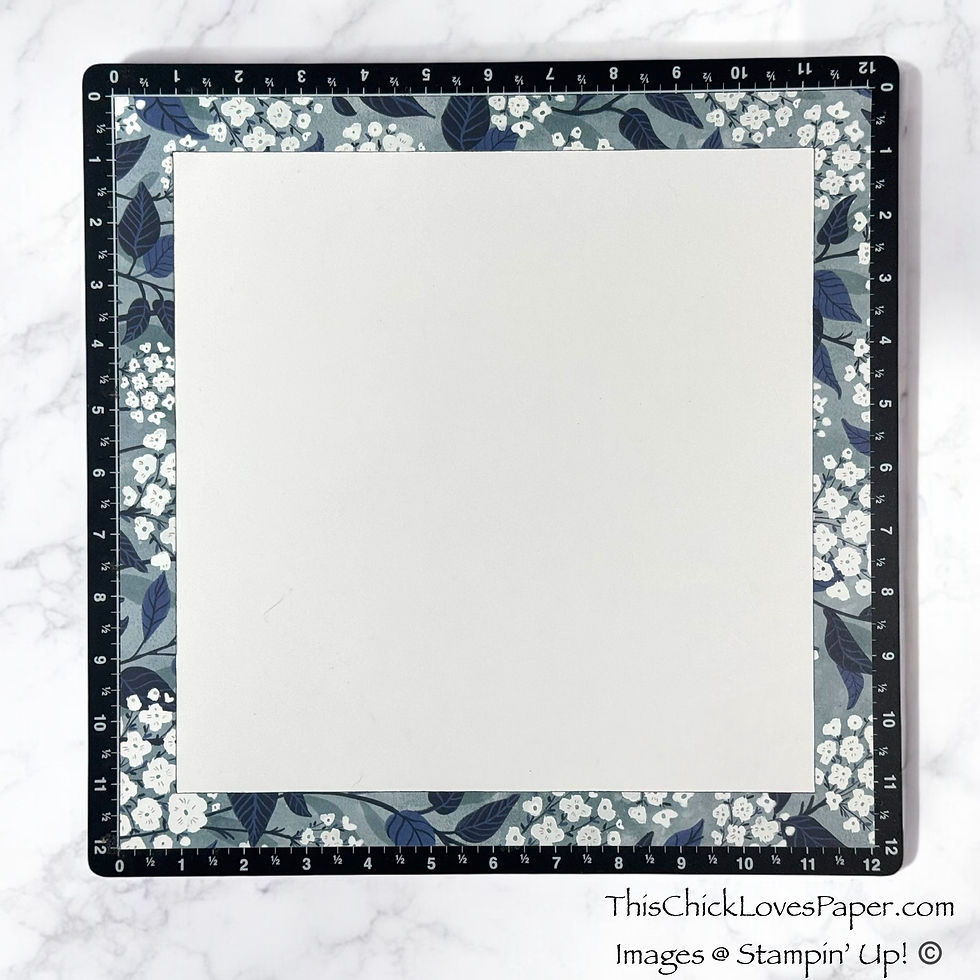
Now cut a 10¼” x 10¼” piece of White Willow cardstock. This is your frosty “snowfield” sitting on top of your patterned frame.
To give it that frosty, wind-kissed finish, ink the edges using a sponge dauber & Secret Sea Classic Stampin’ Pad.
When it’s dry, center your inked White Willow piece inside your DSP frame.
📌 Pro Tip: Inking gives a frosty, windblown edge that feels like a winter breeze just rolled across the page!
🌨️ 2. Frosty Foundation Strip, Reporting for Duty

Start by cutting a 12” × 3” strip from Cloud Cover Two-Tone Cardstock.
For this layout, we’re using the light side of the cardstock to keep everything soft, airy, and winter-bright.
Next, ink the edges very lightly using your Secret Sea Classic Stampin’ Pad.
A sponge dauber works perfectly here — think whisper of color, not full-blown blizzard.
Just enough to frost the edges and help the strip settle into the page.
Once dry, adhere the strip horizontally across the layout in the bottom third of your page.
This one piece grounds your whole design and instantly creates that soft, snowy base your photos and clusters will build on.
📌 Pro Tip: Light inking = depth without distraction. It keeps the layout airy while still adding that magical winter definition. ❄️
📸 3. Frame It Like It’s Flurrying Out!
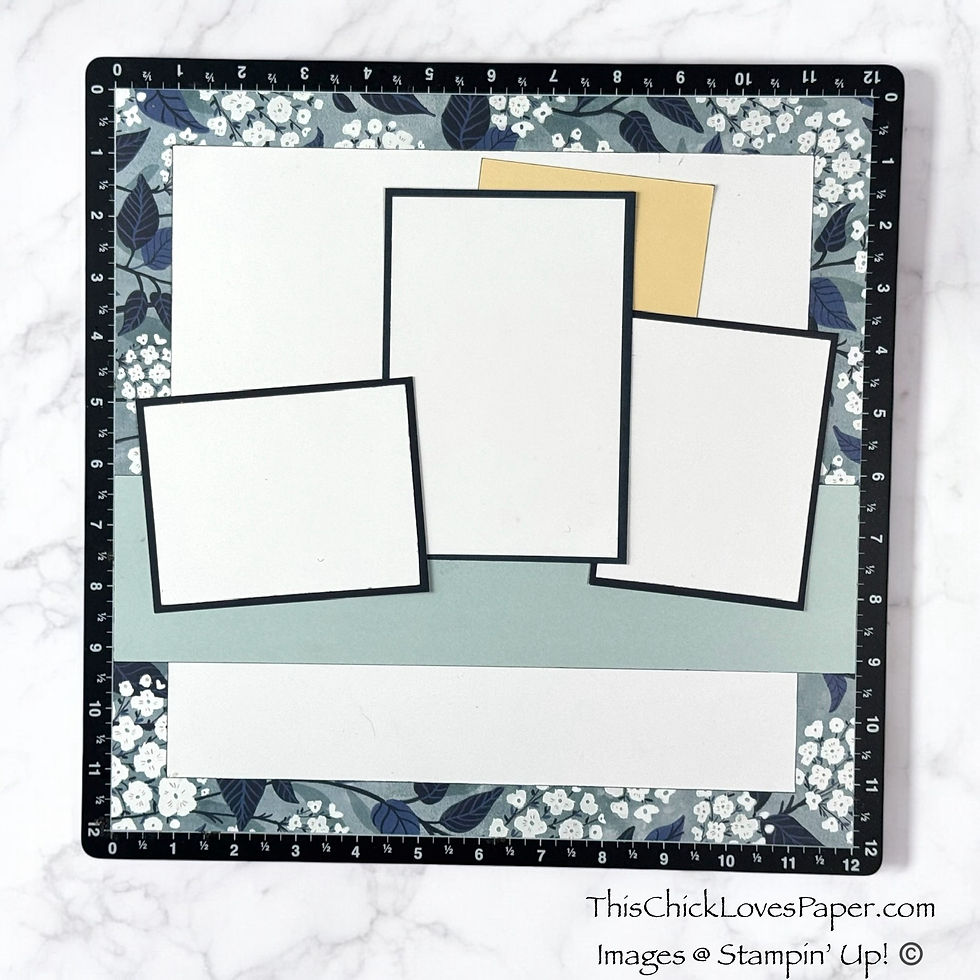
Let’s talk photo glow-up! These layered mats give the main character energy to every snowy snapshot.
Center Photo:
• Secret Sea: 4” x 6”
• White Willow: 3-3/4” x 5-3/4”
• Photo: 3-1/2” x 5-1/2”
Side Photos:
• Photo sizes: 3” x 4” and 4” x 3”
• Mats cut with 1/4” increments using Secret Sea & White Willow
Lightly ink the edges of all your mats with Secret Sea.
This soft halo ties everything together and makes your photos feel like they’re wrapped in winter air.
Once everything is dry, start placing your photos:
Adhere the large center photo first.
Overlap the two smaller mats on either side to create a cozy, connected trio.
They should feel like they’re huddled together for warmth — very “snow day vibes.”
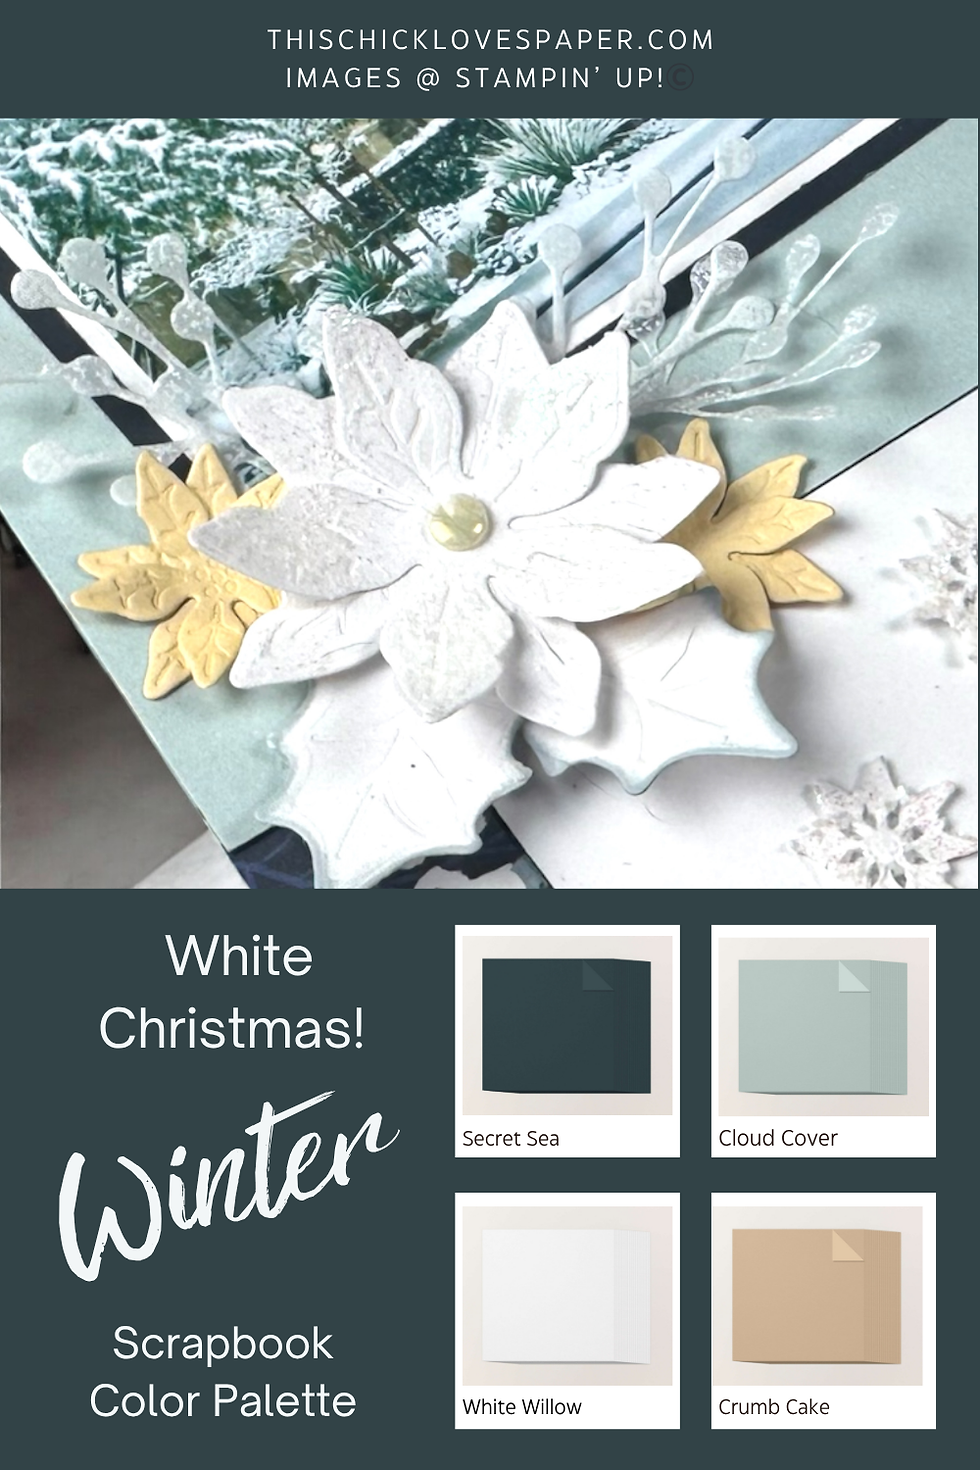
🌿 4. Poinsettias, Pearls, and Perfect Winter Clusters

Now comes the part that makes this layout sing — the soft, snowy clusters that bring all the winter charm to the page.
You’ll create three embellishment clusters, placed in a visual triangle so the eye travels naturally around the layout. Each cluster adds texture, shimmer, and that dreamy winter elegance.
❄️ Die-Cut Details
Large Poinsettias:
Cut from White Willow using the Poinsettia Petals Bundle.
Pop them up with foam tape, then brush on a touch of Shimmery White Embossing Paste for that gentle, snow-kissed sparkle.
Small Poinsettias:
Cut from Shortbread cardstock for a warm, subtle pop that ties in beautifully with your journaling strips later on.
Ivy Leaves:
Cut from White Willow, just like the large poinsettias.
Then softly ink the edges using Cloud Cover Classic Stampin’ Pad to give them definition without overpowering the cluster.
Vellum Sprigs:
Tuck these behind the petals to add softness and that frosty, delicate “winter mist” effect.
Antique Pearls:
Add them to the center of your poinsettias for an elegant, timeless finish.
Arrange your clusters around the page so they flow with your photos — layered, tucked, airy, and intentional. Nothing sits flat, nothing looks forced… It’s all cozy winter magic.
🌬️ 5. Title It With Frosty Flair
This chilly masterpiece wouldn’t be complete without a title that totally delivers the drama.

The “White Christmas” title was designed in Cricut Design Space and layered to perfection using:
• ❄️ A Print & Cut base
• 💙 Secret Sea letters stacked on top for cool contrast
• 🔲 Foam tape to give it that snow-drift shadow and standout pop
📍Title Placement: Nestled to the left of the large photo, just above the horizontal photo, this title doesn’t just sit there… it glows.
But here’s the frosty finesse:
Before adhering the title, I used a blending brush and Cloud Cover Classic Ink to gently soften the white cardstock underneath, creating the illusion of snowfall behind the title.
📌 Pro Tip: Soft ink blending under a dimensional title makes your words feel anchored and magical—like they’re floating on a wintry breeze.
❄️ 6. Let It Snow (With Shimmery Cricut-Cut Snowflakes!)
Time for the sparkle — the part that turns this layout from “cute winter moment” into full-on snow-day magic.

Each snowflake is Cricut-cut from White Willow cardstock using simple shapes pulled from Design Space. Clean, crisp, and perfect for layering.
Once your snowflakes are cut, give them their frosty finish: Brush on Shimmery White Embossing Paste with a light hand — just enough to catch the light and make them look like they drifted straight down from a desert snowstorm.
Let them dry completely, then scatter them across your layout like falling snow.
This is where that intentional open space around the title really shines —
The snowflakes sparkle without crowding the page.
📌 Apply the paste softly — too much can warp the cardstock, but a thin coat gives you that icy crystalline texture.
🧊 7. Finish with Journaling Strips & a Chilly Cricut Icicle

Every snow day needs a story — and a little icy drama to go with it.
Start by cutting your Cricut icicle border from the darker side of the Cloud Cover Two-Tone Cardstock.
Tuck it right under the center photo so it peeks out like a crisp line of frozen drip-drops. Instant winter mood.
Next, create your journaling strips:
Cut four strips of Shortbread cardstock at 3-3/4” × 1/4” each.
Ink the edges lightly using Secret Sea for that soft winter shadow.

Stagger the strips along the bottom right side of your layout so they nestle into the poinsettia cluster. The warm Shortbread tone ties back to your florals and helps the whole page feel balanced and intentional.
✨ A Quick Note on Journaling:
For tiny strips like these, I love using Avery Clear Full-Sheet Labels (8665). They let me type out longer journal entries, trim them down to size, and place them right over the Shortbread strips without hiding the color. The clear background keeps everything crisp, readable, and beautifully seamless — like the words were printed right on the cardstock.
Once everything is adhered, take one last look — the icicles, the soft journaling, the sparkle… that’s your full winter glow-up.
✨Layout Complete: Cue the Winter Glow-Up!

back and take it in — the frosty layers, the soft inked edges, the shimmer from those snowflakes… this layout really does feel like catching snowflakes on your tongue. It’s cozy, sentimental, and full of the kind of joy that only a surprise snow day can bring. Simple pieces, soft colors, and thoughtful layering turned one rare Las Vegas snowfall into a memory that feels timeless on the page.
🔁 Explore More: Flurries, Frost, and Frozen Fun!
If this snowy layout sparked something in your creative heart, you’re going to love exploring more of my winter & Christmas-inspired projects. From Frozen-themed pages to peppermint-swirled Christmas layouts and cozy holiday cards that absolutely sleigh, there’s a whole blizzard of inspiration waiting for you.
Bundle up, grab a hot cocoa, and scroll through the gallery for ideas that shimmer and sparkle, making winter memories feel magical on the page. ❄️✨


📸 Show Us Your Snow Day Scrapbooking Layouts!

There’s something so special about winter memories—the giggles, the chilly cheeks, the moments that feel like magic, even if the snow only lasted ten minutes.
If this layout reminded you of a snowy adventure of your own (or a day that felt just as magical), I’d love to see how you brought it to life on paper.
Share your creations in the Members’ Gallery and let’s celebrate those frosty, unforgettable moments together—whether your snow was falling from the sky or straight from your stash of cardstock. ✨❄️
💬 Final Thoughts From a Snow-Loving Memory Keeper

This White Christmas Winter Scrapbook Layout may be built from cardstock and ink, but the heart of it is the memory — that rare, magical snow day that showed up just long enough to make childhood feel enchanted. It’s a reminder that the best moments aren’t always planned or perfectly photographed; sometimes they’re cold hands, giggly breaths, and a little boy bundled up in a jacket you’ll remember forever.
If the moment matters to you, it’s worth scrapping — whether it lasted an hour, a season, or just long enough to make you smile.
❄️ Scrap the magic while it’s fresh… even if the snow melts fast.
April – This Chick Loves Paper
🛒 Grab Your Supplies & Get Crafting!
All photos and projects are subject to copyright © ThisChickLovesPaper.com.
Images © Stampin’ Up!®
The content in this blog is the sole responsibility of April Graziano, Independent Stampin’ Up!® Demonstrator. The use of and content of classes, services, or products offered is not endorsed by Stampin’ Up!®
A rare Las Vegas snow day turned into a magical three-photo, 12x12 white Christmas winter scrapbook layout—packed with frosty layers, shimmering Cricut snowflakes, vellum sprigs, and cozy clusters.
Follow This Chick Loves Paper’s step-by-step tutorial and recreate the snowy memory that started it all. ❄️💙

⭐How I Protect My DSP, Cardstock & Finished Cards
I store my DSP, cardstock, scraps, and even finished cards in these clear resealable bags.
The 2-mil thickness is perfect for everyday crafting (a 4-mil option is also available for extra durability), and they’re tough, reusable, and great for keeping your entire crafting stash clean, tidy, and protected from the chaos of the craft room.
Different sizes are available! Here are the ones I use the most:
*As an Amazon Associate, I earn from qualifying purchases.
• 13×13 Plymor 2mil Zipper Reclosable Bags — for 12×12 DSP, cardstock sheets & scraps
• 9×12 Plymor 2mil Zipper Reclosable Bags — for 8.5×11 cardstock & scraps
• 6x8 Plymor 4mil Heavy Duty Reclosable Bags — for storing extra die cut embellishments & finished cards, card workshop kits
⭐ Stamping & Journaling Tools I Use in My Projects
*As an Amazon Associate, I earn from qualifying purchases.
Journaling Tools
• Avery® Easy Peel® Full-Sheet Clear Labels (8665) → Used for long typed journaling strips
• Avery® Clear Shipping Labels 2×4 (8663) → Used for short typed journaling strips or blocks
• Skaura Pigma Micron Fineliner Pens - Archival Black - Assorted Point Sizes - Used for handwritten Journaling
Stamping & Precision Tools
• MISTI® Memory Size with 12-1/2" x 12-1/2" Stamping area — for borders, backgrounds & oversized stamping
• MISTI® Stamp Tool Bar Magnet - Additional magnet


Comments