
💥 YOU + ME = SPARKS — Metallic Masculine Valentine's Day Gear Cards That Bring the Boom! 💥
- April - This Chick Loves Paper

- Jan 12
- 11 min read

There’s something ridiculously fun about making a card that shouldn’t work on paper… but absolutely DOES once the gears start turning — literally. I’ve always loved crafting outside the box (sometimes outside the whole warehouse), and this time I found myself wandering into the land of masculine cardmaking… again. But instead of the usual black-gray-boring, I wanted fire. Texture. Metal. Attitude. A little “start your engines, boys — we’re crafting.”
And honestly? It all started because I was staring at my Gears & Texture Dies thinking, “Could this be… a Valentine’s Day card?” And then immediately laughing because… what man wants a pink glitter explosion? Exactly zero. But gears? Metal? Distressed edges? A little industrial romance? NOW we’re cooking.
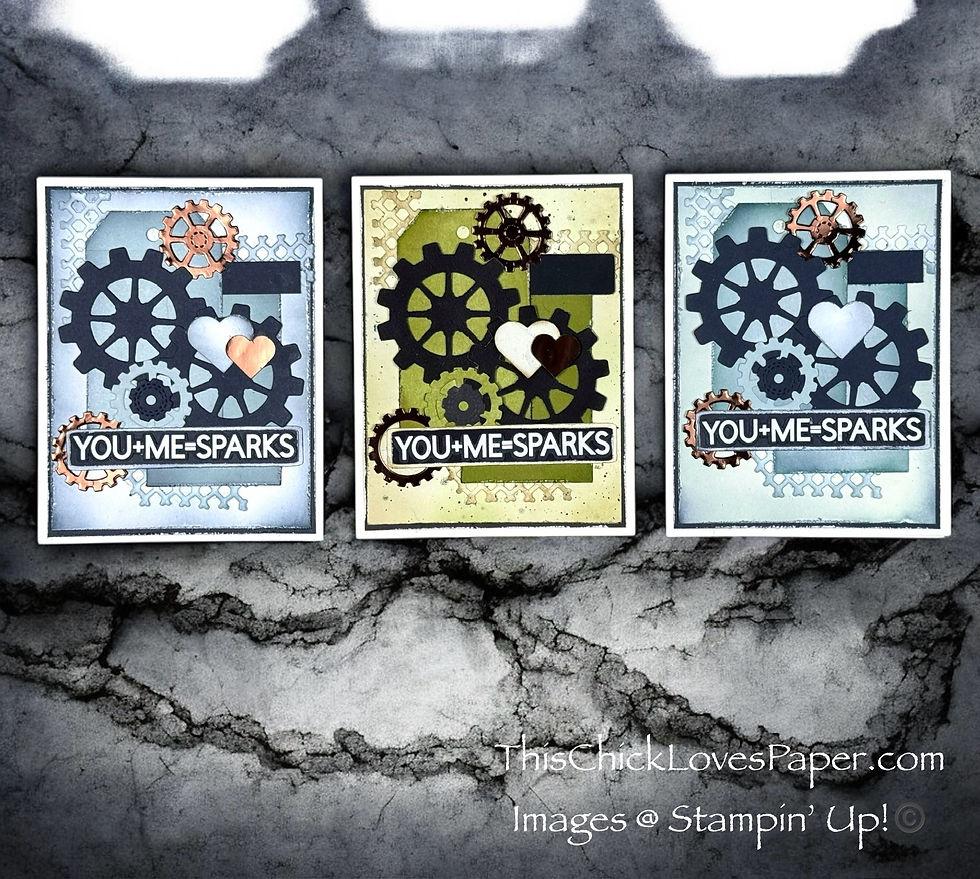
What surprised me the most is how wildly different each card felt once I switched up the color palette — Old Olive for the vintage mechanic vibe… Secret Sea + Cloud Cover for a crisp industrial blue… and Secret Sea, Cloud Cover + Lost Lagoon for a teal card my son immediately approved (trust me, this is HIGH praise). Same design. Same layout. Same gears. But each version has its own personality — like a trio of tough-guy Valentine cards.
So grab your scissors, blending brushes, and maybe that scrap of metallic paper you’ve been hoarding — because today? We’re making sparks fly. ⚙️✨
🧰 Supplies That Make the Magic Happen — Masculine Gear Card Materials

DSP / Patterned Paper
None required — all three designs rely on cardstock, metallics, and ink-built texture to highlight the masculine gear card aesthetic.
Optional: Consider incorporating a subtle, neutral print for added depth.
Speciality Paper
Stampin’ Up! Earthen Tones Metallic Specialty Paper (copper shade) — metallic gears + statement hearts
Cardstock


Stampin’ Up! Very Vanilla 12"x12" Two Tone Cardstock — base + mats for the Old Olive card
Stampin’ Up! Basic White 8.5”×11” Thick — base + mats for the blue and teal cards
Stampin’ Up! Basic Black 12×12 Cardstock — mats + contrasting gears
Stampin’ Up! Old Olive 12×12 Two-Tone Cardstock — dominant color for the first masculine gear card
Stampin’ Up! Secret Sea 12×12 Two-Tone Cardstock — gears + backgrounds for teal/blue cards
Stampin’ Up! Cloud Cover 12×12 Two-Tone Cardstock — lighter gear layers + both tags
Stamps & Dies
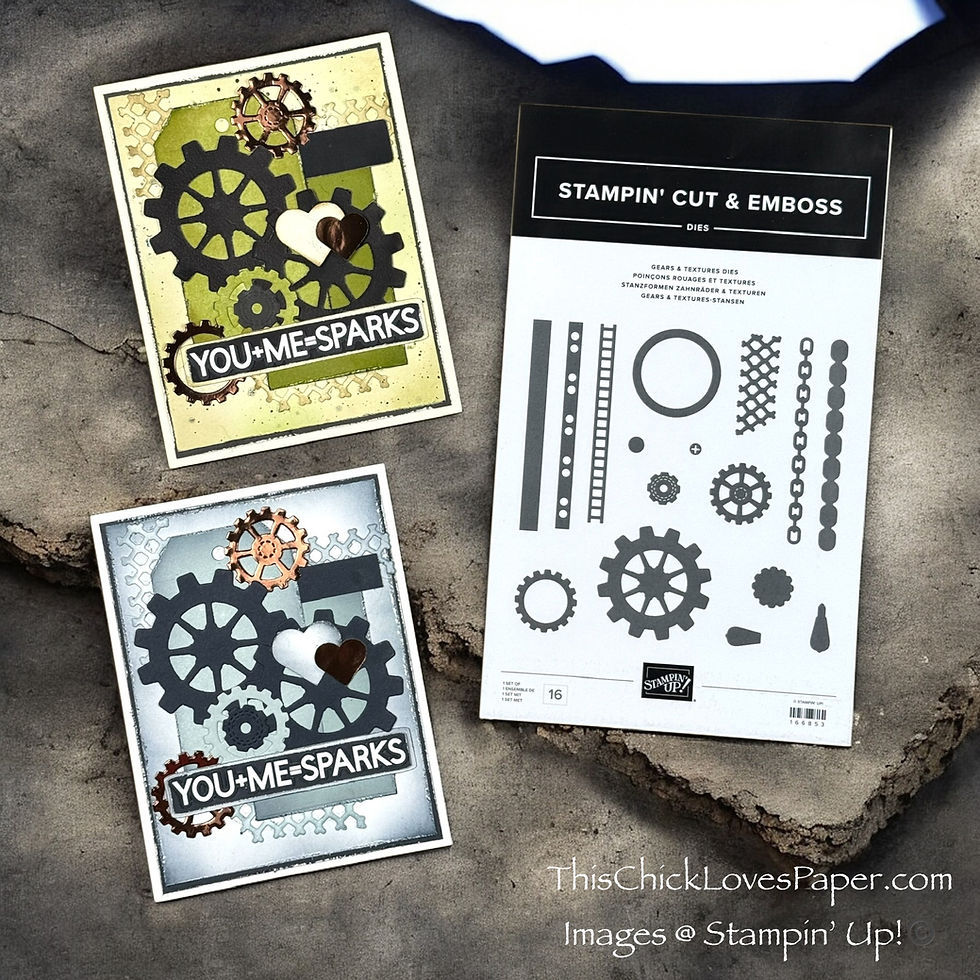
Stampin’ Up! Gears & Texture Dies — all gears + the waffle-grid texture piece
CTMH Tags & Tabs Thin Cuts — layered tag set for every card (any tags die set can be substituted - just use what you have or create your own)!
Cricut Print Then Cut Sentiment: “You + Me = Sparks” — double-matted sentiment panels
*Cricut materials listed below in the Tools section.
Inks (Classic Stampin’ Pads)


Old Olive Classic Stampin' Pad — ink blending + edge distressing for Old Olive card
Crumb Cake Classic Stampin' Pad — shading + distressing on Old Olive card
Secret Sea Classic Stampin' Pad — ink blending + edge shading for Secret Sea & Lost Lagoon masculine gear cards
Cloud Cover Classic Stampin' Pad - ink blending + edge shading for blue masculine gear cards
Lost Lagoon Classic Stampin' Pad - ink blending + edge shading for teal masculine gear cards
CTMH Intense Black — outer-edge grunge shading on all three cards
Tools

Stampin' Cut & Emboss Machine - Die-cutting Machine — gears, waffle texture piece, tags
Blending Brushes — adding soft shading to tags, mats, gears, and waffle die cut.
Paper Snips / Scissors — distressing edges for that rugged masculine finish
Fine Sandpaper — optional: softens and roughens the tags for extra texture
Liquid Glue — for multi-layer dimension and secure embellishing
(See other tools below for links)
⭐ Cricut Essentials & Adhesives I Use in My Projects
*As an Amazon Associate, I earn from qualifying purchases.


Cricut® Essentials
• Cricut® Maker 3 — my primary cutting machine for titles, SVGs & embellishments
• Cricut® StandardGrip 12×12 Mat — 3 count used for cardstock, photo paper & labels
Printer
Canon® Printing System (Photos + Printable Cricut Elements)
• Canon TS9521C Crafting Printer — used for ALL printed project photos, journaling pieces, print-then-cut embellishments & titles
Photo & Embellishment Papers
• Canon Photo Paper Plus Glossy II (4×6, PP-301) → For 4x6 or smaller - printed photos
• Canon Matte Photo Paper (MP-101, 8.5×11) → Used for Cricut print-then-cut elements & titles
• Canon Double-Sided Matte Photo Paper (MP-101D, 8.5×11) → Also used exclusively for Cricut embellishments, icons, & layered pieces
Speciality Adhesives
• Tombow® Mono Aqua Liquid Glue — for corners, details & layered paper pieces
• Bearly Art Precision Craft Glue (4oz Original) — for embellishments & fine-detail gluing
• Tombow® Mono Air Touch Adhesive— my preferred tape runner for base
• Tombow® Mono Air Touch Adhesive, Refill 2-Pack — my preferred tape runner for base layers
⚙️ Layer, Distress & Ignite — The Masculine Valentine's Day Gear Cards Step-By-Step Tutorial
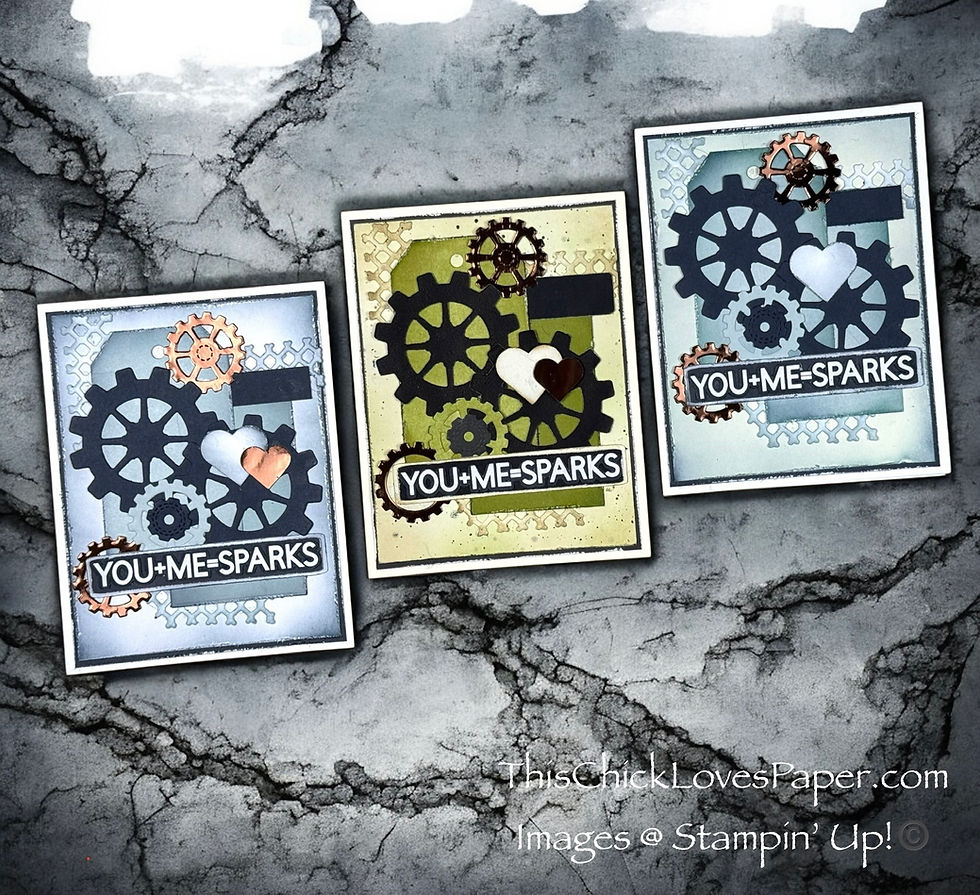
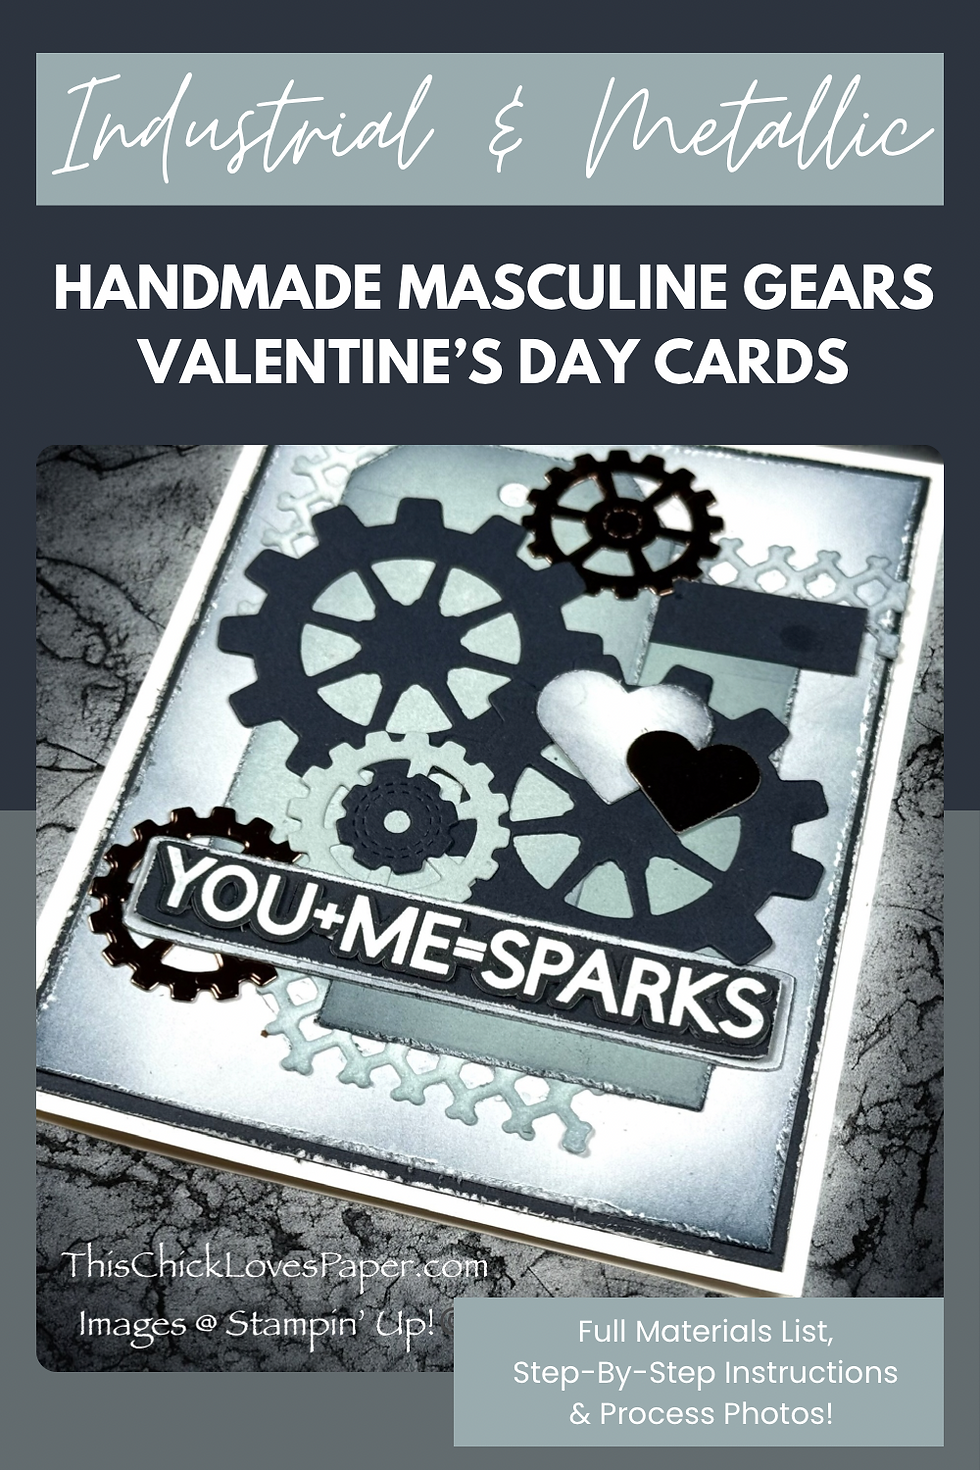
This masculine gear card design is built on distressed mats, layered tags, industrial metallic gears, and that waffle-grid texture piece. Each color palette creates a totally different personality — but every version follows the same core blueprint.
Let’s make sparks fly. 🔥
1️⃣ Rev Up the Base (Distressed Foundations for All Three Cards)
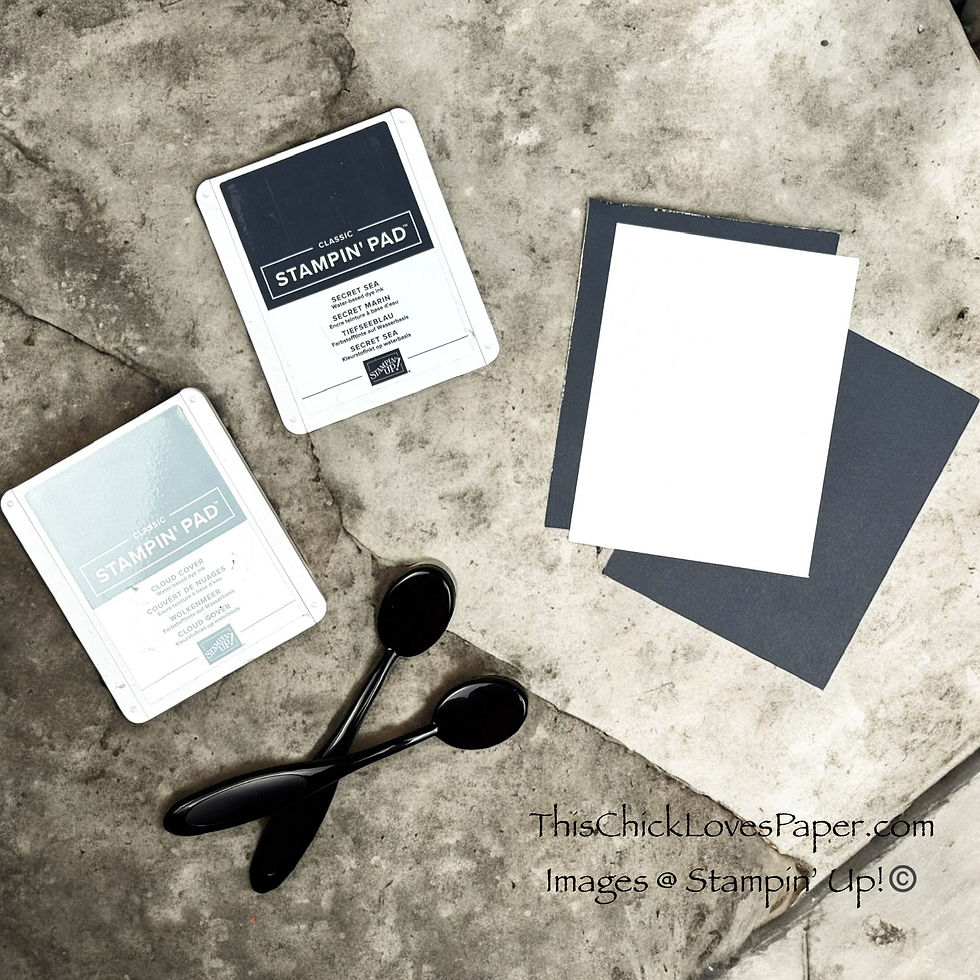
All three A2 cards start with two distressed mats layered on the card front:
Outer mat: 4” × 5¼”
Inner mat: 3⅞” × 5⅛”
(cut just shy enough to give a perfect, even reveal on all four sides)
Both mats are distressed with scissors, curled slightly upward for texture, and inked with coordinating colors to give that rugged, industrial edge that makes the gears pop.
Then sweep a blending brush around the perimeter using your palette color — Old Olive + Crumb Cake for one card, Secret Sea & Cloud Cover for the second, and Lost Lagoon & Secret Sea for the third. This instantly sets the tone and brings that masculine texture forward.
PRO TIP: After distressing, lightly bend corners upward. The subtle shadow makes your layers look thicker… even when they’re not.
2️⃣ Distress the Tags (Double Mats = Double Attitude)

Each card uses a layered tag pair:
• top tag = light side of Cloud Cover or Old Olive
• bottom tag = dark side
Both tags get scissor-distressed edges and matching ink around the perimeter.
For the light-sided tags, swipe a little sandpaper across the surface — it softens the color and gives that worn-metal look.
Stack your tags slightly offset so the darker layer peeks through. Ink the edges heavily for drama — especially on the masculine gear card design, where contrast is everything.
PRO TIP: Leave the top of the tags clean — too much ink there can distract from the gear cluster that anchors the entire card.
3️⃣ Build the Gear Cluster (This Is Where the Sparks Really Start Flying)

Each masculine gear card follows the same bold mechanical structure, but the colors shift depending on the version you’re making.
For the Old Olive card, the two main gears are cut from Basic Black, giving it that strong contrast and rugged feel. For the Lost Lagoon and Secret Sea cards, those same two large gears are cut from the dark side of Secret Sea, which pulls the whole cool-toned palette together.
The smaller accent gear changes, too:

• Old Olive card: small gear in Old Olive with a Basic Black center
• Lost Lagoon + Secret Sea cards: small gear in Cloud Cover with a Secret Sea center
Start by placing the two largest gears first — they set the entire energy of the card. Let them overlap just enough to feel interconnected, like real machinery.
Then position the small gear right where the big gears meet. This hides that intersection and gives the eye a focal point.
PRO TIP: You’ll notice the gears themselves are not distressed or inked — and that’s intentional! The natural light/dark contrast of two-toned cardstock (Cloud Cover, Secret Sea, Old Olive) creates all the definition you need without muddying the edges. Clean cuts keep the gears feeling crisp, modern, and mechanical.
4️⃣ Add the Metallic Gears & Hearts (Where the Texture Really Comes Alive)

After your main gear cluster is in place, it’s time for the metallic moments that make these cards sing. Add your two Earthen Metallic gears last — one on the bottom left, one on the top right — to bring in that coppery “spark” and complete the visual triangle. Let each piece overlap just a bit; that intentional layering is what gives these cards their bold, industrial depth.
On the Lost Lagoon and Secret Sea cards, the non-matellized hearts are distressed and brushed with Secret Sea for a cool, cohesive blend.

On the Old Olive card, the white/vanilla heart is lightly distressed with scissors and shaded with Crumb Cake (with the faintest touch of Old Olive) to soften the edges and echo the warm neutrals in the design.
A metallic copper heart sits on top of each (except the Lost Lagoon card — that one mysteriously lost a heart somewhere in the craft room jungle 🕵️♀️✨), adding the perfect hit of shine.
Position the heart so it completes that visual triangle with the two metallic gears. This simple but powerful placement trick keeps everything balanced and intentional — even with all those rugged shapes working behind the scenes.
5️⃣ Finish With the Sentiment (Double-Matted & Built Right Into the Layers)

“You + Me = Sparks” is printed with Cricut, then layered on two distressed mats customized to each palette:
• Vanilla + Black for the Old Olive card
• White + Secret Sea for both the Lost Lagoon and Secret Sea cards
Each mat is distressed with scissors, inked along the edges, and glued directly onto the card — no foam tape needed. Because the tags are double-matted, the sentiment is double-matted, and the copper gear peeks from underneath, the entire center section already has gorgeous height and built-in dimension.
Position the sentiment so that it slightly overlaps the top of the bottom tag and lets the copper gear edges peek out from behind. This layering creates that industrial–romantic contrast without adding bulk, and it makes the sentiment feel like it truly belongs in the heart of the design.
💙 Card Complete — Cue the Sparks & Celebrate the Shine

Is there anything more satisfying than stepping back and seeing three cards — same bones, same gears, same layout — each with its own bold little personality? Whether you’re Team Olive, Team Lost Lagoon, or Team Secret Sea, these masculine gear cards prove that color can completely transform a design. The copper metallics catch the light in the coolest way, and that waffle-grid texture ties everything together like industrial lace.
But my favorite part? That these cards can be ANYTHING: Valentine’s Day, Father's Day, birthday, anniversary, thinking of you, or “hey babe, thanks for fixing the garbage disposal.” With just a sentiment swap, you’ve got a whole new mood.
It’s rugged, romantic, industrial, and unexpectedly sweet… Exactly the kind of card a guy will actually KEEP. 😉
❤️🔥 EXPLORE MORE — Simple Sentiment Swaps, Big Card Magic
If this gear-themed card got your creativity humming, you’ll love how many of your existing designs can shift into Valentine mode with almost no effort. Swap the sentiment, tuck in a couple of hearts, and BAM — instant love card.
From traditional Valentine styles to kid-friendly designs like Lightning McQueen, and even your bold masculine layouts, so many of them slide perfectly into “romantic” territory with just a tiny tweak. Peek through your stash, grab a favorite design, and try giving it a little heart-day makeover — you’ll be shocked at how fast those sparks fly. 🔧❤️✨


⚙️ Show Us Your Spark! (Let Your Creativity Shift Into High Gear)

Now I need to see what you create with this design — whether you followed the gear layout exactly, swapped in your own colors, or grabbed an older card from your stash and simply changed the sentiment to make it Valentine-ready.
Did you go bold? Subtle? Metallic on metallic? Perhaps you even tried your first-ever masculine card and were surprised by how well it turned out!
Upload your masterpiece to the Members Gallery so we can all cheer, swoon, and maybe even “borrow” a few ideas for our own craft tables.
Let’s fill that gallery with creativity that clangs, clicks, and shines — show off your sparks, your swaps, and your one-of-a-kind magic. ⚙️💙🔥
💛 Final Thoughts — When the Gears Turn, the Magic Begins
What I love most about these cards is how unexpectedly heartfelt they are. Under all that metal and texture and rugged edges is a simple message: connection. Whether it’s for Valentine’s Day, Father's Day, a birthday, or a random Tuesday surprise, these cards remind us that love doesn’t always look like hearts and flowers — sometimes it looks like gears and grit and the quiet kind of spark that keeps life moving.
Crafting these designs reminded me how fun it is to break rules, to play with unexpected colors, and to push myself past the traditional. And honestly? These cards feel like they were meant to happen — bold, shiny, messy, distressed, and full of personality… just like the best stories.
May your creativity stay well-oiled and your inspiration never miss a gear.
April – This Chick Loves Paper
🛒 Grab Your Supplies & Get Crafting!
All photos and projects are subject to copyright © ThisChickLovesPaper.com
Images © Stampin’ Up!® & CTMH®
The content in this blog is the sole responsibility of April Raine – This Chick Loves Paper, Independent Stampin’ Up!® Demonstrator. The use of and content of classes, services, or products offered is not endorsed by Stampin’ Up!®.
Create an A2 masculine Valentine's Day gear card — designed by This Chick Loves Paper. This step-by-step tutorial features distressed layers, metallic copper gears, textured tags, and bold industrial color palettes in Old Olive, teal, and blue. Perfect for Valentine’s Day, Father's Day, or masculine birthday cards. Learn ink-blending, distressing, and layered composition techniques in this detailed guide.

⭐How I Protect My DSP, Cardstock & Finished Cards
I store my DSP, cardstock, scraps, and even finished cards in these clear resealable bags.
The 2-mil thickness is perfect for everyday crafting (a 4-mil option is also available for extra durability), and they’re tough, reusable, and great for keeping your entire crafting stash clean, tidy, and protected from the chaos of the craft room.
Different sizes are available! Here are the ones I use the most:
*As an Amazon Associate, I earn from qualifying purchases.
• 13×13 Plymor 2mil Zipper Reclosable Bags — for 12×12 DSP, cardstock sheets & scraps
• 9×12 Plymor 2mil Zipper Reclosable Bags — for 8.5×11 cardstock & scraps
• 6x8 Plymor 4mil Heavy Duty Reclosable Bags — for storing extra die cut embellishments & finished cards, card workshop kits
⭐ Stamping & Journaling Tools I Use in My Projects
Stamping & Precision Tools
• MISTI® Memory Size with 12-1/2" x 12-1/2" Stamping area — for borders, backgrounds & oversized stamping
• MISTI® Stamp Tool Bar Magnet - Additional magnet
Journaling Tools
• Avery® Easy Peel® Full-Sheet Clear Labels (8665) → Used for long typed journaling strips
• Avery® Clear Shipping Labels 2×4 (8663) → Used for short typed journaling strips or blocks
• Skaura Pigma Micron Fineliner Pens - Archival Black - Assorted Point Sizes - Used for handwritten Journaling


Comments