
🏒 Hockey – In It to Win It! A 12x12 Double Page Scrapbook Layout That Scores Big
- This Chick Loves Paper

- Aug 16, 2025
- 9 min read
Updated: Dec 17, 2025

Snowflakes? Nope. Sunshine? Not today. On this particular game day, the only thing on my mind was turning my little man’s hockey hustle into a scrapbook spread that could win the championship of layouts.
This wasn’t just “photos on paper.” Oh no. This was a full-blown game-day re-creation in cardstock form — puck flying, goalie blocking, scoreboard ticking down the seconds, and fans in the stands waving foam fingers and munching popcorn. And while the scoreboard might not have declared him the winner that day, this layout? Oh… this one is a crafting victory lap. 🏆
So lace up those creative skates, grab your hockey—uh, I mean glue sticks, and let’s hit the ice… er… paper trimmer. This 12x12 double-page scrapbook layout is about to score big in your album!
📦 Materials You’ll Need to Slay This 12x12 Double-Page Hockey Scrapbook Layout
Designer Series Paper

• Peaceful Garden 12x12 DSP (marble background)
Cardstock


• Stampin’ Up! White Willow 12x12 Cardstock – base pages, photo mats
• Stampin’ Up! Smokey Slate 12x12 Two-Tone Cardstock – photo mats, strips, journaling strips
• Stampin’ Up! Cherry Cobbler 12x12 Two-Tone Cardstock– banners, strips
• Stampin’ Up! Basic Black 12x12 Two-Tone Cardstock – banners
• Stampin’ Up! Crushed Curry 12x12 Two-Tone Cardstock – banners
Stamps & Dies
• Stampin’ Up! Poppin’ In Bundle
Cricut Cuts
• Hockey net, goalie, player silhouette, scoreboard, foam finger, tickets, pom-poms, custom jersey (#06 BRAZ), puck with cracked ice
Tools & Adhesives


• Multipurpose Liquid Glue or Bearly Art Glue
• Jet Black Stazon Pad
⭐ Other Tools I Use in My Projects
*As an Amazon Associate, I earn from qualifying purchases.


Cricut® Essentials
• Cricut® Maker 3 — my primary cutting machine for titles, SVGs & embellishments
• Cricut® StandardGrip 12×12 Mat — 3 count used for cardstock, photo paper & labels
Printer
Canon® Printing System (Photos + Printable Cricut Elements)
• Canon TS9521C Crafting Printer — used for ALL printed project photos, journaling pieces, print-then-cut embellishments & titles
Photo Papers
• Canon Photo Paper Plus Glossy II (4×6, PP-301) → For 4x6 or smaller - printed photos
• Canon Matte Photo Paper (MP-101, 8.5×11) → Used for Cricut print-then-cut elements & titles
• Canon Double-Sided Matte Photo Paper (MP-101D, 8.5×11) → Also used exclusively for Cricut embellishments, icons, & layered pieces
Stamping & Precision Tools
• MISTI® Memory Size with 12-1/2" x 12-1/2" Stamping area — for borders, backgrounds & oversized stamping
• MISTI® Stamp Tool Bar Magnet - Additional magnet
Speciality Adhesives
• Tombow® Mono Aqua Liquid Glue — for corners, details & layered paper pieces
• Bearly Art Precision Craft Glue (4oz Original) — for embellishments & fine-detail gluing
• Tombow® Mono Air Touch Adhesive— my preferred tape runner for base
• Tombow® Mono Air Touch Adhesive, Refill 2-Pack — my preferred tape runner for base layers
Journaling Tools
• Avery® Easy Peel® Full-Sheet Clear Labels (8665) → Used for long typed journaling strips
• Avery® Clear Shipping Labels 2×4 (8663) → Used for short typed journaling strips or blocks
• Skaura Pigma Micron Fineliner Pens - Archival Black - Assorted Point Sizes - Used for handwritten Journaling
🏒 How to Make This 12x12 Double Page Hockey Scrapbook Layout
Before we hit the ice with Step 1, here’s a fun fact: I didn’t have a single hockey-themed stamp or die in my entire craft stash. Not one! So I turned to my Cricut and created custom embellishments — jerseys, cracked ice, goalie silhouettes, scoreboard, foam fingers… the whole stadium atmosphere, right on cardstock.
1️⃣ Build Your Base Pages — Start Strong, Like the First Period

Start with two pieces of 12x12 Stampin’ Up! White Willow cardstock as your base.
• Cut two 12” x 1/4” strips of Cherry Cobbler and adhere them to the very top of each base page.
• Cut two 12” x 7-1/4” pieces of Peaceful Garden DSP (marble pattern) and place them directly underneath the Cherry Cobbler strips.
• Cut two 12” x 1/2” strips of Basic Black cardstock and adhere them below the DSP.
2️⃣ Add Your Banner Action — Because Every Rink Needs Team Spirit
For banners, cut strips from Cherry Cobbler, Basic Black, and Crushed Curry to match the team uniforms. Each strip is 1-1/4” wide x 2” long. Ducktail the ends.
• On the left page, run banners across under the black strip.
• On the right page, add four banners to leave space for embellishments and journaling.
3️⃣ Anchor the Bottom Line — Your Layout’s Defensive Line
Cut two 12” x 1/4” strips of Smokey Slate cardstock and adhere them to the very bottom of each page. This creates a visual “rink boundary” for your layout.

4️⃣ Add Your Photo Mats — Frame the MVP Moments
• Two vertical photos: Smokey Slate mats 4” x 5-1/2”, White Willow mats 3-3/4” x 5-1/4”, photos 3-1/2” x 5”
• Two horizontal photos: Smokey Slate mats 5” x 3-1/2”, White Willow mats 4-3/4” x 3-1/4”, photos 5” x 3”
• One square photo: White Willow mat 2-3/4” x 2-3/4”, photo 2-1/2” x 2-1/2”
Pro Tip: Drag the edges of both mats and photos across a Jet Black StazOn ink pad to get that bold, rink-side frame without extra layers.
5️⃣ Set the Scene — Goalie, Net, Scoreboard… It’s Game Time! 🥅

Think of this section as your stage-setting moment, your Cricut cuts are the actors, and you’re directing the play. The die-cut goalie and net immediately shout Game on! While the scoreboard reminds everyone of the stakes. Add in foam tape under the hockey player silhouette, and suddenly you’ve got depth, motion, and a little extra drama (because what’s hockey without some drama, right?).
✨ Pro Tip: Popping up players with foam tape doesn’t just add dimension, it actually guides the viewer’s eye across your page like the play-by-play of the game.
6️⃣ 🏒 A Title That Packs a Punch — Bold, Big, and Totally Game-Day Ready 🏒
Now for your signature title technique (drumroll 🥁):
1. Cricut Print & Cut gave you a smooth, flat “YOU” — the base layer.
2. Then you stacked 3–4 cut layers of each letter from Stampin’ Up! Crushed Curry Two-Tone cardstock.
3. Once glued and dry, you adhered the chunky stack to the flat cut.
The result? Bold, dimensional lettering that screams In It to Win It! across the ice. And the best part — it’s quick, easy, and repeatable for any layout.
✨ Pro Tip: This stacked-letter hack gives the WOW factor of chipboard titles without the cost or bulk. Think of it as “custom embellishments, PaperPixie style.”
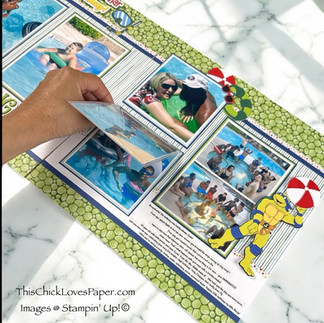
7️⃣ Right Page Action — Players, Fans, Popcorn… Bring the Noise 🏒

Here’s where the energy really explodes:
• The Shot: Your custom-cut hockey player winds up for the hit, puck flying with a cracked ice detail that ties directly back to the “In It to Win It!” title. That little pop of action doesn’t just decorate—it connects the story across both pages.
• The Jersey Moment: The personalized “#06 GRAZ” jersey is layered with foam tape, giving your player his MVP spotlight. Pro tip? Personalized touches like a jersey or team number are the details that make layouts one-of-a-kind.
• The Stands Come Alive: Just above, the fan section rallies with foam fingers, popcorn buckets (hand-cut with White Willow & Cherry Cobbler), tickets, and pom-poms. It feels like a mini stadium shouting encouragement right from the page.
✨ Pro Tip: Keep the Play Connected
Think of your embellishments like a play-by-play announcer. Your puck connects to the cracked ice, your player swings toward the goalie, and the cheering crowd backs them up. The magic? Every element interacts visually, which keeps the eye moving and the story cohesive.
8️⃣ Journal Like a Champ — Tell the Story Behind the Score

Cut your Smokey Slate strips to ¼” high, ink up those edges with Jet Black StazOn (drag ‘em like you’re putting eyeliner on your page!), and line them up evenly for crisp journaling spots. Simple, right? But here’s the real magic: journaling is almost as important as the photos themselves.
Your pictures show the action, that winning smile, the speed across the ice, the goalie blocking a shot. But your words? They capture the why. The nerves before the game. The parents are cheering in the stands. The inside joke the team shared in the locker room. That’s the stuff your kids (or grandkids!) will laugh about years from now.
🥅 Layout Wrap-Up: This Page Shoots… AND SCORES!

From the clean marble base to the custom die cuts, this double-page 12x12 hockey layout is ready for the big leagues. The colors are bold, the structure is strong, and the theme? Absolutely unstoppable. Swap out the team colors for your own roster, add more flip flaps if you’ve got a photo-heavy game, and you’ll have a sports spread that’ll be the star of your scrapbook season.
And if you’ve got extra photos — because let’s be honest, hockey games never have just five good shots — just add Flip Flaps. They tuck in perfectly without messing up the design and give you more storytelling room than a sudden-death overtime.
🏒 Explore More: From Puck Drops to Paper Cuts
If this 12x12 double-page hockey scrapbook layout has you ready to lace up your creative skates, I’ve got even more layouts to keep your albums winning. Whether it’s outdoor adventures under the stars, holiday cookie spreads that make you drool 🍪, or everyday moments that deserve the spotlight, you’ll find inspiration that turns every page into a showstopper.
No matter the theme, sports, seasons, or sweet celebrations, you’ll discover scrapbook ideas that score big every single time.


📣 Share Your Game-Day Glory!

Have you scrapped your own epic game-day memories?
I want to see those winning shots, those tough defensive plays, those team huddles, and even the “we tried our best” moments.
Upload your layouts to the Members Gallery so we can cheer you on from the crafty sidelines!
Whether your team skated away with the trophy or just played with heart, your pages deserve their own spotlight.
And who knows? Your layout may be the one that inspires another scrapbooker to document their own championship moments.
💥 Final Whistle: This Layout Shoots… and Scores!

Goal! 🏒 This hockey scrapbook layout scores big with bold banners, team colors, and full-ice energy. From custom Cricut cuts to dynamic photo mats, every detail works together to recreate the excitement of game day.
Swap out the colors for your own team, add more Flip Flaps for bonus photos, or tweak the embellishments to match your player’s personality.
Whether you’re scrapping a championship win or a learning season, this layout is designed to shine in any album — because on the ice and in scrapbooking, it’s all about playing with heart. 💙
April – This Chick Loves Paper
🛒 Grab Your Supplies & Get Crafting!

All photos and projects are subject to copyright © ThisChickLovesPaper.com.
Images © Stampin’ Up!®
The content in this blog is the sole responsibility of April Raine – This Chick Loves Paper as a Stampin’ Up!® Independent Demonstrator.
The use of and content of classes, services, or products offered is not endorsed by Stampin’ Up!®
Score big with This Chick Loves Paper!
Learn how to create a 12x12 double-page hockey scrapbook layout that holds 5 photos, and is packed with custom Cricut cuts, team-color banners, and game-day photo mats — a winning design for hockey or any sport-themed scrapbook page. 🏒
⭐How I Protect My DSP, Cardstock & Finished Cards
*As an Amazon Associate, I earn from qualifying purchases.

I store my DSP, cardstock, scraps, and even finished cards in these clear resealable bags.
The 2-mil thickness is perfect for everyday crafting (they make a 4-mil option if you want extra durability!), and they’re tough, reusable, and great for keeping your entire crafting stash clean, tidy, and protected from the chaos of the craft room.
Different sizes are available! Here are the ones I use the most!
• 13×13 Plymor 2mil Zipper Reclosable Bags — for 12×12 DSP, cardstock sheets & scraps
• 9×12 Plymor 2mil Zipper Reclosable Bags — for 8.5×11 cardstock & scraps
• 6x8 Plymor 4mil Heavy Duty Reclosable Bags — for storing extra die cut embellishments & finished cards, card workshop kits


Comments