
2 a.m. Assembly-Line Valentine’s Day Cards (Using Stampin’ Up! "Made With Love" Suite)
- This Chick Loves Paper

- Jan 30
- 13 min read
Updated: Feb 8

Here’s what 2 a.m. crafting REALLY looks like:
You’re exhausted, you’re delirious, your glasses are sliding off your nose, and suddenly your brain screams,
“Oh no… I need TWENTY Valentine’s Day cards by 8 a.m.!”
Cue the chaotic scramble — the kind where you’re tripping over your paper trimmer, flinging open drawers, whispering,
“Where the heck is my Real Red cardstock?!”
Meanwhile, your DSP is silently judging you from across the room.

Then comes survival mode:
Coffee gets poured.
Hair goes in a messy bun.
The crafting table becomes a crime scene of half-cut strips and emotional-support adhesives.
And right when you’re about to spiral, that tiny voice kicks in: “Girl… you’re MOM. You’ve GOT this.”
Deep breath.
Grab your Stampin’ Up! Made With Love suite.
Channel the chaos.
Let’s make cute cards — assembly-line style — because that’s the ONLY way twenty Valentine’s Day cards get made before sunrise.
✨ Paper trimmer? Check.
✨ Extra shot of caffeine? Check.
✨ Twenty cards needed by dawn? …Sigh. Let’s do this.
✂️ Assembly-Line Valentine’s Day Cards (Stamped, Stacked & Saved-My-Sanity Cute!)
(Made With Love Product Suite Collection — but all items also sold individually!)

Below is the full materials list showing exactly what each item was used for — so whether you’re crafting one card or twenty at 2 a.m., you’ll know exactly what to grab.

Patterned Paper (DSP)
Stampin’ Up! Made With Love DSP — large heart die-cuts (Bubble Bath pattern), half-inch strips for card edges
Speciality Papers
Stampin' Up! Silver Foil 12"x12" Sheets — Endless Love arrow die-cuts (one arrow per card, later cut in half)
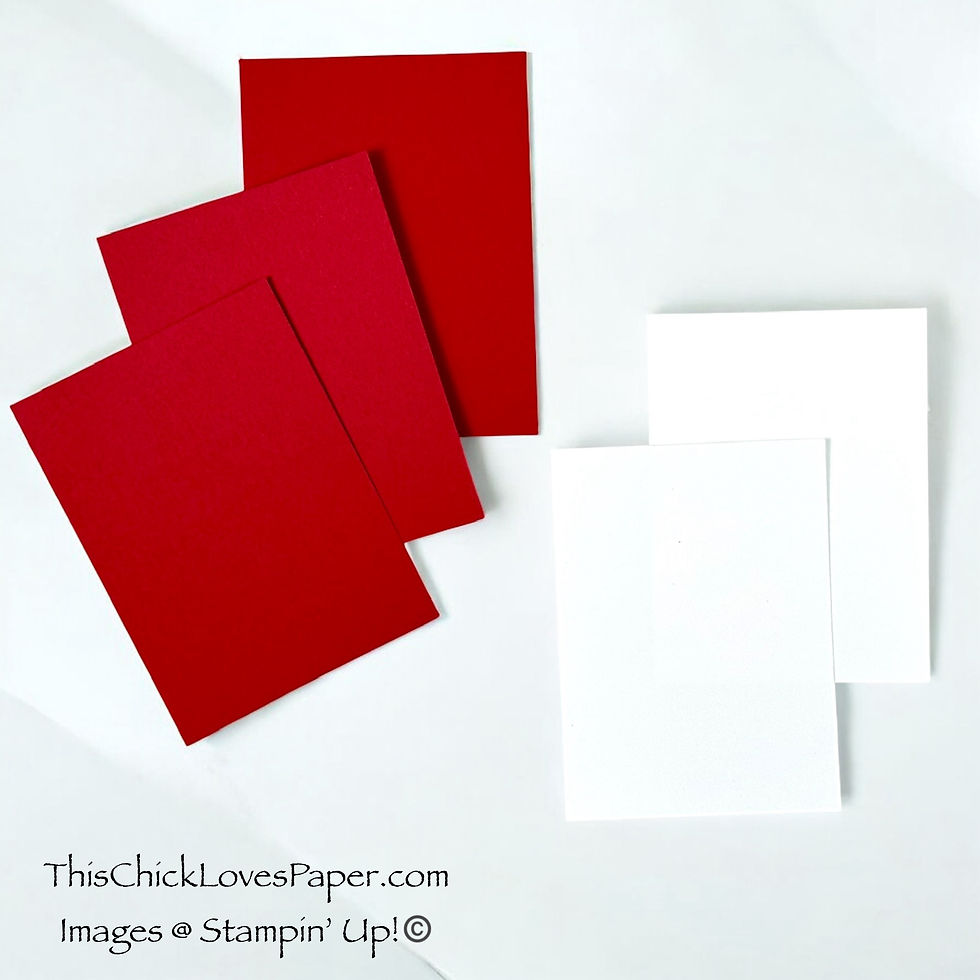
📄 Cardstock
• Stampin’ Up! Basic White Thick 8½” x 11” Cardstock — cut and scored into A2 card bases (5½” x 8½”, scored at 4¼”)
• Stampin’ Up. Basic White 8½” x 11” Cardstock — embossed panel (3½” x 4¾”)
• Stampin’ Up! Real Red 8½” x 11” Cardstock — thin double mat (3⅝” x 4⅞”), small heart die-cuts
🖨️ Stamps & Dies

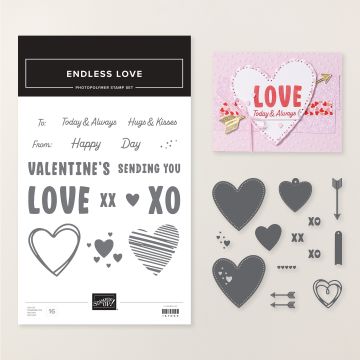


• Stampin’ Up! Endless Love Bundle (stamps + dies), Sentiment, Small Real Red heart die & Large decorative arrow
• Stampin’ Up! Hearts of Elegance Bundle
Large patterned heart (main focal piece)
(These two die sets together give you endless heart sizes, which is why this card design works so well.)

🖍️ Inks
Stampin’ Up! Bubble Bath Classic Stampin’ Pad — inked edges of Bubble Bath hearts (sponge dauber technique)
Stampin’ Up! Real Red Classic Stampin’ Pad — inked edges of Flirty Flamingo hearts + Real Red hearts
✨ Embellishments
Stampin’ Up! Adhesive-Backed Sparkle Gems — placed near the sentiment and arrow for a subtle Valentine shimmer
🛠️ Tools & Adhesives


Stampin’ Up! Paper Trimmer — cutting card bases, DSP strips, mats
Stampin’ Up! Bone Folder — crisp professional folds
Stampin’ Up! Stampin’ Cut & Emboss Machine — heart dies + embossing folder
Stampin’ Up! Hearts of Love 3D Embossing Folder — adds the raised textured design on the white mat
Sponge Daubers — soft, seamless ink edges
Tape Runner / Liquid Glue — assembly
💌 CUT, STACK & SURVIVE — Your Fast & Fabulous Valentine’s Day Card Tutorial
(A 2 a.m. Crafter’s Guide to Cute Cards Under Pressure)
Before we dive in: this design looks time-consuming at first glance — all the strips, the mats, the hearts, the embossing — but trust me, it’s actually not.
Once you get into the assembly-line rhythm, this card comes together way faster than you’d ever expect at 2 a.m.
And the best part? One layout gives you endless mix-and-match possibilities!
Suddenly, twenty cards feels totally doable — almost relaxing… almost. 😅
Every measurement below is written width-across × length-down, because that’s how this chick stays sane under deadline pressure.
Grab your paper trimmer, stretch your shoulders, and let’s roll right into assembly-line magic.
❤️ STEP ONE — Cut, Score & Prep Your Card Bases (The Calm Before the Chaos)

Start with Stampin’ Up! Basic White Thick cardstock. Each sheet is cut in half to create two card bases:
• Cut: 8½” × 11” → two pieces measuring 5½” × 8½”
• Score: Each piece at 4¼” to create the perfect A2 card base
Use your bone folder to get that crisp, professional fold… the kind of fold that quietly whispers,
“Even at 2 a.m., I still have standards.”
✨Pro Tip: Always fold toward the raised score line for the cleanest edge. Your cards will lie flatter, photograph better, and behave more nicely when stacked in those last-minute “please dry faster” piles.
💗 STEP TWO — Choose Your Strip Style (Full Panel or Paper-Saving Genius Mode)
Now for the card-front background — and you get TWO options:
Option A — Full DSP Panel (Classic + Quick)
Trim your Made With Love DSP to 4¼” × 5½” and glue it straight onto your card base.
Boom. Rapid-fire cardmaking at its finest.
Option B — Half-Inch Strip Method (The 2 a.m. Paper-Stretching Special)
This is the method you’ll see in the step photos — and trust me, it’s genius when you’re making a ton of cards on limited supplies.
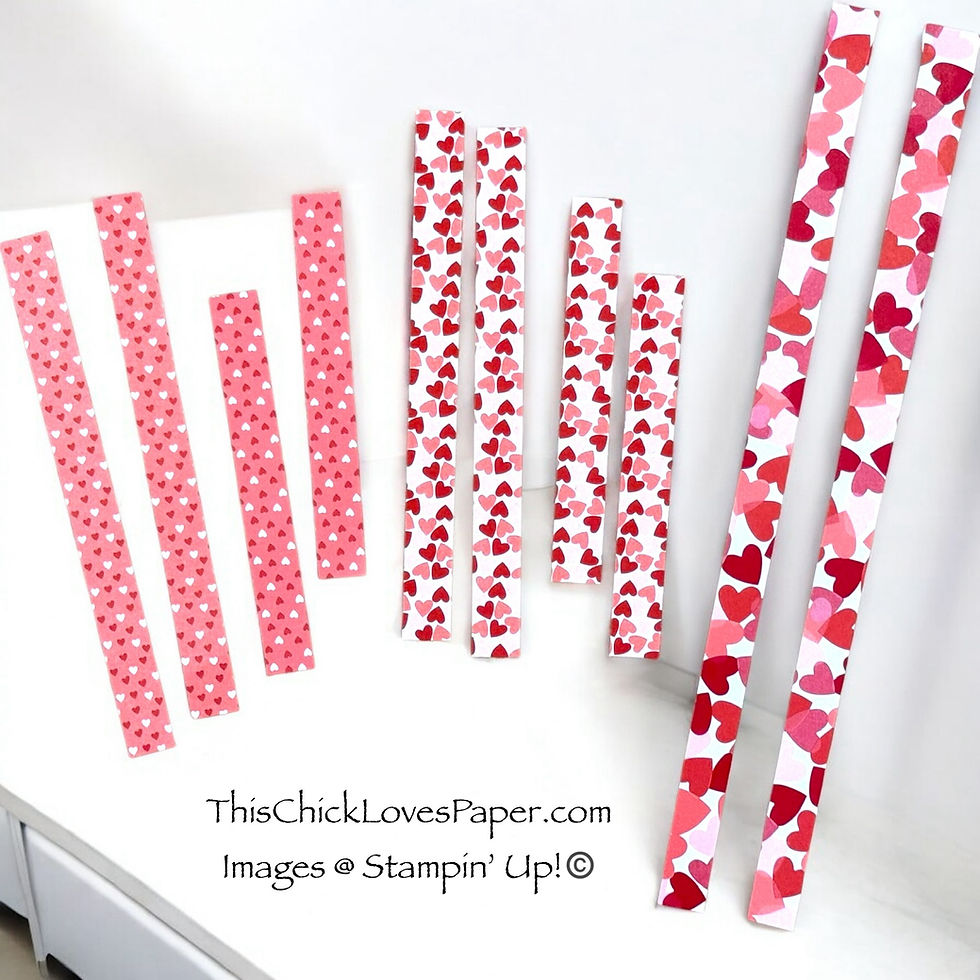
Cut your DSP into:
Two strips: 4” × ½” (top & bottom)
Two strips: 5½” × ½” (left & right)
Place the shorter 4” strips across the top and bottom of your card base first.
Then rotate and overlap the 5½” strips along the left and right edges.
This creates the full-panel look without sacrificing a whole sheet of DSP — which is exactly why you can stretch supplies and make a big batch fast.

⭐ Pattern Direction Notes (Because DSP Has Opinions 😘)
When cutting your half-inch strips, here’s how I handled pattern direction — and how you can keep it simple:
I cut the long strips (5½”) so the DSP pattern ran in its “correct” direction.
The short strips (4”) naturally ran the opposite direction —
BUT because this Made With Love pattern is busy, tiny, and full of hearts pointing everywhere… You truly can’t tell once the card is assembled.
Pro Tip: If you’re using DSP with a very obvious directional print (words, tall shapes, etc.), cut all strips so the pattern runs the same way. But for small Valentine patterns like these?
You’re totally safe mixing strip directions. Nobody will notice — and the card still looks fabulous.
⭐Step 3 — Assembly-Line Version — For When You Need Cards to Flow Smoothly
This is where your card starts looking intentional instead of “I found scraps on my desk and panicked at 2 a.m.” But don’t worry — you get TWO paths here depending on your mood, your caffeine level, and how many cards you still have to crank out before sunrise.
💨 FAST VERSION — For When You’re Cranking Out Cards in a Hurry
If you’re in true survival mode, keep it simple:
1. Cut your Basic White mat to 3½” × 4¾”.
2. Cut your Real Red mat to 3⅝” × 4⅞” (tiny, satisfying 1⁄16” border).
3. Adhere the white mat to the red.
4. Done. Clean. Crisp. Still adorable.

💎 FANCY VERSION — When You Want That “I Tried Today” Texture
If you want a glow-up without adding actual time:
3. Adhere onto your 3⅝” × 4⅞” Real Red mat.
✨ Same measurements. Zero extra thinking. Just that gorgeous raised Valentine texture.
Once your mat (fast or fancy!) is assembled, adhere it directly to the center of your card base. This gives you a clean, ready-to-decorate foundation and saves you from juggling layers later on.
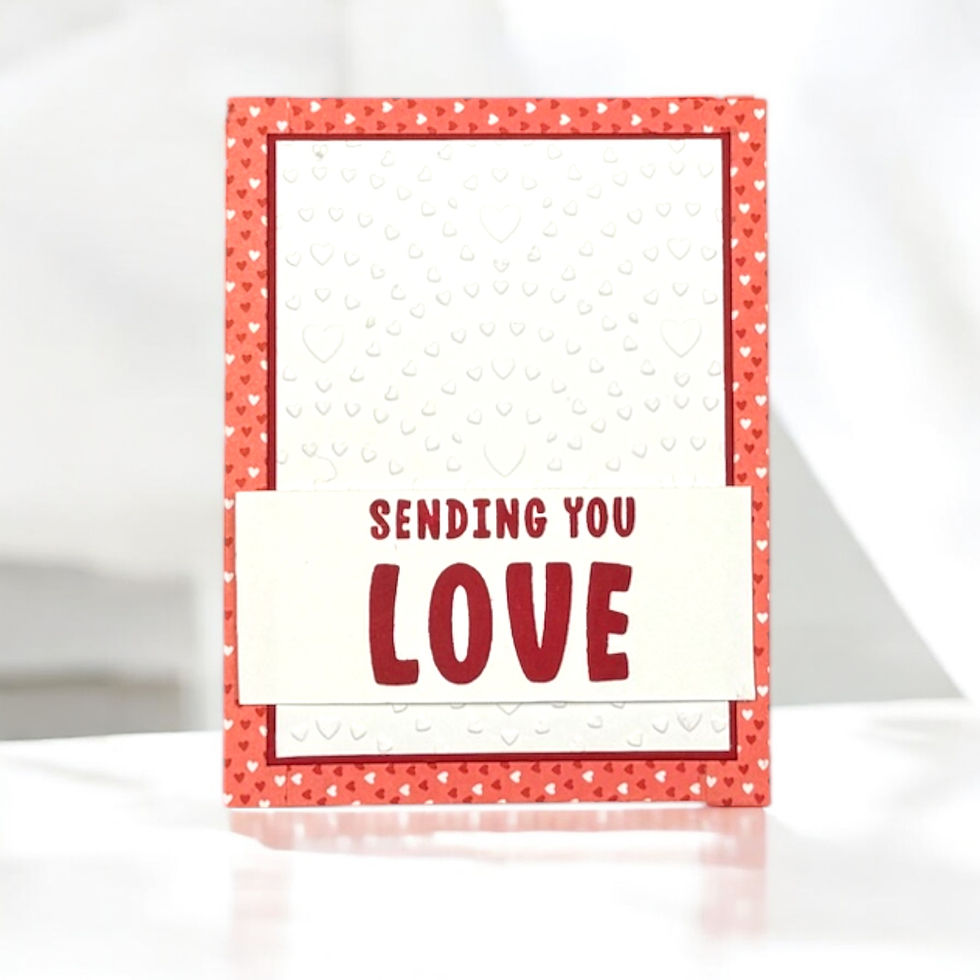
⭐ STEP 4 — Mass-Stamp Your Sentiments (a.k.a. MISTI Saves the Day!)
Now that your mats are done, it’s time for the sentiment — and we’re placing it before the hearts because the hearts tuck behind this strip. This step controls your layout, spacing, and the whole vibe of the card.

Cut Stampin’ Up! Basic White into strips sized 4” × 1¾”.
This slightly taller strip gives the sentiment plenty of breathing room and keeps the proportions clean, balanced, and beautifully intentional — no strange fractions in sight.
Use your MISTI and Real Red Classic Stampin’ Pad to mass-stamp:
SENDING YOU
LOVE
Stamping everything upfront makes assembly-line crafting SO much easier (especially at 2 a.m. 😂).
✨ Pro Tip: Dress Up Your Sentiment (If You’re Not in Survival Mode)
Because I was racing the clock, I kept my strips clean and simple — just straight cuts and done. But if you’re feeling fancy, here are optional upgrades:
Use a sentiment die for a decorative label look
Ducktail one end for a classic banner finish
Pop it up with foam tape for instant dimension
Round the corners, offset it, or layer over Real Red for extra contrast
Feel free to zhuzh it as much (or as little) as your sanity allows. 😜
Assembly-line doesn’t have to mean “boring”… just “efficient.”
✔️ Place the Sentiment Strip (Only Partially!)
Lay your sentiment strip horizontally across the bottom area of your embossed mat:
➤ Position it about ¼” up from the bottom of your double mat. This creates the perfect “pocket zone” for your hearts to slip behind later.
✔️ The Partial-Adhesive Trick
To hold the strip in place without locking yourself in: Adhere ONLY the left-hand side of the strip.
Keep the right side loose — this gives you room to slide your hearts behind the sentiment, so everything lines up perfectly before committing with glue.
❤️ STEP 5: DIE-CUT YOUR HEARTS
We’re officially crafting for a crowd — 20 cards! So yes… this step is where your Stampin’ Cut & Emboss Machine earns her paycheck.

Large Heart (Patterned Paper)
Die Used: Large outline heart from Hearts of Elegance
Paper: Made With Love DSP (use either side — Bubble Bath or Flirty Flamingo)
Optional Ink Edges:
Use Bubble Bath ink on Bubble Bath hearts
Use Real Red ink lightly on Flirty Flamingo hearts
This teeny-tiny whisper of ink gives the edges a finished look without changing the color.

Small Heart (Cardstock)
Die Used: Small heart from the Endless Love bundle
Paper: Real Red 8½” × 11” Cardstock
Optional Ink Edges:
• Use Real Red ink lightly around the edges for a soft, finished look.
✨ That’s it — cutting all hearts at once assembly-line style is the reason this design didn’t take nearly as long as it looks!
✨ Pro Tip: Switch Up the Small Heart Colors!
Because I was in full 2 a.m. survival mode, I stuck with one color for every small heart — Real Red was fast, easy, and matched everything. But if you’re crafting with more time (or more caffeine), try mixing it up!
Bubble Bath
Flirty Flamingo
Poppy Parade
White cardstock for a super-clean contrast
Even silver foil for extra sparkle ✨
Tiny heart, BIG impact — and swapping colors lets you create multiple looks from the same exact design.
STEP 6: Position & Attach Your Hearts (the “tuck + slide” method!) 💘
Now that your double mat is fully glued to the card front and your sentiment strip is tacked only on the left side, it’s time to place those hearts!

1. Tuck the large patterned heart behind the sentiment strip
• Slide your large DSP heart (Bubble Bath or Flirty Flamingo side - either works!) behind the sentiment strip.
• Position it so the top of the heart sits about ¼” down from the top edge of the double mat.
• Once you love the placement, add adhesive behind the heart and secure it — but leave a small pocket of space on the bottom-left edge (right above the sentiment strip) so you can slide the arrow in later.

2. Add the small Real Red heart
• Take your small Real Red die-cut heart and slide it in on the right side of the large heart, tucking it just enough to overlap naturally.
• You can inset it slightly or keep it sitting more outward — both look adorable.
• When the spacing feels just right, glue it into place as well.
3. Finish securing the sentiment strip
• Now that both hearts are locked in and aligned, add adhesive behind the rest of the sentiment strip.
✨ This step is what gives the card that layered, tucked-in look — like the hearts are hugging the sentiment. Totally worth the extra 5 seconds spent sliding things around, even at 2 a.m. in a panic. 😘
STEP 7: Add Your Sparkle & Details (the FAST final touches!) ✨🏹
✨ This is where assembly-line crafting feels magical — once the rhythm is going, this final step is a breeze.
Time to give these cards their chef’s kiss moment — the little details that make them look finished, intentional, and totally handmade-with-love… even if you made them in survival mode. 😜💕

1. Add Your Silver Arrow
• Die-cut one silver foil arrow from the Endless Love dies per card.
• Snip the arrow in half right at the center — this gives you two usable pieces!
Now place each half exactly like the sample:
• Arrowhead (the point):
Glue it directly on top of the large heart, slightly angled upward on the right side.
(No tucking — this piece sits on top and looks like it’s breaking through the heart.)
• Fletching (the feathered end):
Slide the feathered end just slightly underneath the bottom left curve of the large heart, but on top of the sentiment strip.
📸 This placement gives the perfect “Cupid just struck this heart mid-flight” look — balanced, dimensional, and ultra-cute.

• Choose 3 sparkle gems for the bottom-right cluster near the sentiment.
Cluster them on the right side for a clean, balanced shimmer.
You can create a triangle grouping or a soft little curve — both look adorable.
• Choose 2 additional sparkle gems
Place these in the upper left-hand corner of the embossed white mat, just above the large patterned heart.
This tiny sparkle pair pulls the card together and adds that perfect visual triangle.
⭐ I'm done! I Actually Pulled This Off!! 👊


Real talk? When I started this whole 2 a.m. Valentine’s Day scramble, I truly wasn’t sure if I was a genius… or absolutely unhinged. 😂 But once everything was cut, stacked, inked, embossed, stamped, and organized into little production-line piles, these cards came together way faster than I expected.
That’s the magic of assembly-line crafting — one layout, one rhythm, and suddenly you’re zipping through twenty cards like you’ve been training for a papercrafting marathon your whole life. Each heart, each strip, each sentiment slid into place like, “Yep. We’ve got this.”
And because all the cards use the same materials, you can switch up the look just by flipping the DSP to the opposite side or swapping between Bubble Bath, Flirty Flamingo, or a fresh Real Red combo. Same pieces… totally different vibe.
So yes — sleep-deprived, over-caffeinated, talking-to-myself energy and all —
I actually pulled this off.
And you absolutely can too. 💖✨
More Cards. More Ideas. More Just For YOU! Let’s Explore More!
If you loved this Valentine’s Day assembly-line magic, you’re going to adore all the other card designs waiting for you.
From classic birthday cards to bold masculine layouts, clean-and-simple designs to full-blown glam — there’s a tutorial for every mood and every crafter.
New card ideas drop all the time, so keep checking back. Your next favorite project is one click away. 💗


💌 Okay, Craft Queen… Show Me What You MADE!

Did the Made With Love collection jump into your cart, too?
Did you make a card? A scrapbook layout? A classroom Valentine? Something totally unexpected?
Share it with me!
Add your creation to the Share Your Creations gallery so I can swoon, smile, and hype you up as only another paper-obsessed crafter can.
Because trust me… Your ideas don’t just inspire, ✨ they spark a whole community wildfire. ✨🔥
✨ And Just Like That… I Brought It HOME!

Somewhere between the caffeine shakes, the strip-cutting frenzy, and whisper-yelling,
“WHY IS MY REAL RED ALWAYS MISSING?!?”… I did it.
I actually did it. 💗
Twenty Valentine’s Day cards. One assembly-line layout.
Zero full meltdowns (and yes, a half-meltdown still totally counts 😜).
And honestly? I surprised myself a little — in the best way.
Once everything was prepped, stacked, inked, embossed, stamped, and sorted into little production-line piles, the whole process moved faster than I expected. Suddenly I wasn’t spiraling… I was cruising. Crafting magic really DOES happen after midnight, apparently. 😂
The best part?

With one layout, one rhythm, and a whole lot of determination, I turned late-night chaos into something cute, coordinated, and Valentine-ready — and I didn’t even lose my mind in the process.
So the next time a last-minute project tries to take me down, I’ll remember this night:
✨ I’ve pulled off harder things.
✨ I can absolutely do it again.
✨ And I’ll make it look GOOD every single time.
Deep breath.
Crafty fingers stretched.
Confidence restored.
Because this wasn’t just cardmaking —
This was a full-blown 2 a.m. crafting miracle… and I actually pulled it off. 💘✨
🛒 Grab Your Supplies & Start Crafting!

All photos and projects are subject to copyright © ThisChickLovesPaper.com
Images © Stampin’ Up!® & CTMH®
The content in this blog is the sole responsibility of April Raine – This Chick Loves Paper, Independent Stampin’ Up!® Demonstrator.
The use of and content of classes, services, or products offered is not endorsed by Stampin’ Up!®.
Make adorable assembly-line A2 Valentine's Day cards with This Chick Loves Paper! Full step-by-step process photos.
Made with Stampin’ Up! Made With Love Suite Collection

⭐How I Protect My DSP, Cardstock & Finished Cards
I store my DSP, cardstock, scraps, and even finished cards in these clear resealable bags.
The 2-mil thickness is perfect for everyday crafting (a 4-mil option is also available for extra durability), and they’re tough, reusable, and great for keeping your entire crafting stash clean, tidy, and protected from the chaos of the craft room.
Different sizes are available! Here are the ones I use the most:
*As an Amazon Associate, I earn from qualifying purchases.
• 13×13 Plymor 2mil Zipper Reclosable Bags — for 12×12 DSP, cardstock sheets & scraps
• 9×12 Plymor 2mil Zipper Reclosable Bags — for 8.5×11 cardstock & scraps
• 6x8 Plymor 4mil Heavy Duty Reclosable Bags — for storing extra die cut embellishments & finished cards, card workshop kits

⭐ Stamping Tools I Use in My Projects
*As an Amazon Associate, I earn from qualifying purchases.
Stamping & Precision Tools
• MISTI® Memory Size with 12-1/2" x 12-1/2" Stamping area — for borders, backgrounds & oversized stamping
• MISTI® Stamp Tool Bar Magnet - Additional magnet


Comments