How to Create a 5x7 Handmade Birthday Card with the Cake Day Bundle and Brushed with Beauty DSP (Sweet, Shimmery & Chic!)
- This Chick Loves Paper

- Oct 29, 2025
- 9 min read

Let’s be real—sometimes a paper pack hits your desk and it’s love at first shimmer. That was me with the Brushed with Beauty 12” x 12” DSP from Stampin’ Up!®. The second I saw those soft brush strokes and dreamy Petal Pink tones, my brain yelled, “CAKE!”—and the Cake Day Bundle basically jumped into my cart.
Here’s the funny part though… the thing that sold me on that bundle? Those little cookie toppers that look just like Oreos. 🍪
You see, for my son’s 20th birthday, I totally forgot what day it was (don’t judge me, fellow crafters—we’ve all been there 😅). I ran to Walmart, grabbed the only cake I could find—an Oreo ice cream cake—and called it a win. But as I flipped through my photos later, I realized this wasn’t the first Oreo cake to make an appearance in our house. Apparently, I’ve been in a long-term relationship with Oreo cakes without even knowing it. 😂
So when I saw those adorable cookie toppers, I knew this bundle was meant for me—and the second I saw Brushed with Beauty, I instantly knew what I wanted to create. No hesitation, no overthinking—just pure paper love.
The result? A 5x7 handmade birthday card that feels like a fancy bakery window in card form—soft, shimmery, elegant, and full of sweet nostalgia (with a side of accidental cake tradition). 🎂✨
Now grab your paper trimmer, clear off your “creative chaos zone,” and let’s bake up some birthday-card magic—This Chick Loves Paper style. 💅
📦 MATERIALS – AKA WHAT YOU’LL NEED TO WHIP UP THIS SWEET SLICE OF PAPER HEAVEN
If you’ve ever wanted a card that looks like it came straight out of a boutique bakery, grab your supplies and let’s layer it up! This design is frosted, fancy, and full of those subtle little details that make people go, “Wait… you made THAT?”
✨ Stampin' Up! Designer Series Paper (DSP)

Brushed with Beauty 12” x 12” DSP – The real showstopper of this card. Those Petal Pink brush strokes are pure frosting fantasy.
🧁 Stampin' Up! Cardstock


Thick Basic White 8-1/2"x11" Cardstock – 5x7 card base (vertical) with that crisp, clean white border that frames your masterpiece.
Very Vanilla 8-1/2"x11" Cardstock – For the frosting, candles, and dollops (it’s giving bakery-chic elegance).
Petal Pink 8-1/2"x11" Cardstock – Used for decorative strip.
🎂 Stamps & Dies

Stampin’ Up!® Cake Day Bundle – This one’s doing the heavy lifting! Stamps, dies, and the cutest cookie toppers (aka Oreo look-alikes) you ever did see. 🍪
☕ Inks & Coloring
Early Espresso Classic Stampin' Pad – Soft, rich, and perfect for edging, stamping, and adding that “freshly baked” touch.
Stampin’ Blends Marker – For adding those candle grooves and gentle two-tone details.
✨ Tools & Finishing Touches


Stampin' Up! 3D Painted Textured Embossing Folder – Adds the whipped-frosting dimension we all crave.
Foam Adhesive – For a little lift where it counts.
Close to My Heart Clear Shimmer Brush – For the shimmer that says, “Yeah, I totally meant to make it sparkle there.” Can easily substitute Stampin' Up! Wink of Stella Glitter Brush.
Stampin' Up! Paper Trimmer & Bone Folder – Because crafting chaos still needs clean edges, darling.
Stampin' Cut & Emboss Machine - Because no cake—or card—is complete without a little press, pop, and wow factor. 🎂✨
Bearly Art Precision Craft Glue - Because every crafty masterpiece needs a little stick-to-it magic. ✨ Can easily substitute Multi-Purpose Adhesive.
💡 Pro Tip: If your craft desk looks like a bakery explosion after this project, just call it “creative ambiance.”
🎂 STEP-BY-STEP TUTORIAL - 5x7 Handmade Birthday Card with the Cake Day Bundle and Brushed with Beauty DSP
Step 1: Prep the Base

Cut a 5” x 7” vertical card base from Thick Basic White cardstock. Leave that crisp white border—trust me, it makes everything pop like icing on a cake.
Then cut your Brushed with Beauty DSP pieces:
Floral print (top): 4 ¾” x 5”
Neutral stripes (bottom): 4 ¾” x 2”
Petal Pink divider strip: 4 ¾” x ¼”
Lightly ink the edges of each piece with Early Espresso for that baked-to-perfection finish before adhering them to your card base.
💡 Pro Tip: Don’t go heavy on the ink—just a soft glow on the edges gives warmth without overpowering those dreamy Petal Pink tones.
Step 2: Create the Archway Window

No die? No drama. Hop into Cricut Design Space, pick your favorite arch shape, and cut it from Basic White cardstock.
Ink the arch’s edges with Early Espresso for a soft, shadowed contrast. This shape is what gives the card its elegant “bakery display” vibe—like a storefront window showing off the sweetest treat in town.
💡 Pro Tip: That white arch isn’t just a background—it’s a visual spotlight! Keeping the border even helps your cake take center stage while letting the floral DSP frame everything like a bakery window. Clean, balanced, and chef’s kiss perfection. 👩🍳✨
Step 3: Bake the Cake (Paper-Style!)

Cut your cake layers using the Cake Day Dies. The main cake piece features the Petal Pink swirl pattern from the Brushed with Beauty DSP—soft, sweet, and totally irresistible.
For the frosting details, both the “L-shaped” edge piece (which frosts the top and side) and the two center “buttercream” strips are die-cut from Very Vanilla cardstock. Instead of using foam tape, I stacked and glued several die-cut pieces together to get that perfect layered dimension—think fluffy frosting without the extra calories. 😉
Lightly ink every edge with Early Espresso. It’s amazing how just a whisper of shadow makes each layer pop like real buttercream—rich, dimensional, and oh-so-yummy-looking!
Finally, adhere your cake base and main frosting overlay together, aligning the edges so the frosting seamlessly wraps around the side and top of the cake.
Step 4: Add the Frosting Details

Run the edge and top frosting piece through your Textured 3D Embossing Folder (any swirl or texture pattern works!). This gives the frosting that irresistible whipped look you can almost taste. Adhere to your cake piece.
Now let’s talk about those frosting dollops! You’ve got two styles going on here:
🍦 The first pair—the dollops sitting on top of the cake—are die-cut from Very Vanilla cardstock. They add that perfect fluff factor and soften the overall look.
🍪 Then there are the scalloped-edge dollops that look like piped borders. These are stamped in Early Espresso on Very Vanilla cardstock, then die-cut. One goes along the bottom edge of the cake and another tucks neatly at the top front, right in front of those vanilla dollops, to create that bakery-tiered illusion.
💡 Design Spotlight: Layering die-cut frosting instead of using foam keeps your card beautifully balanced—plenty of dimension without warping or extra bulk. It’s the “less mess, more finesse” trick every crafter needs in their toolbox.

Step 5: Serve Up That Cake! 🍰
Now that your cake piece is assembled, it’s time to serve it up!
Center it within the archway, leaving just a tad of white space on each side and placing the front corner about one inch from the bottom of the card.
This positioning grounds the design beautifully and gives you room up top for your candles, sparklers, and sentiment later.
💡 Pro Tip: When you’re centering the cake, imagine it as the star of your bakery window—symmetry matters!
Keeping just a whisper of space on both sides draws your eye straight to the texture and shimmer details without feeling crowded.
Step 6: Candlelight & Sparklers
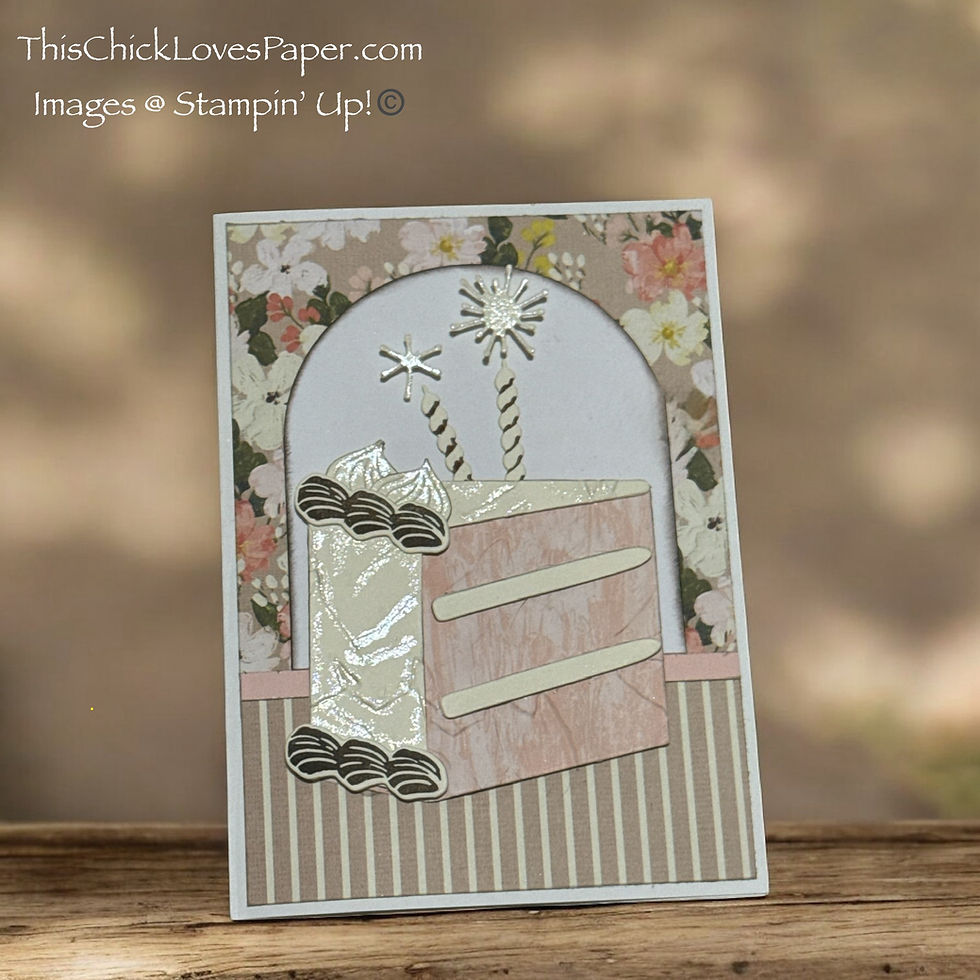
Die-cut your candles on Very Vanilla cardstock and lightly shade them with a Stampin’ Blend marker for that subtle two-tone glow.
Next, die-cut your sparklers and brush them with a hint of shimmer—just enough to catch the light when the card moves. Then, swipe your shimmer brush along the raised frosting edges to highlight the texture and give your cake that soft, magical sparkle (without going full glitter bomb 💥).
Now for placement: tuck your first candle slightly under the top frosting layer, centered within the archway. Its sparkler should sit just above the arch’s curve so it looks like it’s bursting with light. Angle your second candle gently to the left and tuck it behind the cake, placing its sparkler a touch lower than the first. This creates that natural, dimensional flow and leaves the perfect open space on the right side for your sentiment flag.
💡 Pro Tip: The secret to lifelike sparkle? Variation! Slight tilts and height differences make your candles look more realistic—and help your card glow with personality and depth.
Step 7: Add the Sentiments

Stamp “Happy Birthday” in Early Espresso on your Very Vanilla flag, then adhere it so it sits slightly above the cake’s top tier, just to the right of the candles. That little angle makes it feel playful—like it’s waving its own party flag!
Next, stamp “Yay!” in Early Espresso on a Basic White banner and pop it up with foam tape for that perfect “ta-da!” moment. Position it so it slightly overlaps the cake and extends just past the card’s edge—because sometimes, breaking the border brings the whole design to life.
💡 Pro Tip: Let your eye guide the balance! That tiny overlap gives the layout movement and keeps it from feeling boxed in. It’s like your sentiment’s leaning in to join the celebration—bold, confident, and just the right amount of extra. ✨
🎀 STEP-BY-STEP WRAP-UP

This 5x7 handmade birthday card uses the Stampin’ Up! Cake Day Bundle and Brushed with Beauty DSP is the perfect mix of sweet and sophisticated. From the warm Early Espresso inking to the shimmered frosting details, every inch of this card feels intentional, elevated, and oh-so-elegant.
If you ever struggle with what to do with a gorgeous DSP, this is your reminder—sometimes inspiration hits before the glue dries. 😉
EXPLORE MORE: From Birthdays to Bright Ideas
The best part of crafting? One idea always leads to another. If this Cake Day birthday card has your creative gears turning, check out more projects that mix shimmer, layers, and clever product pairings. Whether it’s a bold birthday design, a playful card for a friend, or something that just makes your trimmer hand twitch with excitement—there’s a whole lineup of inspiration waiting to be unwrapped on the blog.
Each post is packed with full tutorials, real-life stories, and just enough chaos to keep it fun (because let’s face it—half the magic happens when glitter ends up in your coffee mug). ☕✨


💌 CRAFT YOUR OWN CAKE DAY MOMENT

Have you tried the Cake Day Bundle yet? Or maybe that Brushed with Beauty DSP is sitting on your craft table whispering your name? Either way, I’d love to see what you create!
Upload your masterpiece to our Members Gallery and show off your own take—whether you swapped colors, added sparkle, or went full-on “cookies and cream” with your design. Tell us your story behind it: what inspired you, what you changed, and how your version turned out.
Because let’s be honest—every crafter’s twist on a design tells a new story, and I want to see yours! 💗
🎂 WRAPPED IN FROSTING & FULL OF HEART

This project started with a laugh, a little nostalgia, and a pack of paper that just demanded to become a cake—and somehow turned into a reminder of all the little moments that make crafting so special.
Whether it’s an Oreo tradition you didn’t plan or a paper collection that sparks your next big idea, every project tells a story. And that’s why we create—because every card, layout, or tag becomes a piece of our lives in color and cardstock.
So keep that shimmer brush close and your trimmer ready, my friend—because the best ideas often start with a giggle and a “what if.”
💗 April – This Chick Loves Paper
🛒 Grab Your Supplies & Get Crafting!
All photos and projects are subject to copyright © ThisChickLovesPaper.com.
Images © Stampin’ Up!®
The content in this blog is the sole responsibility of April Graziano, Independent Stampin’ Up!® Demonstrator. The use of and content of classes, services, or products offered is not endorsed by Stampin’ Up!®.
Learn how to create a 5x7 handmade birthday card using Stampin’ Up! Cake Day Bundle and Brushed with Beauty DSP. This Chick Loves Paper shows how to blend Petal Pink tones, elegant shimmer, and layered frosting texture for a boutique-inspired birthday design that’s full of charm and sparkle.


Comments