
Fast & Fabulous Christmas Cards — Full of Holiday Magic That Shine in Half the Time!
- This Chick Loves Paper

- Dec 7, 2025
- 11 min read
Updated: Dec 16, 2025

You know that moment when the calendar flips to December, and suddenly you need — oh, I don’t know… 25 Christmas cards by tomorrow? 😬
Yeah. That was me.
I needed something fast…
I needed something classy…
I needed something that would make people say, “Wait…you HANDMADE this?!” without spending three days buried in cardstock.
And out of that little holiday panic came today’s project… a set of fast & fabulous Christmas cards that are simple, stunning, and totally doable even if you’re short on time (or caffeine). If you can cut rectangles, you can make these cards, I promise!
Plus, there’s a BONUS super-speed version for when time is tighter than your jeans after Thanksgiving dinner. 😉
So grab your coffee (extra espresso encouraged ☕️) and let’s deck these halls, This Chick Loves Paper style!
🎄 Everything You Need to Make These Fast & Fabulous Christmas Cards
Before we dive into the glitter and glue, here’s your complete supply lineup — the exact materials I used for both the Peaceful Garden and Modern Christmas versions of these fast & fabulous Christmas cards. Grab your favorites, cue up some holiday music, and let’s get ready to craft something beautiful! 🎶✨
✂️ Designer Series Paper (DSP)


Stampin’ Up!® Peaceful Garden 12×12 DSP
Soft, cool-toned patterns perfect for elegant winter cards.
Stampin’ Up!® Modern Christmas 12×12 DSP
Bold, graphic holiday prints — especially stunning with black & gold.
💙 Cardstock


Stampin’ Up!® Cloud Cover 12×12 Two-Tone Cardstock
Light side used for the main mat behind the silver foil on Peaceful Garden cards.
Stampin’ Up!® Cloud Cover 8½×11 Cardstock
Used as the card base for the Peaceful Garden cards
Stampin’ Up!® Basic Black 8½×11 Cardstock
Used as the card base for the Modern Christmas cards — striking and dramatic.
Stampin’ Up!® Basic White 8½×11 Cardstock
Used for stamping the Merry Christmas sentiment and all die-cut poinsettias.
✨ Foil Sheets
A mix of all four was used & they coordinate beautifully:

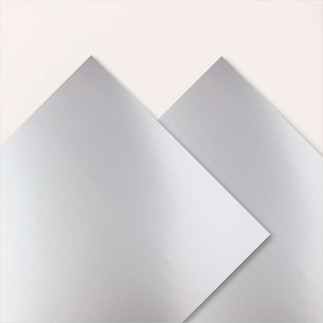


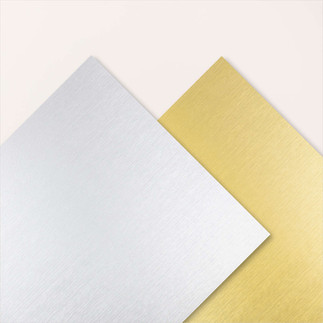
Stampin’ Up!® Silver Foil Sheets
Stampin’ Up!® Gold Foil Sheets
Stampin’ Up!® Brushed Silver & Gold
🌸 Stamps & Dies

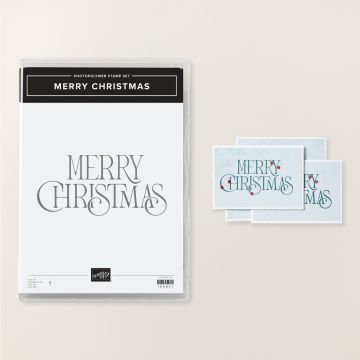


Stampin’ Up!® Merry Christmas Stamp Set
The perfect bold statement for the front of this card.
Stampin’ Up!® Delicate Pines Dies
Used for poinsettias and both styles of sprigs.

🖊 Inks
Stampin’ Up!® Misty Moonlight Classic Stampin’ Pad
Used with the Peaceful Garden DSP cards.
Jet Black StazOn® Ink
Used with the Modern Christmas DSP cards.
💎 Embellishments
Stampin’ Up!® Antique Pearls
One goes in each poinsettia + two on the sentiment panel.
Tools:


Stampin’ Up!® Paper Trimmer
Stampin’ Up!® Bone Folder
Stampin’ Up!® Stampin' Cut & Emboss Machine
⭐ Other Tools I Use in My Projects
*As an Amazon Associate, I earn from qualifying purchases.


Cricut® Essentials
• Cricut® Maker 3 — my primary cutting machine for titles, SVGs & embellishments
• Cricut® StandardGrip 12×12 Mat — 3 count used for cardstock, photo paper & labels
Printer
Canon® Printing System (Photos + Printable Cricut Elements)
• Canon TS9521C Crafting Printer — used for ALL printed project photos, journaling pieces, print-then-cut embellishments & titles
Photo Papers
• Canon Photo Paper Plus Glossy II (4×6, PP-301) → For 4x6 or smaller - printed photos
• Canon Matte Photo Paper (MP-101, 8.5×11) → Used for Cricut print-then-cut elements & titles
• Canon Double-Sided Matte Photo Paper (MP-101D, 8.5×11) → Also used exclusively for Cricut embellishments, icons, & layered pieces
Printer Ink
• EZ Ink Compatible 280XXL/281XXL Ink Pack → The exact ink set used for the TS9521C
Stamping & Precision Tools
• MISTI® Memory Size with 12-1/2" x 12-1/2" Stamping area — for borders, backgrounds & oversized stamping
• MISTI® Stamp Tool Bar Magnet - Additional magnet
Speciality Adhesives
• Tombow® Mono Aqua Liquid Glue — for corners, details & layered paper pieces
• Bearly Art Precision Craft Glue (4oz Original) — for embellishments & fine-detail gluing
• Tombow® Mono Air Touch Adhesive— my preferred tape runner for base
• Tombow® Mono Air Touch Adhesive, Refill 2-Pack — my preferred tape runner for base layers
Journaling Tools
• Avery® Easy Peel® Full-Sheet Clear Labels (8665) → Used for long typed journaling strips
• Avery® Clear Shipping Labels 2×4 (8663) → Used for short typed journaling strips or blocks
• Skaura Pigma Micron Fineliner Pens - Archival Black - Assorted Point Sizes - Used for handwritten Journaling
📸 Sip, Stamp & Save the Season — Time to Craft Something Gorgeous!
Okay, crafty friend — this is where the fun really begins! This design may look all glitz and glamour, but it’s built on easy, repeatable steps anyone can do. I’ll walk you through two versions: the Fast option for when time is short, and the Fabulous upgrade for when you want that extra holiday sparkle. Follow the one that fits your vibe, or mix and match for a little of both! Either way, you’ll end up with Christmas cards that shine brighter than your tree topper. 🎄✨
1️⃣ Build That Beautiful Card Base
Every masterpiece starts with a solid foundation — even the fast and fabulous ones! ✂️
Grab your 8½″ × 11″ cardstock and slice it cleanly in half at 5½″. Boom... You have two card bases in seconds. Score each piece at 4¼″ and fold it crisply with your bone folder so they stand tall and straight (we love a card with good posture). 😉

Now choose your DSP:
Modern Christmas for drama.
Peaceful Garden for tranquil winter vibes.
Trim it to 5½″ × 4¼″ so it covers the entire front of your card base.
Adhere each DSP panel to its card base with your favorite adhesive. Then set your growing stack aside and admire that progress… you’re already halfway to holiday glory! ✨
💡 Pro Tip: Cut all your bases and DSP at once. You’ll feel like a holiday-crafting superhero — cape optional — and your assembly line will run smooth as butter.
2️⃣ Let’s Make That Gorgeous Double-Matted Sentiment
Now for the show-stopper — that bold, beautiful “Merry Christmas” panel that makes every card look high-end (without spending hours layering like a holiday maniac).

🌟 Fast Version
Keep it quick and classy.
Cut your two layers:
Foil mat – 4¼″ × 2¾″ (gold for Modern Christmas / silver for Peaceful Garden)
Basic White sentiment layer – 4″ × 2½″
Stamp your “Merry Christmas” using Misty Moonlight or Jet Black StazOn, whichever matches your DSP.
Adhere the foil and white layers together — simple, sleek, and already looking fabulous.
💡 Pro Tip: Batch-stamp in your MISTI for lightning-fast results. It’s the secret to turning card-making into a peppermint-mocha-fueled production line.
💖 Fabulous Upgrade


Want that extra “ooh-la-la” sparkle? Here’s your moment!
Add a cardstock mat – 4½″ × 3″ behind your foil layer for that triple-matted designer finish.
→ Use Basic Black for Modern Christmas cards.
→ Use Cloud Cover (light side) for Peaceful Garden cards.
Pop foam tape on the back for a touch of dimension (thin for subtle, thick for “look-at-me” drama). Line them up, tilt under the light, and bask in that shimmer — it’s giving boutique-holiday-card energy! ✨
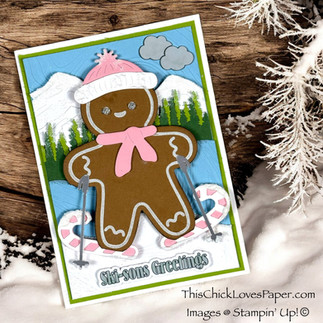
3️⃣ Die-Cut Magic — Where the Sparkle Happens!
This is where the sparkle really happens! 🌟
Grab your Delicate Pines Dies and fire up that die-cut machine! It’s time to make a little crafting magic. Batch-cutting your shapes is the secret here (trust me, it saves a ton of time and sanity).

🌟 Fast Version
Keep it simple, speedy, and stunning.
Using your Delicate Pines Dies, cut two Basic White poinsettia layers per card.
Glue them together and pop an Antique Pearl right in the center. Boom! Instant elegance!
That’s really all you need for this version. The clean white petals against your background do all the talking. It’s proof that “simple” can still steal the spotlight.
💖 Fabulous Upgrade
Alright, time to turn up the shine!
Now grab those foil sheets and let’s talk sprigs. If you look at the Delicate Pines dies, you’ll see:

One large die that cuts two three-armed sprigs (perfect for one full card),
Three smaller dies that each cut two one-armed sprigs (that’s six sprigs per pass — hello, efficiency!).
When you’re batch-cutting for speed, use the large and all of the smaller sprig dies together & they’ll give you enough sprigs for several cards in minutes. Use your mix like this:
Two smaller sprigs under the sentiment mat.
One larger sprig under the poinsettia.
But if you love that fuller, dramatic look (and who doesn’t?), take the extra passes with the big die. It’s totally worth the shimmer.
4️⃣ Assembly Magic — Where It All Comes Together
This is the step where everything clicks into place — and unlike the other steps, we’re starting with the Fabulous Version first this time! 💫 That’s because where you place your sprigs (under & over your sentiment panel) totally changes the look, and it’s super important to get the order right before gluing anything down.
💖Fabulous Upgrade


Now for the showpiece moment!
Start by gluing your foil sprig (or pair of smaller sprigs) directly to the bottom right-hand corner of your card base, right on top of the DSP. This placement gives you that perfect peek of shimmer once everything’s layered.
Next, center your foam-taped “Merry Christmas” sentiment panel on the card and press it down gently for that dimensional, professional finish.

Now grab your second sprig and place it on top of the sentiment mat, angling it so it points toward the upper left corner of the card — just like the photo shows. This creates that graceful diagonal flow and makes your poinsettia placement feel natural and balanced.
Glue your layered poinsettia right on top of that upper sprig, letting the petals slightly overlap the foil for that luxe, boutique-card look.
To finish, add two Antique Pearls to the sentiment:
one at the end of “Merry,”
and one nestled between the S and T in “Christmas.”
Those tiny touches are what make the Fabulous version shine — simple steps, high-impact sparkle. ✨

🌟Fast Version
If you’re going for speed and simplicity, this is your moment! Skip the sprigs altogether!
Start by gluing your double-matted “Merry Christmas” panel right in the center of your card base.
Next, glue your Basic White poinsettia directly onto the top left corner of your sentiment panel. Pop an Antique Pearl in the center and add two to the sentiment, one at the end of “Merry,” and one nestled between the S and T in “Christmas.”
That’s it — clean, elegant, and ready to mail! The shimmer from your foil mat and pearls gives it all the sparkle it needs, no extra layers required.
💫 Fast or Fabulous — Every Version Shines

Whether you went full-on Fabulous with foil sprigs, layers, and pearls, or kept it Fast and sleek with clean lines and simple shine, the result is pure Christmas magic. Each version carries its own sparkle — one glows with elegant restraint, the other gleams with show-stopping shimmer.
The best part? Both deliver that handmade “wow” without the holiday overwhelm. So take a breath, admire your glitter-dusted workspace, and smile at that growing stack of cards — proof that even in the busiest season, your creativity still shines bright. 🌟
✨ BONUS VERSION — When You Need Beautiful Cards Even Faster

We’ve all been there — the to-do list is a mile long, your peppermint mocha is half gone, and the words “mass-produce Christmas cards” suddenly sound like a dare. Don’t worry, this version’s got your back (and your craft sanity).
Instead of covering the entire card front with DSP, we’re trimming things down — literally! Grab your Stampin’ Up!® Modern Christmas Striped DSP and cut it into 5½” × 1¼” strips.


A. Add one strip across the bottom of your horizontal card base. Vertical striped DSP works so well with this design!
B. Then top it off with a 5½” × ¼” Brushed Gold foil strip. That single glint of metallic shimmer transforms the whole design — simple, sleek, and oh-so-chic. ✨
C. Before adding your sentiment panel, glue one foil sprig to the bottom right corner of your card base. This gives just the right peek of sparkle once everything’s layered.

D. Next, add your double-matted “Merry Christmas” sentiment, popped up with foam tape for that subtle, dimensional shadow.
E. Now place your second sprig on top of the sentiment mat, angling it gently toward the upper left corner for balance.
Finish with your layered Basic White poinsettia, centered right where it catches the light, and press a single Antique Pearl into its center.
And just like that — BAM! 💥 Instant holiday glam.
The result? A clean, modern, elegant Christmas card that looks anything but rushed. She’s the queen of fast but fabulous, ready to impress everyone on your list — even the ones who think you bought them. 😉
❄️ Explore More Christmas Inspiration — Because One Card Is Never Enough
If these fast & fabulous Christmas cards have your creative wheels spinning, it’s time to pour another cup of coffee (or maybe something with a little extra cheer 🍷😉) and dive into more holiday magic!
From elegant black-and-gold showstoppers to cozy baking-themed cuties, gift card holders, and time-saving kits, there’s a whole sleigh full of inspiration waiting for you. Every design tells its own story — and who says you can’t make them all?
Scroll through the Christmas Collection and see what sparks your next crafty moment. Because around here, one handmade card is never enough. 💫


🎄 Share Your Creations — Let Your Holiday Magic Shine

Nothing makes this crafty community brighter than seeing your creations! Whether you made one card or a whole sparkling stack, followed every measurement to a T, or added your own creative twist, I’d love to see what you made.
Upload your finished cards to the Members Gallery and share your magic with the world. ✨ Your version might be the exact inspiration another crafter needs when they’re staring at their paper, wondering where to start.
Your creativity shines brighter than twinkle lights on Christmas Eve — let it light up someone else’s season! 💖
🎉 Cue the Christmas Glow — We Did It!


There’s something so magical about sitting down — coffee in hand, holiday chaos swirling around you — and turning simple pieces of paper into something truly beautiful.
This project wasn’t just about making fast & fabulous Christmas cards. It was about slowing down just enough to enjoy the process — that quiet, creative joy that reminds us why we craft in the first place. It’s not just paper and glue; it’s peace, joy, and a little bit of Christmas magic folded into every layer.
Because the truth is, the transformation doesn’t happen to the paper — it happens with you. And if this project reminded you that simple can still be stunning, that quick can still be meaningful, and that handmade always has heart — then this little tutorial did exactly what it was meant to do.
So here’s to creating Christmas cards quickly, joyfully, and with plenty of time left to soak in the sparkle of the season. 💫
💙 April – This Chick Loves Paper
✨ Grab Your Supplies & Get Crafting!

All photos and projects are subject to copyright © ThisChickLovesPaper.com.
Images © Stampin’ Up!®
The content in this blog is the sole responsibility of April Raine – This Chick Loves Paper, Independent Stampin’ Up!® Demonstrator. The use of and content of classes, services, or products offered is not endorsed by Stampin’ Up!®.
Create fast & fabulous Christmas cards that shine in half the time! 🎄 This step-by-step tutorial includes full measurements, materials, and two versions — a quick base design and a fabulous upgraded option with extra sparkle.
Designed by This Chick Loves Paper, this handmade card guide proves that simple can still be stunning.✨
⭐How I Protect My DSP, Cardstock & Finished Cards

I store my DSP, cardstock, scraps, and even finished cards in these clear resealable bags.
The 2-mil thickness is perfect for everyday crafting (they make a 4-mil option if you want extra durability!), and they’re tough, reusable, and great for keeping your entire crafting stash clean, tidy, and protected from the chaos of the craft room.
*As an Amazon Associate, I earn from qualifying purchases.
• 13×13 Plymor 2mil Zipper Reclosable Bags — for 12×12 DSP, cardstock sheets & scraps
• 9×12 Plymor 2mil Zipper Reclosable Bags — for 8.5×11 cardstock & scraps
• 6x8 Plymor 4mil Heavy Duty Reclosable Bags — for storing extra die cut embellishments & finished cards, card workshop kits


Comments