
“Ski-sons Greetings”! A Handmade Gingerbread Man Christmas Card Tutorial with a Disguised Twist ⛷️🍬
- This Chick Loves Paper

- Nov 1, 2025
- 11 min read
Updated: Dec 16, 2025

The Gingerbread Man Who Ditched the Oven for the Slopes 🍪⛷️
You know that classic school project where kids have to disguise their Thanksgiving turkeys so they don’t end up as dinner? One year, my son turned his turkey into a pirate — full Jack Sparrow mode, eye patch and all. And honestly? That clever little disguise lives rent-free in my crafty brain.
So when I sat down to design a new winter card, I couldn’t help but think… what if our gingerbread man tried the same trick? What if he swapped frosting for fresh powder, ditched the cookie sheet, and hit the slopes instead?
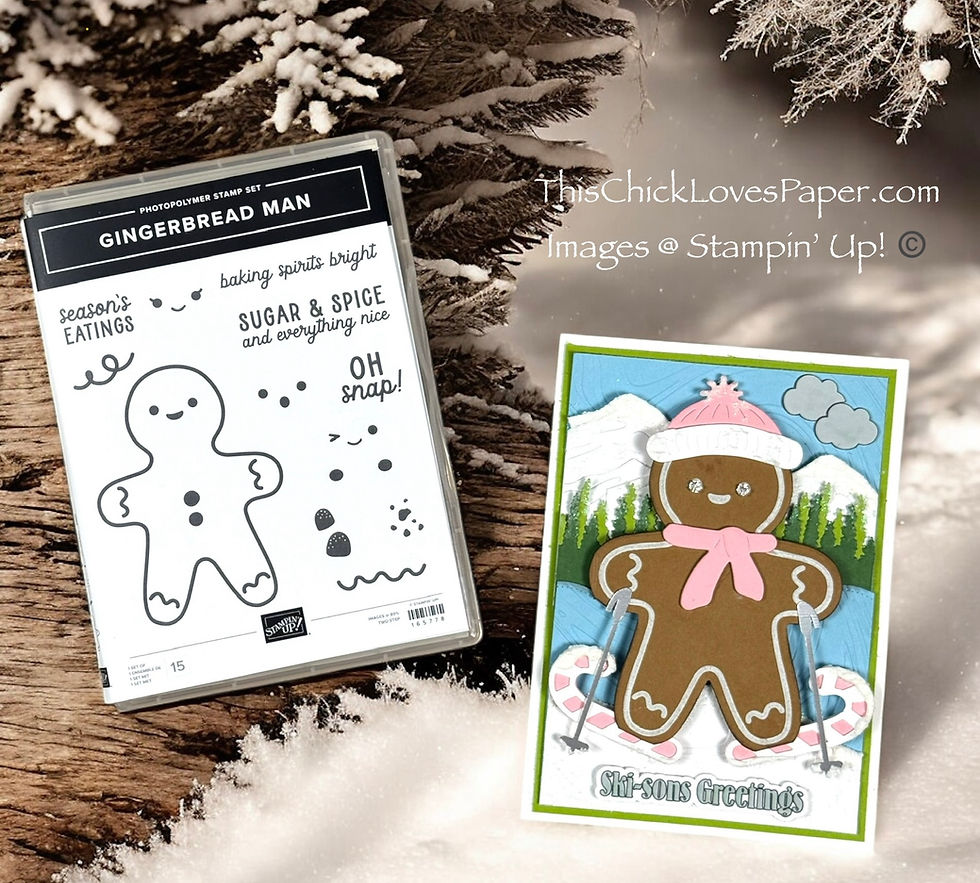
And just like that — boom 💥 — this Ski-sons Greetings card was born. Think candy-cane skis, Pretty in Pink winter gear, shimmer-topped mountains, and a breezy Balmy Blue sky that’s as sweet as a mug of cocoa.
So grab your paper trimmer, foam tape, and a strong cup of creative fuel, because we’re about to build a gingerbread adventure that proves cookies can conquer the slopes. 💪✨
Here’s Everything You Need for This Handmade Gingerbread Man Christmas Card ⛷️💖
Cardstock


Stampin’ Up! Basic White Thick 8-1/2"X11"Cardstock – Card base (10″ × 7″, scored at 5″ to create a vertical 5″ × 7″ card)
Stampin’ Up! Basic White 8-1/2"x11" Cardstock – Mountains and snow overlay
Stampin’ Up! Balmy Blue 8-1/2"X11" Cardstock – Embossed sky and snowbank pieces (4½″ × 6½″, curved cut approx. 3½″ from top)
Stampin’ Up! Granny Apple Green 8-1/2"X11" Cardstock – Mat layer (4¾″ × 6¾″, hollowed center to reduce bulk), Tree line (for layered forest depth)
Stampin’ Up! Pretty in Pink 8-1/2"X11" Cardstock – Hat, scarf, and base of candy-cane skis
Stampin’ Up! Pecan Pie 8-1/2"X11" Cardstock - Gingerbread Man
Stampin' Up! Garden Green 8-12"x11" Cardstock - Tree line
Bundles, Stamps & Dies


Stampin’ Up! Scenic Adventure Bundle – For mountains and trees
Stampin’ Up! Gingerbread Man Bundle – For the gingerbread figure and accessories
Close To My Heart Border Dies – For curved snowbanks and the white overlay pieces

Embellishments & Embossing Folders
Stampin’ Up! Drusy Adhesive-Backed Embellishments – For the gingerbread man’s eyes (sparkle highlight)
Stampin' Up! Shimmery Embossing Paste – For snowy shimmer on mountains, snowbank, hat, and skis
Stampin’ Up! So Swirly 3D Embossing Folder – For texture on the sky and snowbank
Ink
Close To My Heart White Daisy Ink (can substitute UNINKED STAMPIN’ PAD & WHITE CRAFT REFILL) – Stamped the gingerbread man on Pecan Pie cardstock
Stampin’ Up! Early Espresso Classic Stampin' Pad – Blended softly around gingerbread edges for that “baked cookie” look
Tools


Stampin’ Cut & Emboss Machine – For die-cutting and embossing
MISTI Stamping Tool – For precise multi-pass stamping of the White Daisy Ink
Foam Tape / Foam Dots – To pop the gingerbread man off the background
Paper Trimmer & Bone Folder – For sharp edges and clean folds
Sponge Dauber – For softly inking the cookie edges
⭐ Other Tools I Use in My Projects
*As an Amazon Associate, I earn from qualifying purchases.


Cricut® Essentials
• Cricut® Maker 3 — my primary cutting machine for titles, SVGs & embellishments
• Cricut® StandardGrip 12×12 Mat — 3 count used for cardstock, photo paper & labels
Printer
Canon® Printing System (Photos + Printable Cricut Elements)
• Canon TS9521C Crafting Printer — used for ALL printed project photos, journaling pieces, print-then-cut embellishments & titles
Photo Papers
• Canon Photo Paper Plus Glossy II (4×6, PP-301) → For 4x6 or smaller - printed photos
• Canon Matte Photo Paper (MP-101, 8.5×11) → Used for Cricut print-then-cut elements & titles
• Canon Double-Sided Matte Photo Paper (MP-101D, 8.5×11) → Also used exclusively for Cricut embellishments, icons, & layered pieces
Stamping & Precision Tools
• MISTI® Memory Size with 12-1/2" x 12-1/2" Stamping area — for borders, backgrounds & oversized stamping
• MISTI® Stamp Tool Bar Magnet - Additional magnet
Speciality Adhesives
• Tombow® Mono Aqua Liquid Glue — for corners, details & layered paper pieces
• Bearly Art Precision Craft Glue (4oz Original) — for embellishments & fine-detail gluing
• Tombow® Mono Air Touch Adhesive— my preferred tape runner for base
• Tombow® Mono Air Touch Adhesive, Refill 2-Pack — my preferred tape runner for base layers
Journaling Tools
• Avery® Easy Peel® Full-Sheet Clear Labels (8665) → Used for long typed journaling strips
• Avery® Clear Shipping Labels 2×4 (8663) → Used for short typed journaling strips or blocks
• Skaura Pigma Micron Fineliner Pens - Archival Black - Assorted Point Sizes - Used for handwritten Journaling
How to Make This Handmade Ski-sons Greetings Gingerbread Man Christmas Card - Step-by-Step Tutorial
Step 1 — Build the Card Base

Start with Stampin’ Up! Basic White Thick Cardstock.
Cut a piece measuring 10” × 7”, and score at 5” to create a vertical 5” × 7” card base.
Next, cut your Granny Apple Green mat to 4¾” × 6¾” and hollow out the center to save weight and cardstock.
Then, trim a piece of Balmy Blue cardstock to 4½” × 6½”—this will become your embossed sky and snowbank layers later.
Pro Tip: Hollowing out mats not only conserves cardstock but also keeps your finished card from feeling too heavy when layered with multiple die-cuts.
Step 2 — Die Cut the Scenic Elements

Using the Scenic Adventure Dies, cut your mountains from Stampin’ Up! Basic White Cardstock.
Cut your trees from Granny Apple Green and Garden Green Cardstock for a vibrant layered look.
Now, switch to the Gingerbread Man Bundle to create all the fun accessories:

Hat: Cut one in Pretty in Pink, and two more in Basic White. Trim the tops off the white hats, leaving only the brims, then stack and glue the brims onto the pink hat to create a dimensional two-tone look.
Scarf: Cut one in Pretty in Pink.
https://www.stampinup.com/?demoid=2298803Candy Cane Skis: Cut the base in Pretty in Pink and the top layers in Basic White. This double-layer design gives that perfect frosted finish!
Pro Tip: When you stack die-cut layers of white over color, it mimics frosting—perfect for that “freshly baked” gingerbread vibe.
Step 3 — Stamp and Build the Gingerbread Man
Stamp the gingerbread man image from the Stampin’ Up!® Gingerbread Man Bundle onto Stampin’ Up!® Pecan Pie 8½″ × 11″ cardstock using Close To My Heart White Daisy Ink.
Use your MISTI to stamp multiple passes so the White Daisy Ink layer is fully opaque and bright against the warm brown cardstock. Let it dry completely—this ink needs extra time to set before you handle it.
Once the image is dry, gently ink the edges of the gingerbread man with Stampin’ Up!® Early Espresso Ink using a blending brush or sponge dauber. Work in light circular motions so the edges look toasted, like a perfectly baked cookie.
After inking, assemble his details:

Attach the two-tone Pretty in Pink hat with stacked Basic White brims you prepared in Step 2.
Add the Pretty in Pink scarf.
Adhere the peppermint-striped candy-cane skis and poles.
Finish with DRUSY Adhesive-Backed Embellishments for sparkling eyes.
Finally, add a light sweep of Shimmery Embossing Paste over the hat, skis, and pole tips for a frosted-snow shimmer, and let everything dry before attaching him to the card.
Pro Tip: Because White Daisy Ink is pigment-based, use short, firm presses in your MISTI rather than rocking the stamp — you’ll get clean edges and solid coverage without smudging.
Step 4 — Create the Snowbank Curve and Emboss the Sky
Take the Balmy Blue panel (4½″ × 6½″) you prepared in Step 1 and position your Close To My Heart border die so the curve cuts about 3½″ down from the top edge.
(This placement gives you a high enough horizon for your mountains and trees while still leaving open sky for clouds and your sentiment.) Once you’ve positioned the die, run it through your machine to cut the curve.

Next, while your die-cutting machine is still set up, cut your white snow overlay using the same border die. The highest point of this white piece should measure about 2”, with the left side dipping to 1½” and the right side around 1”—though this will vary depending on which border die you’re using.
The goal is for the top of your candy-cane skis to sit mostly in the blue section, with the tips crossing slightly into the white snow for contrast.
Once both pieces are cut, run each of them separately through the So Swirly 3D Embossing Folder to add that breezy, winter-sky texture.

Now’s also the perfect time to add shimmer paste while your embossed pieces are out:
• Use a small palette knife or your fingertip to lightly apply Shimmery Embossing Paste across the white snow overlay, focusing on the curved edge.
• Then, add a touch of shimmer along the tops of your die-cut mountains for a subtle snow-capped effect.
Let both pieces dry completely before moving on to assembly.
Pro Tip: Always cut before embossing! Cutting first keeps your swirl pattern crisp—if you emboss first and then die-cut, the second pass can flatten those beautiful raised details.
Step 5 — Assemble the Background Scene on the Mat
Now it’s time to bring your winter wonderland to life! Start by laying both Balmy Blue panels on top of your Granny Apple Green mat, lining them up so they sit centered and evenly spaced. Don’t adhere to anything just yet—you’re building your layers first.
Next, position your Basic White mountains (from the Scenic Adventure bundle) and your tree line, cut from Granny Apple Green and Garden Green cardstock. These two sections will tuck underneath the bottom Balmy Blue piece to create that layered mountain-and-valley look.
Then, place your white snow overlay along the bottom of your curved Balmy Blue piece. Where you cut this overlay depends on your gingerbread man’s final placement and the specific border die you’re using.
Before adhering, lay your gingerbread man temporarily over the card to test positioning. You’ll want to leave about ½″ of space at the bottom for your “Ski-sons Greetings” sentiment.

Once you’ve got your spacing set:
The tree line should sit just below the gingerbread man’s eyes and about halfway between the top and bottom of his arms.
The bottom Balmy Blue panel should cover most of his body, leaving the candy-cane skis to sit mostly over the blue with just a hint of overlap onto the white snow. This contrast makes the skis pop beautifully against the background.
After you’re happy with the placement, carefully lift the gingerbread man off the card and adhere all your scenic layers—making sure that the bottom Balmy Blue panel overlaps the trees so the curved edge softens that straight line and adds natural flow to your snowy hillside.
Pro Tip: Dry-fit everything before committing with glue! These little shifts can make a huge visual difference, especially when you’re playing with curves and layers like this.
Step 6 — Add the Sentiment, Gingerbread Man & Final Details

Now it’s time for the finishing touches!
Start by adding your “Ski-sons Greetings” sentiment. I created mine in Cricut Design Space and used Print Then Cut for a crisp layered look. I stacked the gray top layer over a pink base to match the gingerbread man’s accessories.
Then, adhere your gingerbread man using foam tape for dimension. Position him so he’s skiing right through the center of your card.
Finish with your Smoky Slate clouds, placed near the top corners to form a visual triangle with the gray sentiment and ski poles.
Sweet Success on the Slopes 🍪❄️
And there you have it — one gingerbread man who officially traded frosting for fresh powder! Between the shimmer-topped mountains, swirly Balmy Blue skies, and his candy-cane skis catching all the sparkle, this little cookie is living his best snow day life.
What I love most about this card is how playful it feels — a perfect mix of whimsy and winter magic. The textured snowbanks, that hint of shimmer paste, and the pop of Pretty in Pink bring just enough sweetness without losing the cozy alpine vibe. It’s kid-friendly, joy-packed, and full of personality — basically everything a handmade holiday card should be.
The Magic Doesn’t Melt Here ⛄💫 Explore More Holiday Cards.
Think this gingerbread cutie was sweet? Wait until you see the rest of the holiday lineup! From shimmer-dusted elegance to playful peppermint whimsy, This Chick Loves Paper has a Christmas card for every crafting mood. Whether you crave glittering gold layers, soft pastels with frosty flair, or candy-colored chaos that makes you grin ear-to-ear—there’s inspiration waiting to be unwrapped.
Each post is packed with step-by-step instructions, close-ups that teach the why behind great design, and plenty of Pro Tips to help your cards shine brighter than your tree topper. ✨
So grab your cocoa, your cardstock, and that unstoppable creative spirit—because around here, the magic doesn’t melt…it multiplies. 🎄💖


Your Turn to Hit the Slopes! Share Your Creations🎿💖

Now that our gingerbread daredevil has mastered the mountains, it’s your turn to craft a card that makes everyone say “snow way—that’s handmade?!”
Upload your masterpiece to the Members Gallery and show us your take on this Ski-sons Greetings theme! Did you give your gingerbread a different outfit? Change up the color palette? Add a touch of shimmer or sparkle snow? We want to see your twist on this frosty favorite!
Remember: every crafter’s card tells a new story, and sharing yours might just inspire someone else to pick up their trimmer and join the fun. 💗
Crafting Outside the Cookie Cutter 🍪💖

Who says gingerbread men only belong in cookie tins? Not us, sugar! This little guy proved he’s more than frosting and gumdrops—he’s got ski skills and sparkle to spare.
But why stop here? Try turning your gingerbread into a beach bum with a tiny surfboard for a sunny twist, or pop him into a mug of “hot cocoa” with embossed marshmallow accents for a cozy winter card. You could even pair him with other Scenic Adventure elements to create a full-on candy village scene. Once you start reimagining your stamps, the possibilities are sweeter than a bakery window. 🍬
The best part? Each variation tells a new story—one full of laughter, creativity, and a little holiday magic. Because here at This Chick Loves Paper, we don’t just make cards—we bake memories, sprinkle joy, and serve them with a side of sass. 💖✨
So go on, sugar — grab your cocoa, cue up your favorite holiday playlist, and let your creativity hit the slopes. Because this gingerbread guy isn’t the only one who can sparkle under pressure. 💖❄️
April – This Chick Loves Paper
🛒 Grab Your Supplies & Get Crafting!

All photos and projects are subject to copyright © ThisChickLovesPaper.com.
Images © Stampin’ Up!®
The content in this blog is the sole responsibility of April Raine – This Chick Loves Paper as a Stampin’ Up!® Independent Demonstrator. The use of and content of classes, services, or products offered is not endorsed by Stampin’ Up!®
Get ready to sugar-coat the slopes with this handmade Ski-sons Greetings gingerbread man Christmas card tutorial from This Chick Loves Paper—where every project is baked with shimmer, sass, and pure creative magic! 🍪✨ Follow along as we turn a classic cookie into a slopeside superstar in this frosty holiday how-to that’s guaranteed to melt your heart and spark your imagination. 💖🎿
⭐How I Protect My DSP, Cardstock & Finished Cards

I store my DSP, cardstock, scraps, and even finished cards in these clear resealable bags.
The 2-mil thickness is perfect for everyday crafting (they make a 4-mil option if you want extra durability!), and they’re tough, reusable, and great for keeping your entire crafting stash clean, tidy, and protected from the chaos of the craft room.
*As an Amazon Associate, I earn from qualifying purchases.
• 13×13 Plymor 2mil Zipper Reclosable Bags — for 12×12 DSP, cardstock sheets & scraps
• 9×12 Plymor 2mil Zipper Reclosable Bags — for 8.5×11 cardstock & scraps
• 6x8 Plymor 4mil Heavy Duty Reclosable Bags — for storing extra die cut embellishments & finished cards, card workshop kits


Comments