Patchwork & Pinstripes: A Disney-Inspired Jack & Sally Scrapbook Layout
- This Chick Loves Paper
- Jun 12, 2025
- 8 min read

✂️ No Cricut? No problem.
A few weeks ago, someone in a scrapbook group asked:
“What if I don’t have a Cricut or SVG files? Can I still make a themed layout that feels magical?”
And that question stuck with me—because I love using SVGs. Especially for titles. Especially for Disney-inspired scrapbook layouts & cards.
But this time? I challenged myself to leave the machine off.
No Cricut. No SVGs. No pre-designed cut files.
Just paper, dies, and a little creative chaos.
🎃 This layout is the result—and yes, it includes hand-cut stripes, layered die cuts, and one… ever-so-slightly misspelled title. 😅 (More on that below.)
Let’s just say “Pinstrips” was a design choice, not a typo. We’re calling it Halloween chic now. 💀🖤
🧵 One page stitched and zig-zagged like Sally’s dress
🦴 One page bold and striped like Jack’s pinstriped suit
🕷️ Hidden Mickeys, webs, and spooky drama to haunt your craft table in the BEST way
Let me show you how to bring it to life—step by patchworked step.
🎨 What You Need To Create This Disney-Inspired Jack & Sally Scrapbook Layout
Cardstock:


• Stampin’ Up! White Willow 12x12 Cardstock - Base Page on Jack's Side & photo mats
• Stampin’ Up! Basic Black 12x12 Two-Toned Cardstock – used for all die cuts, including stripes, zig-zags, Mickey silhouettes, and title letters. Photo mats.
• Stampin’ Up! Pool Party 12x12 Two-Tone Cardstock base page Sally’s Side.
• Stampin’ Up! Pretty Peacock 12x12 Two-Toned Cardstock - Patchwork on Sally’s Side
Stampin’ Up! Spooky Sweet 12x12 Specialty Designer Series Paper

For this patchwork masterpiece, I pulled from the Melon Mambo and Pumpkin Pie sheets in the Spooky Sweet DSP—and oh, are they screaming with style! 🎃💗 These bold, Halloween-inspired colors gave Sally’s side that stitched-up charm, without needing themed character paper.
Want to recreate this look? ✨ Grab your own pack of Spooky Sweet DSP—available July 2025 to the public, but shipping now for demonstrators during preorder! (Perk of the job: Stampin’ Up! demonstrators get early access! 💅)!
🦇 Stamps & Thin Cut Bundles:


• Spooky Halloween Bundle – for the haunted house, bats, fence, and scene-setting embellishments
• Fright Night Bundle – for the spiderwebs, spiders, “EEK,” label die, and spooky Halloween title base
✂️ Pro Tip: These two bundles pack a serious Halloween punch. Mix and match elements from both to build scenes, borders, and custom titles with tons of character—no Cricut® required!
Tools & Adhesives:


• Foam tape
📸 Distressed & Inked Photo Mats That SCREAM
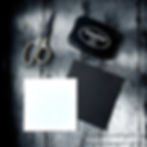
To add texture and haunted flair, I created double-matted photo frames using Basic Black and White Willow. I distressed the edges of both layers for a tattered, dimensional look—then dragged the White Willow mats directly along my StazOn Jet Black ink pad for a spooky, smudgy finish.
🖤 Pro Tip: This inking technique not only adds drama, but it also hides any uneven cuts or imperfections. Creepy and clever!
🕷️ Jack Side: Stripes, Spiders & That Hidden Mickey
🦴 Step-by-Step:
1. Base Layer:
Start with a 12x12 sheet of White Willow cardstock—clean, bold, and perfect for high contrast.
2. Stripes:
Cut multiple 1/4” strips of Basic Black Two-Toned Cardstock and adhere them vertically across the page to mimic Jack’s suit. Yes, it’s a labor of love—but the payoff is spectacular.
🕸️ Pro Tip: Vary your spacing slightly for that hand-sewn feel. Not every stripe needs to be perfectly straight—embrace the chaos!

3. Photo Mats:
• Place a 4-1/2” x 4-1/2” photo mat vertically on the far left. I positioned mine about 3 inches from the top to leave room for the title.
• Add a second 4-1/2” x 4-1/2” mat to the upper right side of the page.
• Finish by overlapping a third 4-1/2” x 4-1/2” mat diagonally at the bottom, tucked slightly under the other two for a layered dimension.
4. Die Cuts:
Add spiders and spiderwebs crawling up the page. I used the Stampin’ Up! Fright Night Bundle and placed one large web in the bottom right corner. Then I trailed the spiders up toward the top left for that creepy-crawly climb.

5. Title:
Use the Fright Night label die to create a matted sentiment base—cut the base from Basic Black and the top layer from White Willow. Distress and ink the White Willow layer with StazOn Jet Black.
Cut your title in a spooky Halloween-style font using your Cricut®, pop it up with foam tape, and adhere it to the label.
Before securing the title, tuck a Hidden Mickey just behind it for that subtle Disney wink.
🎃 Pro Tip: You don’t need Disney die cuts to go Disney—just a clever silhouette in the right spot can say it all!
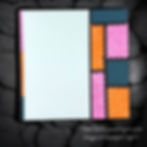
🪡 Sally Side: Patchwork Perfection
🧩 Step-by-Step:
1. Base Layer:
Start with a full 12x12 sheet of Pool Party cardstock. This soft, eerie blue-green hue was chosen to mimic Sally’s ghostly skin tone. It sets the stage beautifully for all the stitched chaos to come.
2. Patchwork Block Order – Left to Right, Top to Bottom
To make Sally’s side feel stitched, layered, and authentically hand-pieced, I placed each patterned block intentionally—no overlaps, no guesswork, just pure patchy precision.

Left Column:
1️⃣ Pretty Peacock – 4” x 1-1/2” (topmost piece)
2️⃣ Pumpkin Pie – 1-1/2” x 6” (long vertical strip directly beneath the Peacock)
5️⃣ Melon Mambo – 1-1/2” x 4-1/2” (bottom piece on the left)
Right Column:
3️⃣ Melon Mambo – 2-1/2” x 4” (aligned next to the upper portion of Pumpkin Pie)
4️⃣ Pretty Peacock – 2-1/2” x 3” (placed directly under the Mambo)
6️⃣ Pumpkin Pie – 2-1/2” x 3-1/2” (final piece at the bottom right)
🧵 Pro Tip: Number your pieces on the back if you’re building in layers—especially if you’re photographing the layout in stages. It’ll help you keep the magic in order even if Wix tries to get spooky with your sequence. 👻
3. Zig-Zag Stitches:
To mimic sewn seams, die-cut zig-zag borders from Basic Black cardstock and adhere them over the edges of your patchwork blocks. It adds structure and that stitched-together storytelling magic.
🪡 Pro Tip: You can create zig-zag edges by using pinking shears, a Cricut, or simply fussy cutting by hand. Experiment with each method to see which one gives you the perfect hand-stitched feel you’re after.
4. Divider Strips to Bridge the Pages:
To create a visual transition between Jack’s stark stripes and Sally’s stitched patchwork, I added a bold vertical accent using paper scraps.
Here’s how to do it:
• First, cut a 1/4” x 12” strip of Basic Black cardstock and adhere it flush to the left edge of the Pool Party base page. This acts as the stitched boundary line between Jack and Sally’s sides.
• Next, cut two 1/4” strips, any lengths, from your leftover Melon Mambo, Pumpkin Pie Spooky Sweet DSP, and your Pretty Peacock Cardstock.
• Layer these color strips just inside the black one, Melon Mambo on top, Pumpkin Pie below, and Pretty Peacock on the very bottom, to give the illusion that Sally’s patchwork is beginning to “unravel” into the center of the spread.
5. Photo Mats:
This side of the layout holds three photo mats:
• At the top left, place a 4-1/2” x 4-1/2” square mat
• To the right of that, add a vertical 4-1/2” x 6-1/2” mat
• Finally, overlap a horizontal 6-1/2” x 4-1/2” mat slightly over the bottom-left of the vertical one
📸 Pro Tip: Line the vertical mat on Sally’s side to match up visually with the first vertical photo on Jack’s side—tying the pages together seamlessly.

6. Halloween Town Magic:
To channel the spooky spirit of Halloween Town, I die-cut a haunted house, bats, and a rickety fence from the Stampin’ Up! Spooky Halloween Bundle, all in Basic Black Two-Toned Cardstock.
These are clustered in the bottom left to create a little scene that’s eerie, whimsical, and totally on theme.
🎃 Pro Tip: Want more drama? Add vellum behind the haunted house windows or pop a bat off the page with foam tape for extra depth.
🌕 Why This Layout Hits Different

This project proves:
🎃 You can create a bold, story-driven layout using just DSP, cardstock, and creativity.
🎃 You can craft spooky vibes—no SVGs, no Cricut required.
🎃 And you can bring any Disney-inspired layout—like this Jack & Sally spread—to life with nothing but paper, dies, and fearless imagination.
✨ Bonus memory moment: If you noticed the title says “Pinstrips,” that’s not a typo—it’s a treasured bit of our own story. That’s how my little man used to pronounce “pinstripes” when he was small, and I loved it so much I made it permanent. Because scrapbooking isn’t just about what’s accurate… it’s about what’s authentic. 💛
It’s equal parts eerie and epic. And that’s exactly what scrapbooking should be. 🖤
✨ Explore More Disney-Inspired Scrapbook Magic!
From handmade magic to Cricut-crafted titles, these layouts show just how many ways you can bring Disney stories to life. Whether you’re working with die cuts, SVGs, or just your favorite cardstock, there’s inspiration waiting in every park-themed page.
🎠 Ready to ride into more creative fun? Check these out!


🧵 Share Your Patchwork Masterpiece!
Are you team Jack or team Sally?
Or did you create a whole new character combo of your own?
🖤 Have you tried making a patchwork layout like this?
🕷️ Got any clever no-Cricut tricks for spooky embellishments?
🎃 Found a fun way to hide your own Mickey?
Whatever your twist on this layout, please share it in the Members Gallery and help inspire the rest of the (creepy-cute) crew!
🕸️ Final Thoughts From Halloween Town…

You asked: Can I make a themed layout without SVGs or a Cricut? And this layout answers: Heck yes.
Whether you’re scrapbooking Jack & Sally, Haunted Mansion, or any other of your theme park moments, you can capture that vibe using just Stampin’ Up! DSP, cardstock, dies, and a little imagination.
You don’t need fancy tools. You don’t need a machine.
You just need a story—and the courage to tell it your way.
So grab your scissors and let the spooky magic begin. Because the most powerful tool in your craft room… is YOU. 💀
Now go make something spooky & spectacular.
April – This Chick Loves Paper
🛒 GRAB YOUR SUPPLIES & GET CRAFTING!
All photos and projects are subject to copyright © ThisChickLovesPaper.com.
Images © Stampin’ Up!®
The content in this blog is the sole responsibility of April Raine, This Chick Loves Paper as a Stampin’ Up!® Independent Demonstrator. The use of and content of classes, services, or products offered is not endorsed by Stampin’ Up!®.
Want to scrapbook Jack & Sally without Cricut® or Disney-themed paper? This Disney-inspired 12x12 double-page scrapbook layout uses cardstock, die cuts, and patchwork magic to capture the Nightmare Before Christmas vibe—no SVGs needed! 🎃 Find the full tutorial from This Chick Loves Paper!