Grizzly River Run Scrapbook Layout: Capturing the Chaos, Thrills & Splash-Tastic Memories! 🐻💦🎢
- This Chick Loves Paper
- Oct 29, 2024
- 9 min read
Updated: Dec 9, 2025

You know those scrapbook layouts that feel like a ride?
This one is the ride. 🎢
Inspired by Disney California Adventure’s Grizzly River Run, this 12×12 single-page layout takes the chaos, the thrills, and the splash-tastic memories of the park’s wildest adventure — and turns them into paper-crafted perfection!
When I created this page using CTMH’s Lake Life Collection, I wanted it to feel alive: the tilt of the raft, the roar of the rapids, and the chaos that somehow always ends in laughter. But here’s the twist — these aren’t perfect photos. They’re blurry, water-soaked, slightly crooked… and completely real.
Because sometimes the best scrapbook pages aren’t the ones that capture the flawless picture — they’re the ones that capture the moment. 💖
So grab your trimmer, your towel, and maybe a cup of courage, because this layout is going to take you right back to the riverbank — splashes, screams, and all. 💦✨
🎨 Designing the Layout: How I Brought the Wild Rapids to Paper

Before I even touched my paper trimmer, I wanted to make sure this layout had movement. I didn’t want a flat, perfectly aligned design — because this ride is anything but smooth!
So I turned to Cricut Design Space®️ to mock it all up first. Here’s why:
✔ It helped me visualize the layers, from the towering Grizzly Peak to the foamy river below.
✔ I could adjust the tilt of the photos to mimic the real-life ride experience.
✔ It saved me from cutting a million tiny pieces and hoping they fit. (Been there. No thanks. 😂)
Once the digital version was ready, I used my Cricut®️ to cut out all the key elements — the mountain, river, sign, trees, and water splashes. Then it was time to bring it to life! 🌲🌊
🧰 Materials You’ll Need for This Grizzly River Run Scrapbook Layout


This adventure-filled layout was crafted using CTMH’s Lake Life Collection and coordinating elements, but it can easily be recreated using Stampin’ Up! products! 🎨✨ The crossover colors and similar products are linked in the gallery below—so whether you’re a CTMH fan, a Stampin’ Up! enthusiast, or love mixing and matching, you can make this design uniquely yours! 🚀
📝 Paper & Cardstock


✔ CTMH “Lake Life” Paper Pack & Coordinating Cardstock – Base-layer & border
✔ White Daisy Cardstock – Layout base
✔ CTMH Pine Cardstock – For the mountain layers
✔ CTMH Glacier, Sage & Lagoon Scraps – For the river elements
✔ Gray Granite Cardstock – For the rocky shore
💡 Stampin’ Up! Crossover Colors: Similar hues can be achieved using Shaded Spruce, Pool Party, Lost Lagoon, and Gray Granite. Check out the product gallery for exact matches!
🎨 Inks, Blending & Texture


✔ CTMH Glacier Ink Pad – Blended background sky
✔ CTMH Pine Ink Pad & Sponge Dauber – Adding dimension to the mountain
✔ CTMH Charcoal Ink – Edging the rocky shore
✔ Glitter Paste – Adds shimmer to the sand
🛠 Tools & Adhesives


✔ Blending Brushes – For inked sky effect
✔ Paper Trimmer – Precision cutting
✔ Adhesive, Glue & Foam Tape – Assembling the layers
🖥 SVGs, Die-Cuts & Embellishments
✔ SVG Files from Design Space® – Includes the mountain, title sign, and water splash accents
✔ Silhouette Pine Trees – Cut from black cardstock for framing
✔ Foam Strips – To create a 3D water splash effect
🎢 Hold Onto Your Glue! Step-by-Step Instructions for Scrapbooking the Chaos & Thrills of Grizzly River Run
🌲 Step 1 – Setting the Scene: Building the Base & Background

We’re diving right in — because when it comes to a wild water-ride layout like Grizzly River Run, the background has to do more than look cute — it has to move.
My base started with a sheet from the CTMH Lake Life paper pack — the one splashed with words like “Relax,” “Explore,” and “Sun Time.” Total mood-setter, right?
Then I used the hollow-out trick: cutting
one inch in from every edge to remove the center square. This saves paper and keeps the page light (because we all know foam tape’s coming later 😏).

On top, I layered an 11×11 piece of coordinating paper, framing it perfectly for that “window to adventure” look.
Next came the mountain magic:
The back mountain: acorn-pattern paper mimicking the rocky Grizzly Peak textures.
The front overlay: Pine cardstock torn into jagged peaks — forest perfection.
Both were inked up with matching colors using a dauber for depth.
And of course, no Grizzly Peak is complete without its star — a Cricut-cut grizzly bear SVG perched at the top like the king of the mountain! 🐻
Finally, I softly blended Glacier Ink behind the peaks to create that dreamy sky, leaving just enough space for my future puffy clouds to drift through.
💡 Pro Tip: Never skip the inking! It’s the difference between “flat paper” and “holy cow, is that a mountain?”
🌊 Step 2 – Making Waves: The River & Sandy Shore

Every wild ride needs water — and this layout definitely needed some splash factor! 💦
To create my river, I reached for a mix of CTMH Glacier, Sage, and Lagoon cardstock scraps. I love using different tones because it instantly gives that layered, moving-water look — like the light’s hitting the surface as the raft twists through the rapids. Each piece was cut into waves, inked around the edges to add even more dimension and flow.
Layering the sand slightly over parts of the river gave it that “splashing up onto the bank” feel, tying everything together. Between the flowing blues, glittery textures, and that perfect mix of Lagoon and Glacier, you can almost hear the rushing water.
By this point, the layout started to feel like more than paper — it was turning into a little piece of the park itself!
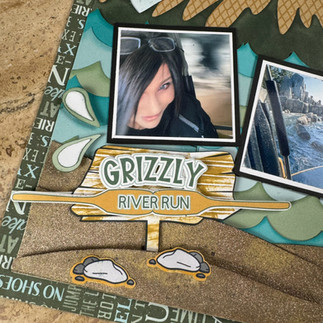
🪵 Step 3 – The Grizzly River Run Sign: A Custom Title That Pops!
Every great Disney-inspired layout deserves its own marquee moment — and for this one, the Grizzly River Run sign steals the show again!

Here’s a fun twist: this isn’t a brand-new design. It’s actually the same Cricut Design Space file I created for my very first Grizzly River Run layout! 🐻✨
That’s the beauty of Design Space® — once you’ve made something you love, it’s saved and ready to reuse, resize, or remix whenever inspiration strikes. So for this layout, I simply opened my original sign, scaled it down to fit this smaller, single-page design, and used the Print Then Cut feature to bring it to life again.
I layered my printed sign over the Glitter-Paste sandy shoreline, angled just slightly so it looked like it had drifted ashore after a wild raft ride. The oars crisscrossed behind it for that perfect “Adventure Awaits” energy — and suddenly, the whole layout felt complete.
💡 Pro Tip: Never delete your favorite Cricut projects! You never know when an old file might become the perfect finishing touch for something new.
🌲 4. Pine Tree Silhouettes: Framing the Scene

No dies? No problem.
My die stash was basically non-existent when I made this layout, so I turned to Cricut Design Space® for my pine forest fix. I print-then-cut sleek black trees with white outlines — simple, bold, and graphic.
At first, I planned for two clusters, but one was all it took to hit the visual triangle jackpot — tying the trees to the grizzly bear and the black mats below.
💡 Pro Tip: Design Space® is your best friend when your craft stash is in training wheels mode.
💦 Step 5 – Photos, Splashes & That Wild Ride Energy
Once the mountain and river were built, it was time to bring the story to life with photos — real, messy, water-splashed, joy-filled photos! I double-matted each picture in black and White Daisy cardstock to pull that deep inky black from the bear and the trees down through the layout. (Visual triangle for the win! 🖤)
Each photo was tilted left or right to mimic the chaotic bounce of the ride — because if you’ve ever been on Grizzly River Run, you know it’s more spin-cycle than smooth sailing. 😂
To keep that sense of movement flowing, I added Cricut-cut water splashes in Sage + White Daisy, double-matted for extra pop. I made two mirrored sets — one crashing around the left photo and one hugging the right — so the water framed the entire scene like the ride wrapping you in its wave.
Those puffy clouds above the peak completed my visual triangle in white, giving balance and movement from top to bottom.
Now, I’ll admit — there’s no journaling block on this layout (gasp!). My original plan was to sneak in a few Avery labels down in the sandy section, but I changed my mind mid-stream. Instead, I’ll be adding a flip-flap over that last photo to tuck my journaling inside — handwritten, heartfelt, and hidden — so it won’t distract from the full scenic moment. 💕
And here’s the thing: my photos may not be perfect. They’re blurry, soaked, and completely chaotic — but this layout? It’s perfect to me.
Because it’s real. It’s honest. It’s what the ride felt like.
💦 Why This Layout is One of My All-Time Favorites

Not only does this page capture one of our favorite Disney memories, but it reminds me exactly why I scrapbook.
It’s not about perfect photos — it’s about real stories. The laughter, the motion, the wind-in-your-hair kind of memories that make you feel alive every time you look back.
If I only scrapped the perfect photos, this layout wouldn’t exist. And honestly? That would be the biggest miss of all.
So here’s my challenge to you — scrap the blurry, scrap the wild, scrap the messy moments. Those are the ones that hold the most heart. 💛
Because when you embrace imperfection, that’s when the magic really makes a splash. 🌊✨
💦 Explore More: Ride the Rapids, Relive the Magic
If this layout made you laugh, splash, or whisper, “Please don’t ruin my hair again, Grizzly River Run,” then you, my friend, are my kind of crafter. 🐻💦
👉 Explore my Disney Scrapbook Layouts Collection and take the grand tour: you’ll find haunted mansions that glow, Radiator Springs sunsets that sparkle, and castles that shimmer with just the right amount of sass and glitter. ✨
Because here’s the thing: every ride, every photo, every layout is a chance to relive a little magic — one paper wave at a time. 🌊🎢


🐻 Share Your Splash! Join the Wild Ride of Creativity
Now it’s your turn to brave the rapids, crafty friend! 💦
Have you ever scrapped a blurry, “oops-my-phone-got-drenched” photo? Or turned a chaotic moment into paper perfection?
I want to see it all — the soaked smiles, the glittery puddles, and the pure, unfiltered joy that only memory-making brings.
📸 Upload your layouts to the Members Gallery. Let’s build a creative current that keeps flowing — one wild ride, one paper splash, and one perfectly imperfect memory at a time. 🌲✨
Because around here, we don’t just craft layouts — we craft legacies. 💖
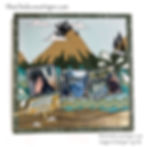
🌲 Final Thoughts: Because Adventure Deserves to Be Scrapped!

Inspired by one of our favorite Disney rides, this layout brings Grizzly Peak to life with bold layers, dynamic angles, and inky details that mimic the untamed waters. A scrapbook page as adventurous as the ride itself!
So grab your paper, tilt those photos, add some splashy details, and scrapbook the wild ride that is life. 🎢✨
Here’s to making a splash — one layout (and one soggy smile) at a time. 💦
April, This Chick Loves Paper
Grab Your Supplies & Get Crafting! ✂️
Please note: All photos are subject to copyright. ThisChickLovesPaper.com
Images @ Stampin’ Up!©️
Images @Close To My Heart©️
Disclaimer: The content in this blog is the sole responsibility of April Raine - This Chick Loves Paper as a Stampin’ Up!® Independent Demonstrator. The use of and content of classes, services, or products offered is not endorsed by Stampin’ Up!
🌊🐻 Dive into this 12×12 single-page, 3-photo Grizzly River Run Scrapbook Layout created by This Chick Loves Paper! Featuring CTMH Lake Life papers, Cricut Design Space SVGs, and scene-building techniques, this Disney-inspired step-by-step tutorial captures the chaos, thrills & splash-tastic memories of Disney’s wildest ride — all crafted with that signature This Chick Loves Paper sass & sparkle! 🎢✨