Beginner Scrapbooking Essentials — The 10 Tools Every New Crafter Needs
- This Chick Loves Paper
- Jun 1, 2024
- 11 min read
Updated: Nov 17, 2025

Starting your scrapbooking journey? Feeling overwhelmed by ALL the supplies out there? Trust me, I’ve been there! When I first started, I made the classic beginner mistake—buying everything that looked pretty instead of what I actually needed.
So, let’s save you some time, money, and frustration by breaking it down:
✔ What you truly need to get started
✔ The “nice to have” extras that make crafting easier
✔ Smart shopping tips to maximize your budget
By the end of this guide, you’ll know exactly what to grab first and what you can build up over time!
Beginner Scrapbooking Essentials — The 10 Tools Every New Crafter Needs
These 10 essential items are the foundation of every great scrapbook layout. If you’re just starting, start here!
1️⃣ Paper Trimmer – The Ultimate Cutting Sidekick

Your paper trimmer is basically the superhero of your craft room — the one tool that keeps everything straight, crisp, and chaos-free. No wonky cuts, no crooked edges, no “oops, I sneezed and my scissors slipped.” A good trimmer gives you clean, confident cuts every single time.
✂ Why You Need It: Precision matters! Straight edges make your layouts look polished and professional.
💡 My Pick: The Stampin’ Up! Paper Trimmer is beginner-friendly, lightweight, and designed with BOTH a cutting blade and a scoring blade—so you can trim AND create perfect folds with one tool.
2️⃣ Adhesives & Glue – Keeping It All Together (Literally!)
Adhesives are the unsung heroes of scrapbooking — the quiet little MVPs that make sure your beautiful layers, photos, and embellishments actually stay where you put them. Whether you’re building dimension, adding tiny details, or securing full 12x12 layers, the right adhesive makes a HUGE difference in how polished your layouts look.

📌 Why You Need It: Because without adhesive… well, nothing sticks! And we’re going for “Pinterest-worthy,” not “fell off the page overnight.”
💡 My Picks:
✔ Stampin’ Seal Adhesive – Smooth, clean, and perfect for everyday use
✔ Foam Strips or Dimensionals – Add that delicious, professional-looking POP to your embellishments
✔ Glue Dots – A lifesaver for tiny accents, ribbons, sequins, and all the cute little finishing touches
3️⃣ Black Ink Pad – The Scrapbooking Essential You’ll Reach For Constantly

A good black ink pad is one of those tools you don’t realize you need… until you have it, and then suddenly you’re using it on everything. Titles, journaling spots, stamped accents, sentiments, borders—black ink is the clean, crisp foundation that makes your designs look sharp and intentional. It’s the little detail that instantly elevates any page.
🖋 Why You Need It: A solid black ink pad gives you crisp, clean impressions every single time, making your stamped elements look professional and photo-ready.
💡 My Pick: StazOn Jet Black Ink — beginner-friendly, smudge-resistant, and perfect for both stamping AND coloring with markers.
4️⃣ Clear Stamping Blocks – Perfect Placement, Every Time

🖋 You’re using clear stamps; stamping blocks are your new best friends. Think of them as the steering wheel of your stamping—giving you full control, perfect pressure, and spot-on placement. They let you SEE exactly where you’re stamping, which means fewer mistakes and way more confidence (especially for beginners!).
📦 Why You Need It: Clear stamps can’t do their job alone—you need a block to mount them, line them up, and get beautiful, crisp impressions right where you want them.
💡 Pro Tip: Grab a few different sizes! Having the right block for the right stamp makes stamping easier, cleaner, and way more accurate.
5️⃣ Versatile Stamp Sets & Dies – Your Creative Powerhouses
When you’re just starting, a few well-chosen stamp sets and coordinating dies can take you so far. These are the tools that help you create titles, accents, borders, embellishments, and those extra little details that make your pages look intentional and put-together. Pick designs that match the moments you scrapbook most, and you’ll use them again and again.
🎨 Why You Need It: A versatile stamp set becomes the “little black dress” of your craft room — it works for multiple layouts, seasons, and themes. Dies take it a step further by cutting perfect shapes without any fussy cutting.
💡 Pro Tip: Look at your photos! If you scrap lots of vacations, birthdays, or outdoor adventures, choose a stamp set that fits your style. And remember — bundles that include both stamps and dies help you save money while building a coordinated, flexible stash.
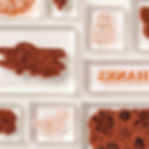
6️⃣ Alcohol Markers or Colored Pencils – Bring Your Stamped Images to Life

Coloring is where your stamped images truly come alive. With just a little shading and a soft blend of color, you can turn simple line art into gorgeous embellishments that look custom-made for your scrapbook layout. Alcohol markers make that process effortless — smooth color, beautiful gradients, and zero streaks.
🎨 Why You Need It: Alcohol markers or colored pencils add depth, richness, and dimension to your stamped images. They’re beginner-friendly, blend like butter, and instantly make your pages feel more polished and professional.
💡 My Pick: Stampin’ Blends — these dual-tip alcohol markers blend seamlessly, offer amazing color variety, and give you both soft shading and bold saturation without any streaking. Perfect for bringing stamped images to life!
7️⃣ 12x12 White Cardstock – The Base of Every Great Layout

Think of 12x12 white cardstock as the blank canvas for your creativity. It’s clean, crisp, and works with every style — from minimalist to full-blown layered masterpieces. Whether you’re stamping, inking, layering patterned paper, or building a bold background, white cardstock gives you the perfect foundation to bring your ideas to life.
📖 Why You Need It: You’ll use white cardstock for photo mats, backgrounds, journaling blocks, die cuts, and layering. It’s the one supply you’ll reach for every single time, so keeping a stack on hand is essential.
💡 Pro Tip: Stock up! White cardstock disappears faster than you think — especially when you start mixing it into multiple layouts.
8️⃣ Paper Snips and a Cut & Emboss Machine – Your Cutting Dream Team


When you’re starting out, you’ll be cutting A LOT — stamped images, titles, borders, embellishments… all the cute little details that make your scrapbook pages shine. And while you can fussy cut everything by hand, adding a Cut & Emboss Machine to your toolbox will change your crafting life. These two tools work together to give you clean shapes, crisp edges, and a whole lot of saved time (and sanity!).
✂️ Why You Need Both:
Paper Snips are perfect for stamps that don’t come with coordinating dies. They let you trim tiny details with precision, and they’re great for quick cuts and small shapes.
A Cut & Emboss Machine does the heavy lifting — especially when you have multiple stamped images or detailed dies. Instead of cutting each shape by hand, you can place your dies, roll them through, and cut everything at once. Fast, clean, and totally beginner-friendly.
💡 Pro Tip: Start with paper snips if you’re brand-new, but upgrade to a Cut & Emboss Machine as soon as you begin collecting stamps and dies. It makes cardmaking and scrapbooking SO much easier, and your projects will look polished and professional with almost zero effort.
9️⃣ Scrapbook Sketches – Your Layout Lifesaver
If designing a whole page from scratch feels overwhelming, scrapbook sketches will become your new creative BFF.

A good sketch tells you exactly where to place photos, papers, titles, & embellishments while still giving you the freedom to add your own style. They take out the guesswork so you can focus on the FUN part: choosing colors, stamping, layering, and making it uniquely yours.
📖 Why You Need It: Sketches give you instant direction and help you avoid that “blank page freeze.” They’re perfect for beginners AND for experienced crafters who want quick inspiration without starting from zero.
💡 Pro Tip: There are tons of free sketches online, & layout guides are amazing for beginners. Try flipping a sketch, rotating it, or switching the photo sizes to make it feel totally new!
🔟 Coordinating Paper Packs, Product Suites & Scrapbook Workshop Kits – Your No-Stress Way to Create Beautiful Pages
When you’re new to scrapbooking, choosing papers that actually coordinate can feel overwhelming. You grab one cute pattern… then another… then a few more… and suddenly nothing matches and you’re wondering how your cart turned into chaos. That’s why coordinated paper collections, Product Suites, and the new Scrapbook Workshop Kits are absolute game-changers for beginners and seasoned crafters alike.
🖼 Why You Need Them: Everything matches — colors, patterns, textures, themes — so creating polished layouts becomes SO much easier. No guessing. No stress. Just perfectly coordinated pages every time.
💡 Your Two Best Options:
✔ Product Suites

These are full themed collections that all work together beautifully. They typically include:
Full packs of patterned DSP
Coordinating cardstock
The matching stamp & die bundle
Embellishments
Sometimes embossing folders or accents
It’s basically the entire crafting wardrobe for one theme — perfect when you want everything to match effortlessly.
✔ Scrapbook Workshop Kits

These are AMAZING for brand-new scrapbookers or anyone who wants fast, beautiful layouts. Each kit includes everything you need to create three pre-designed, double-page scrapbook spreads, including:
Pre-cut patterned papers
Cardstock bases
Punch-out embellishments
Full instructions
You just add your adhesives, a trimmer, and your favorite photos — that’s it!
💡 Pro Tip: Whether you choose a full Suite or a Workshop Kit, coordinating collections takes away the overwhelm of matching colors and patterns. They make scrapbooking faster, easier, and WAY more fun… without the guesswork or the “why doesn’t this paper match??” meltdown we’ve all had at least once. 😂✂️
✨ You’ve Got the Bare Minimum Basics — Now Let Your Craft Stash Grow With You!

With these Top 10 Essential Tools, you have everything you need to start scrapbooking and cardmaking with confidence. These are the true must-haves — the tools every crafter relies on again and again. Once you start creating, you’ll naturally figure out which styles you love most and which supplies you want to add next. Whether that’s more ink pads, fun new coloring tools, embossing folders, or themed paper collections, your stash will grow right along with your creativity. And trust me… it grows FAST. 😉
Ready to Level Up Your Crafting? Here Are Popular Extras You May Want Later:


🎨 Blending Brushes & Sponge Daubers – For soft shading and inky edges
🖋 More Ink Pads, Markers & Colored Pencils – Build your color collection as you go
✂️ Extra Stamp & Die Bundles – Add embellishment details
🧼 Stamp Cleaners & Shammy – Keep your stamps fresh and ready
🧩 Coordinating Paper Packs – Build beautifully matched layouts
🪜 Workshop Kits & Product Suites – Perfect when you want everything to coordinate effortlessly
🖋 Take Your Pick - Multipurpose pickup and precision tool simplifies meticulous tasks.
🧩Embossing - Dry, Heat & Paste Embossing - Add texture you can see and feel
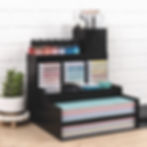
✨ORGANIZATION SECTION (the ONE item you want singled out)

As your crafting supplies start to grow, organization becomes a TOTAL game-changer. You’ll need a place for your inks, a home for your markers, trays for your paper, and somewhere to store the stamp sets you collect over time. A simple system keeps your space tidy, makes crafting so much easier, and helps you actually use what you own. Whether it’s a rolling cart, cubes, paper trays, or ink pad holders, start small and build up as your collection grows. And don’t worry — a full craft room organization guide is coming soon!
✨ And One More Thing… Choose Storage That Fits the Products You Actually Use
Organization isn’t just about having a place to put everything — it’s about choosing storage that actually fits the products you buy. Not all craft storage is universal, so pay close attention before you invest. For example, stamp pad holders are NOT one-size-fits-all, and some brands won’t fit in organizers made for others. The same goes for paper storage — look at the height, width, and depth of shelves and trays, especially if you plan to store full Workshop Kits, Product Suites, bundles, or embellishment packs together. Keeping everything that coordinates in one section is a total game-changer… but only if your storage is big enough to hold it. A little planning now saves a LOT of frustration (and money!) later.
🌟Explore More: Build Your Confidence, One Project at a Time
Now that you’ve got your essentials — and a few ideas for growing your stash — you’re officially ready to start scrapbooking! And don’t worry… it doesn’t have to feel overwhelming. Most of my scrapbook and cardmaking blogs include step-by-step instructions, exact measurements, materials lists, and helpful photos to guide you every step of the way. If you’re a beginner, these walkthroughs are the perfect place to start building confidence while creating pages you’re genuinely proud of.
Take a look around, explore the different styles, and try out the ones that match your creative vibe. You’ve already got the tools — now let’s spark some inspiration. ✨


📸Share Your Creations — And Get Inspired in the Members’ Gallery!
One of the BEST parts of being a crafter is sharing what you make — and seeing what everyone else is creating too! The Members’ Gallery is our community space where you can upload your projects, explore ideas from other crafters, and find encouragement every step of the way.
Whether you’re posting your very first layout, showing off a card you’re proud of, or trying one of the techniques you learned here, your creativity helps other scrapbookers feel brave enough to try something new, too. This is a space to learn, grow, celebrate, and be inspired — and I can’t WAIT to see what you make.
💖Final Thoughts — Start Small, Have Fun, and Let Your Creativity Lead You

Scrapbooking isn’t about having every tool, every color, or every gadget — it’s about telling your story, one beautiful page at a time. With these essentials, a few creative extras, and a space to keep everything organized, you’re more than ready to begin your crafting journey.
Take it one project at a time. Give yourself permission to learn as you go. And most of all — have FUN with it. Every layout you make is a little piece of your world captured forever… and that’s something truly magical.
Happy Scrapbooking!
💖 April – This Chick Loves Paper
Grab Your Supplies & Get Crafting!
All photos and projects are subject to copyright © ThisChickLovesPaper.com.
Images © Stampin’ Up!®
The content in this blog is the sole responsibility of April Graziano, Independent Stampin’ Up!® Demonstrator. The use of and content of classes, services, or products offered is not endorsed by Stampin’ Up!®
Beginner Scrapbooking Essentials — The 10 Tools Every New Crafter Needs. Start your creative journey with confidence and easy tips from This Chick Loves Paper.