
Smile, Little Man! – A 12x12 Fall Scrapbook Layout Full of CTMH Cozy-Up Charm
- This Chick Loves Paper

- Oct 11, 2023
- 7 min read
Updated: Dec 15, 2025

Some scrapbook pages start with a perfect photo.
Others?
They start with pure attitude.
This layout was born from one of those real life moments—the kind that makes you laugh later but had a whole lot of pout happening in real time. We wrapped up our pumpkin patch adventure, and my little man went straight into full dramatic fall meltdown mode: head down, lips out, every ounce of his soul saying, “I’m not done with pumpkins.”
But then?
His sweet little friend reached over with tiny fingers… gently lifted the corners of his mouth… and turned his frown into the MOST reluctant smirk I’ve ever seen.

Instantly, I knew that THIS was a scrapbook moment—the kind you keep forever because it captures friendship, childhood sweetness, and how a tiny gesture can flip a whole mood.
And with a story this cute? Honey, you KNOW we’re crafting a layout worthy of the moment.
So grab your Pumpkin Spice-Anything and let’s get this fall magic started! 🍁✨
🍂 Materials I Used for This 12×12 Fall Scrapbook Layout
Before we dive into the steps, here’s a little behind-the-scenes sparkle: this layout is one of the very first fall pages I EVER created—long before I knew what a blog was, what step-by-step instructions should look like, or that process photos would someday be part of my creative world.
So while today’s blogs are far more detailed and polished, this layout holds a special place in my heart. It’s simple, sweet, storytelling-rich, and built with a whole lot of “new scrapbooker energy” (and maybe a mischievous paper trimmer 😂).
And honestly?
That’s part of its charm.
With a story this sweet, I needed a layout that did it justice! So I went all in on cozy textures, warm autumn hues, and a whole lot of leaves (maybe too many—but who’s counting? 😂). Every little detail was crafted to bring that crisp fall feeling to life—because in Vegas, if we can’t have real autumn, we’ll make our own!
Here’s What I Used to Create This Layout:

Cardstock & Papers
CTMH Mocha Cardstock → 12×12 border; center hollowed out to reduce bulk
CTMH White Daisy Cardstock → 11½” × 11½” stitched background
CTMH Pumpkin Cardstock → Photo mat (4½” × 6½”) + circle layer (8¼”)
CTMH White Daisy Cardstock → Photo mat (4¼” × 6¼”) + circle layer (8”)

Scraps Used for Leaves
CTMH Cozy Up paper scraps → Primary colors & patterns for leaf cuts
CTMH Mix-In paper scraps (fall season) → Extra textures, tones & variety
Perfect way to use leftover pieces—especially if your paper trimmer and you weren’t besties yet. 😂
Inks & Embellishments
CTMH Pumpkin Ink → Circle edge blending
CTMH Cozy Up Digital Art Kit → Leaf shapes + digital elements
Brown Fineliner → Faux-stitching details
The result? A scrapbook layout that captures the moment, tells the story, and brings the fall magic—no matter what season it actually is! 🍁✨
⭐ Other Tools I Use in My Projects Now
*As an Amazon Associate, I earn from qualifying purchases.


Cricut® Essentials
• Cricut® Maker 3 — my primary cutting machine for titles, SVGs & embellishments
• Cricut® StandardGrip 12×12 Mat — 3 count used for cardstock, photo paper & labels
Printer
Canon® Printing System (Photos + Printable Cricut Elements)
• Canon TS9521C Crafting Printer — used for ALL printed project photos, journaling pieces, print-then-cut embellishments & titles
Photo Papers
• Canon Photo Paper Plus Glossy II (4×6, PP-301) → For 4x6 or smaller - printed photos
• Canon Matte Photo Paper (MP-101, 8.5×11) → Used for Cricut print-then-cut elements & titles
• Canon Double-Sided Matte Photo Paper (MP-101D, 8.5×11) → Also used exclusively for Cricut embellishments, icons, & layered pieces
Printer Ink
• EZ Ink Compatible 280XXL/281XXL Ink Pack → The exact ink set used for the TS9521C
Stamping & Precision Tools
• MISTI® Memory Size with 12-1/2" x 12-1/2" Stamping area — for borders, backgrounds & oversized stamping
• MISTI® Stamp Tool Bar Magnet - Additional magnet
Speciality Adhesives
• Tombow® Mono Aqua Liquid Glue — for corners, details & layered paper pieces
• Bearly Art Precision Craft Glue (4oz Original) — for embellishments & fine-detail gluing
• Tombow® Mono Air Touch Adhesive— my preferred tape runner for base
• Tombow® Mono Air Touch Adhesive, Refill 2-Pack — my preferred tape runner for base layers
Journaling Tools
• Avery® Easy Peel® Full-Sheet Clear Labels (8665) → Used for long typed journaling strips
• Avery® Clear Shipping Labels 2×4 (8663) → Used for short typed journaling strips or blocks
• Skaura Pigma Micron Fineliner Pens - Archival Black - Assorted Point Sizes - Used for handwritten Journaling
Turning Real-Life Attitude Into a Fall Scrapbook Layout Worth Smiling About
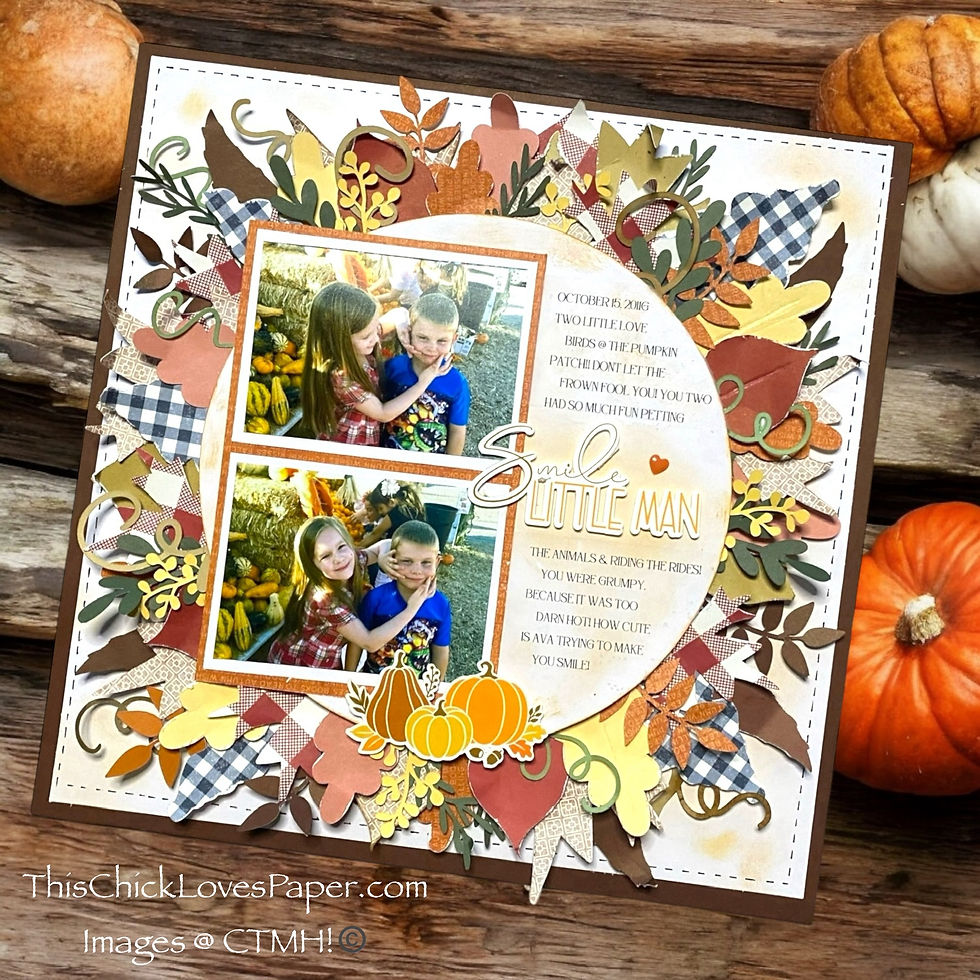
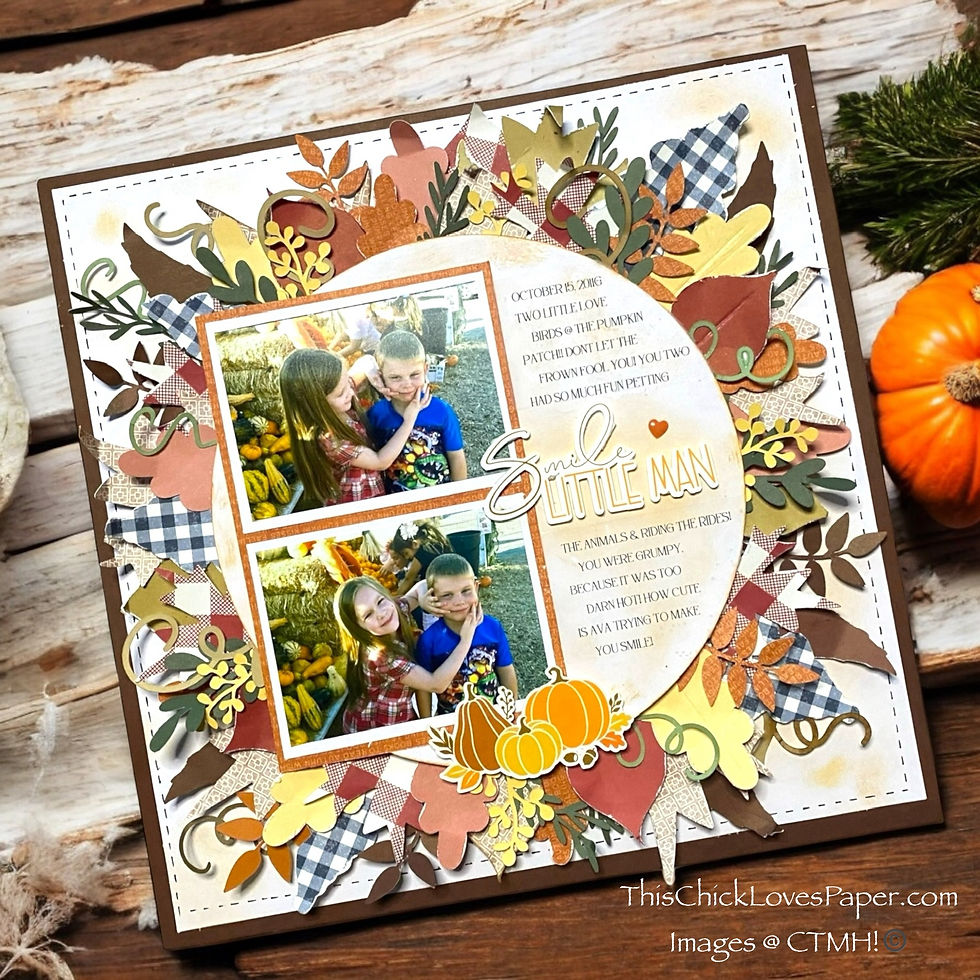
Step 1: Build the Fall Base (Where the Magic Begins!)
To ground the page in those warm fall vibes we don’t get naturally here in Vegas (lol #DesertProblems), I started with a Mocha cardstock border and hollowed out the center—because bulky pages are OUT and slim, album-friendly pages are IN. Then I layered a crisp 11½” × 11½” piece of White Daisy on top, giving the entire layout a clean, bright backdrop for all that color to shine.
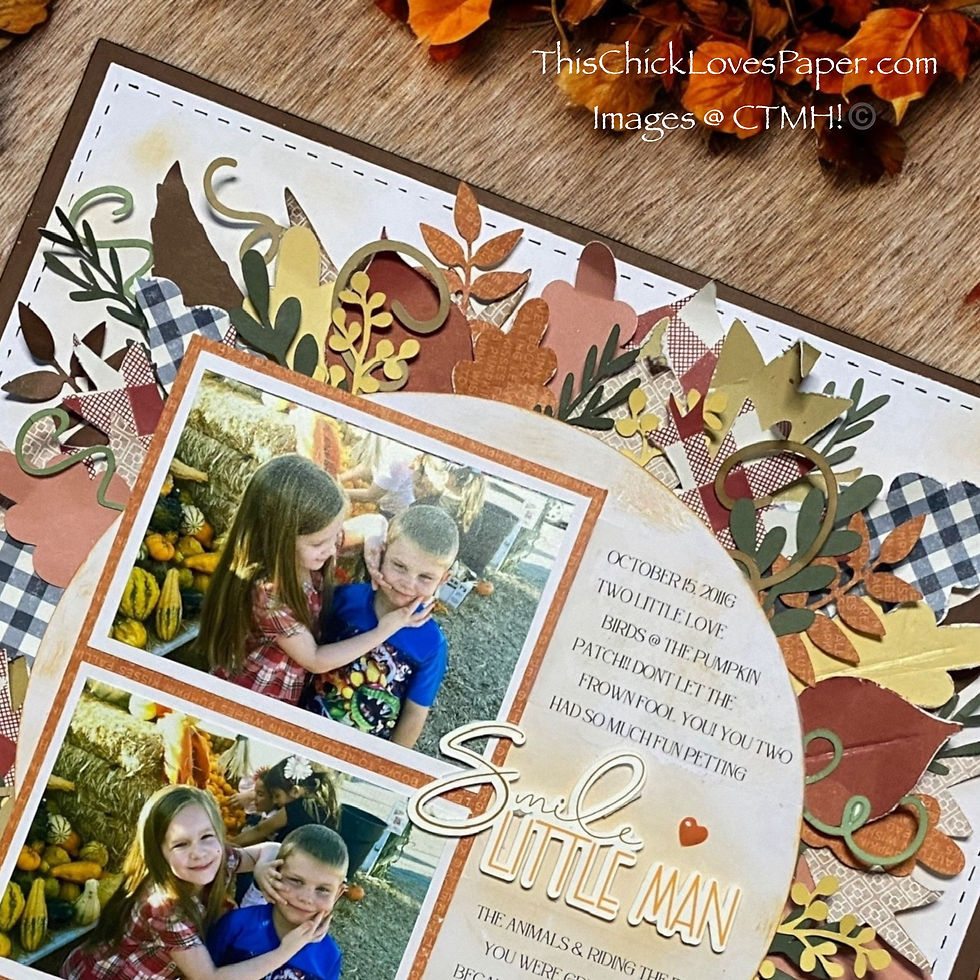
Step 2: Add Hand-Stitched Details for Cozy Texture
Bring on the homemade charm! I grabbed a brown fineliner and freehand stitched around the perimeter of the White Daisy. Is it perfect? No. Does it ooze fall coziness and handmade warmth? ABSOLUTELY. This Chick LOVES imperfections that tell a story! It’s cozy, slightly rustic detail builds instant fall texture and handmade charm.
Step 3: Build Your Focal Point With Double-Matted Circles
Cut:
Pumpkin circle: 8¼”
White Daisy circle: 8”
Ink-blend the edges of the White Daisy layer with Pumpkin ink until you get that soft, warm, apple-cider glow. This circle becomes the heart of your story—literally holding the photos, journaling & title.
Step 4: ALL. THE. LEAVES. (AKA: My Scrap-Saving Redemption Arc) 🍂

Confession time. When I created this layout? I was brand new to scrapbooking…
…and my paper trimmer was ABSOLUTELY out to get me. 😂
I had a pile of leftover scraps from the Cozy Up collection AND from the fall Mix-In papers. Instead of tossing them, I found the PERFECT solution:
💥 Leaf cuts using the CTMH Cozy Up Digital Art Kit.
This is where the magic happened:
Those scraps—every odd piece, every too-small-to-save rectangle—became a stunning, dimensional leaf wreath.
✨ Pixie Pro Tip:
Leaf clusters are one of the BEST ways to use leftover scraps. Mixed patterns = natural variation. Slightly different tones = gorgeous depth. Smaller pieces = zero waste.
Layer them. Ink them. Curl the edges. Tuck them under your circle until it looks like a crunchy pile of fall goodness ready for jumping.

Step 5: Add Your Photos, Mats & That Heart-Melting Story
To make the two photos really pop, I double-matted them with Pumpkin and White Daisy cardstock. The warmth brings out all those fall tones while keeping the attention exactly where it belongs—the frown-turned-smirk moment.
Double-mat your 4×6 photo(s) using:
White Daisy: 4¼” × 6¼”
Pumpkin: 4½” × 6½”
This layout works beautifully with either 1 photo or 2 smaller photos—both versions tell the story perfectly.
Add your journaling, your title
And just like that… BAM.
A layout built from emotion, wrapped in fall magic, and finished with a smirk you’ll treasure forever.
Scrapbooking the Real, the Raw & the Unexpected
Not every layout begins with giggles or perfection. Sometimes the BEST stories come from a tiny pout, a stubborn mood, or a sweet friend who knows exactly how to lift you up—literally.
This page captures fall magic, a childhood friendship, and the exact moment a little frown turned into scrapbook gold. 🍁✨
Warm textures, layered leaves, and cozy ink blends pull the whole story together like a handmade fall hug.
🍂 Explore More Cozy, Heartfelt 12×12 Layouts
If this fall story made you smile (or reminded you of your own kids’ dramatic moments), you’re going to LOVE my other layouts bursting with color, Cricut® magic, handmade textures, and real-life moments worth remembering.
Come explore more crafty inspiration — your next idea might just fall right into your lap.


📸 Share Your Sweet & Sassy Scrapbook Moments!

Ever scrapped a not-so-perfect moment that turned out to be scrapbook gold? Whether it’s a grumpy goodbye, an unplanned photo-bomb, or a happy accident that made your layout even better—I want to see it!
Share your layouts in the Members’ Gallery so we can cheer on the perfectly imperfect stories that make scrapbooking so meaningful.
💛 Final Thoughts: Celebrate the Messy, Moody & Magical Moments
This layout is proof that the best stories aren’t always planned. Sometimes, it’s the smirk that says “I’m trying not to smile,” the little friend who reaches over to help, or the unexpected pout that steals the spotlight.
So next time you scroll through your camera roll and see a moment that’s messy, moody, or maybe a little mundane—SCRAP IT. Those are the stories that stick.
Until next time—stay crafty, stay creative, and never stop capturing the little moments that make life beautiful.
💖 April – This Chick Loves Paper
🛒 Grab Your Supplies & Start Crafting

Please note: All photos are subject to copyright. ThisChickLovesPaper.com
Images @ Stampin’ Up!©️
Images @Close To My Heart©️
The content in this blog is the sole responsibility of April Raine - This Chick Loves Paper as a Stampin’ Up!® Independent Demonstrator. The use of and content of classes, services, or products offered is not endorsed by Stampin’ Up!®
A cozy 12×12 fall scrapbook layout (single page, 1–2 photos) featuring CTMH Cozy Up Digital Art Kit leaves, scrap-busting paper techniques, double-matted elements, and the sweetest pumpkin-patch friendship moment — designed by This Chick Loves Paper. Follow this step-by-step tutorial to recreate your own warm, textured autumn layout full of story and charm. 🍁✨
My DSP & Cardstock Storage System
*As an Amazon Associate, I earn from qualifying purchases.
• 13×13 Plymor 2mil Zipper Reclosable Bags — for 12×12 DSP, cardstock sheets & scraps
• 9×12 Plymor 2mil Zipper Reclosable Bags — for 8.5×11 cardstock & scraps
• 6x8 Plymor 4mil Heavy Duty Reclosable Bags — for storing extra die cut embellishments & finished cards, card workshop kits


Comments